溫馨提示×
您好,登錄后才能下訂單哦!
點擊 登錄注冊 即表示同意《億速云用戶服務條款》
您好,登錄后才能下訂單哦!
小編給大家分享一下Vue和Element UI如何實現下拉菜單的封裝,相信大部分人都還不怎么了解,因此分享這篇文章給大家參考一下,希望大家閱讀完這篇文章后大有收獲,下面讓我們一起去了解一下吧!
具體內容如下
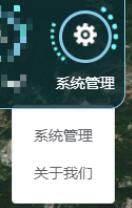
先貼個效果圖,菜單項沒有做樣式美化,圖中顯示的邊框也是沒有的(邊框是外部容器的邊框),其它的根據需要自己修改一下樣式即可。

組件的封裝用到了CSS動畫、定位、,以及Element UI提供的下拉菜單組件el-dropdown。代碼如下,
<template>
  <div class="all" @click="clickFire">
    <span class="item-border">
      <el-image
        class="item"

        fit="cover"
        :lazy="isLazy"
        :src="itemProperty.url"
        :title="itemProperty.name"
        :placeholder="itemProperty.name"
      ></el-image>
    </span>
    <div class="wrap-item"></div>
    <!-- 下拉菜單 -->
    <el-dropdown class="dropMenu" @command="handleCommand">
      <span class="el-dropdown-link" v-text="itemProperty.name"></span>
      <el-dropdown-menu slot="dropdown" class="dropMenuitems">
        <!-- <el-dropdown-item>黃金糕</el-dropdown-item>
        <el-dropdown-item>獅子頭</el-dropdown-item>
        <el-dropdown-item>螺螄粉</el-dropdown-item> -->
        <el-dropdown-item
          class="dropMenu-item"
          v-for="(item, index) in itemProperty.menus"
          :key="index"
          :command="item"
          >{{ item }}</el-dropdown-item
        >
      </el-dropdown-menu>
    </el-dropdown>
  </div>
</template>
<script>
export default {
  props: {
    itemProperty: Object,
    require: true,
  },
  data() {
    return {
      isLazy: true,
      item: {
        name: 'item',
        url: require('../../../static/imgs/menus/warning.png'),
        menus: [
          'submenu-1',
          'submenu-2',
          'submenu-3',
          'submenu-4',
          'submenu-5',
        ],
      },
    }
  },
  mounted() {
    this.$data.item = this.$props.itemProperty
    // console.log(this.$props.itemProperty)
  },
  methods: {
    //父級圖標點擊事件
    clickFire() {
      //參數1:自定義組件事件,在父組件中被調用才能觸發父子組件的值傳遞;參數2:向父組件傳遞的數據[可為數組形式]
      this.$emit('clickItem', this.$data.item)
    },
    //下拉菜單點擊事件
    handleCommand(command) {
      // console.log(command)
      this.$emit('handleCommand', command)
    },
  },
}
</script>
<style lang="less" scoped>
.all {
  // border: 1px solid skyblue;
  display: inline-block;
  position: relative;
  width: 65px;
  height: 65px;
  // overflow: hidden;
}
// 最內層
.item-border {
  display: inline-block;
  margin: 0 auto;
  margin-left: 0px;
  margin-top: 10px;
  width: 44px;
  height: 44px;
  border-radius: 50%;
  border: 3px solid skyblue;
  // background-color: slateblue;
  .item {
    position: absolute;
    top: 50%;
    left: 50%;
    transform: translate(-50%, -50%);
  }
}

// 最外層
.wrap-item {
  position: absolute;
  top: 0;
  left: 0;
  display: inline-block;
  width: 56px;
  height: 56px;
  border: 5px dotted transparent;
  border-left: 5px dotted #73ffff;
  border-left-width: 3px;
  border-right-color: #73ffff;
  border-top-color: transparent;
  border-radius: 50%;
  // background-color: burlywood;
  animation: circle 3s infinite linear;
}
@keyframes circle {
  0% {
    transform: rotate(0deg);
  }

  100% {
    transform: rotate(-360deg);
  }
}
//下拉菜單
.dropMenu {
  margin-top: 5px;
  // background-color: yellowgreen;
  color: #fff;
  //標題項
  .el-dropdown-link {
    cursor: pointer;
  }
  //菜單子項
  .el-dropdown-menu__item {
    color: red !important;
  }
  .dropMenu-item {
    background-color: rosybrown;
  }
}
</style><template>
<!-- 功能模塊:使用子組件-注意自定義事件clickItem與handleCommand -->
<div class="funcModules">
<RingItem
class="ringitem-style"
v-for="(item, index) in funcItems"
:key="index"
:itemProperty="item"
@clickItem="clickRingItem"
@handleCommand="handleCommandDropMenu"
/>
</div>
</template>
<script>
//1-導入子組件
import RingItem from '../Controls/RingItem'
export default {
components: {
//2-注冊組件
RingItem,
},
data() {
return {
//功能模塊圖標資源
funcItems: [
{
name: '系統管理',
url: require('../../../static/imgs/menus/management.png'),
menus: ['細則管理', '關于我們'],
},
],
}
},
methods: {
/**
* RingItem子組件點擊事件:value是子組件中通過emit傳遞的值
*/
clickRingItem(value) {
//判斷子組件的name屬性值,實現相應的業務邏輯
switch (value.name) {
case '系統管理': {
console.log('系統管理')
//執行頁面跳轉-管理中心(看自己的需求,添加業務邏輯)
//this.$router.push({ path: '/admincenter' })
break
}
}
},
/**
* RingItem子組件:下拉菜單點擊事件(value是子組件中通過emit傳遞的值)
*/
handleCommandDropMenu(value) {
console.log(value)
switch (value.name) {
case '細則管理': {
console.log('系統管理')
//執行頁面跳轉-管理中心(看自己的需求,添加業務邏輯)
//this.$router.push({ path: '/admincenter' })
break
}
case '關于我們': {
console.log('系統管理')
//執行頁面跳轉-管理中心(看自己的需求,添加業務邏輯)
//this.$router.push({ path: '/admincenter' })
break
}
}
},
},
}
</script>
<style lang="less" scoped>
//樣式調整
</style>以上是“Vue和Element UI如何實現下拉菜單的封裝”這篇文章的所有內容,感謝各位的閱讀!相信大家都有了一定的了解,希望分享的內容對大家有所幫助,如果還想學習更多知識,歡迎關注億速云行業資訊頻道!
免責聲明:本站發布的內容(圖片、視頻和文字)以原創、轉載和分享為主,文章觀點不代表本網站立場,如果涉及侵權請聯系站長郵箱:is@yisu.com進行舉報,并提供相關證據,一經查實,將立刻刪除涉嫌侵權內容。