您好,登錄后才能下訂單哦!
您好,登錄后才能下訂單哦!
本篇內容主要講解“Synchronized的原理是什么”,感興趣的朋友不妨來看看。本文介紹的方法操作簡單快捷,實用性強。下面就讓小編來帶大家學習“Synchronized的原理是什么”吧!
當synchronized修飾普通方法、修飾某個對象、修飾this時,是對象鎖,只有相同的對象可以訪問。
當synchronized修飾靜態方法、修飾.class時,是類鎖,同一個類的不同實例都可以訪問。
public class Test {

    Object o1=new Object();
    Object o2=new Object();

    public synchronized void test1() {
        int i = 5;
        while (i-- > 0) {
            System.out.println(Thread.currentThread().getName() + " : " + i);
            try {
                Thread.sleep(500);
            } catch (InterruptedException ie) {
            }
        }
    }
    public void test2() {
        synchronized (this){
            int i = 5;
            while (i-- > 0) {
                System.out.println(Thread.currentThread().getName() + " : " + i);
                try {
                    Thread.sleep(500);
                } catch (InterruptedException ie) {
                }
            }
        }
    }
    public static synchronized void test3() {
        int i = 5;
        while (i-- > 0) {
            System.out.println(Thread.currentThread().getName() + " : " + i);
            try {
                Thread.sleep(500);
            } catch (InterruptedException ie) {
            }
        }
    }
    public void test4() {
        synchronized (Test.class){
            int i = 5;
            while (i-- > 0) {
                System.out.println(Thread.currentThread().getName() + " : " + i);
                try {
                    Thread.sleep(500);
                } catch (InterruptedException ie) {
                }
            }
        }
    }
    public void test5() {
        synchronized (o1){
            int i = 5;
            while (i-- > 0) {
                System.out.println(Thread.currentThread().getName() + " : " + i);
                try {
                    Thread.sleep(500);
                } catch (InterruptedException ie) {
                }
            }
        }
    }
    public void test6() {
        synchronized (o2){
            int i = 5;
            while (i-- > 0) {
                System.out.println(Thread.currentThread().getName() + " : " + i);
                try {
                    Thread.sleep(500);
                } catch (InterruptedException ie) {
                }
            }
        }
    }
    public void test7() {
        synchronized (o2){
            int i = 5;
            while (i-- > 0) {
                System.out.println(Thread.currentThread().getName() + " : " + i);
                try {
                    Thread.sleep(500);
                } catch (InterruptedException ie) {
                }
            }
        }
    }
    public static void main(String[] args) {
        final Test myt1 = new Test();
		final Test myt2 = new Test();
        Thread test1 = new Thread(new Runnable() {
            @Override
            public void run() {
                myt.test1();
            }
        }, "test1");
        Thread test2 = new Thread(new Runnable() {
            @Override
            public void run() {
                myt.test2();
            }
        }, "test2");
        test1.start();
        test2.start();
    }
}
當兩個線程都使用myt1這個對象去訪問方法時:
1,2是同一把鎖(會產生鎖的競爭);3,4是同一把鎖;6,7是同一把鎖;他們相互之間是不同的鎖。
當兩個線程分別使用myt1和myt2去訪問方法時:
1,2是不同的鎖(因為myt1和myt2是不同的對象);3,4是同一把鎖(因為myt1和myt2是相同的類);6,7是不同的鎖。
對象鎖的實現使用的是monitorenter 和 monitorexit 指令,其中monitorenter指令指向同步代碼塊的開始位置,monitorexit指令則指明同步代碼塊的結束位置,當執行monitorenter指令時,當前線程將試圖獲取 objectref(即對象鎖) 所對應的 monitor 的持有權,當 objectref 的 monitor 的進入計數器為 0,那線程可以成功取得 monitor,并將計數器值設置為 1,取鎖成功。如果當前線程已經擁有 objectref 的 monitor 的持有權,那它可以重入這個 monitor (關于重入性稍后會分析),重入時計數器的值也會加 1。倘若其他線程已經擁有 objectref 的 monitor 的所有權,那當前線程將被阻塞,直到正在執行線程執行完畢,即monitorexit指令被執行,執行線程將釋放 monitor(鎖)并設置計數器值為0 ,其他線程將有機會持有 monitor 。
而monitor的本質是操作系統的互斥鎖(Mutex Lock)
java中每個對象都可以成為鎖,是因為java對象頭的設計:
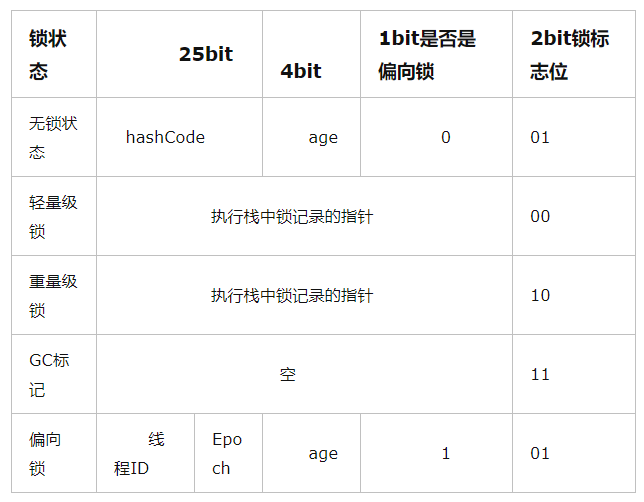
對象頭含有三部分:Mark Word(存儲對象自身運行時數據)、Class Metadata Address(存儲類元數據的指針)、Array length(數組長度,只有數組類型才有)。重點在Mark Word部分,Mark Word數據結構被設計成非固定的,會隨著對象的不同狀態而變化,如下表所示:


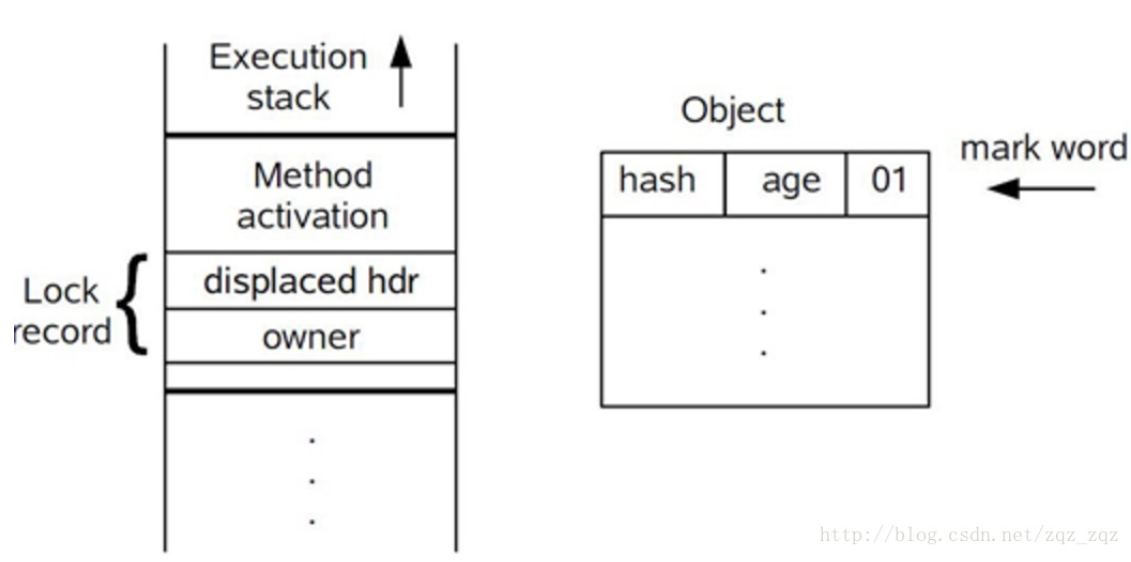
2、拷貝對象頭中的Mark Word復制到鎖記錄中;
3、拷貝成功后,虛擬機將使用CAS操作嘗試將對象的Mark Word更新為指向Lock Record的指針,并將Lock record里的owner指針指向object mark word。如果更新成功,則執行步驟4,否則執行步驟5。
4、如果這個更新動作成功了,那么這個線程就擁有了該對象的鎖,并且對象Mark Word的鎖標志位設置為“00”,即表示此對象處于輕量級鎖定狀態,這時候線程堆棧與對象頭的狀態如圖所示。
5、如果這個更新操作失敗了,虛擬機首先會檢查對象的Mark Word是否指向當前線程的棧幀,如果是就說明當前線程已經擁有了這個對象的鎖,那就可以直接進入同步塊繼續執行。否則說明多個線程競爭鎖,輕量級鎖就要膨脹為重量級鎖,鎖標志的狀態值變為“10”,Mark Word中存儲的就是指向重量級鎖(互斥量)的指針,后面等待鎖的線程也要進入阻塞狀態。 而當前線程便嘗試使用自旋來獲取鎖,自旋就是為了不讓線程阻塞,而采用循環去獲取鎖的過程。
輕量級鎖釋放:
之前在獲取鎖的時候它拷貝了鎖對象頭的markword,在釋放鎖的時候如果它發現在它持有鎖的期間有其他線程來嘗試獲取鎖了,并且該線程對markword做了修改,兩者比對發現不一致,則切換到重量鎖。
總結加鎖流程:
檢測Mark Word里面是不是當前線程的ID,如果是,表示當前線程處于偏向鎖
如果不是,則使用CAS將當前線程的ID替換Mard Word,如果成功則表示當前線程獲得偏向鎖,置偏向標志位1
如果失敗,則說明發生競爭,撤銷偏向鎖,進而升級為輕量級鎖。
當前線程使用CAS將對象頭的Mark Word替換為鎖記錄指針,如果成功,當前線程獲得鎖
如果失敗,表示其他線程競爭鎖,當前線程便嘗試使用自旋來獲取鎖。
如果自旋成功則依然處于輕量級狀態。
如果自旋失敗,則升級為重量級鎖
https://blog.csdn.net/zqz_zqz/article/details/70233767
https://blog.csdn.net/u012465296/article/details/53022317
https://www.cnblogs.com/javaminer/p/3889023.html
到此,相信大家對“Synchronized的原理是什么”有了更深的了解,不妨來實際操作一番吧!這里是億速云網站,更多相關內容可以進入相關頻道進行查詢,關注我們,繼續學習!
免責聲明:本站發布的內容(圖片、視頻和文字)以原創、轉載和分享為主,文章觀點不代表本網站立場,如果涉及侵權請聯系站長郵箱:is@yisu.com進行舉報,并提供相關證據,一經查實,將立刻刪除涉嫌侵權內容。