您好,登錄后才能下訂單哦!
您好,登錄后才能下訂單哦!
這篇文章給大家分享的是有關React虛擬列表的實現方法的內容。小編覺得挺實用的,因此分享給大家做個參考,一起跟隨小編過來看看吧。
在開發過程中,總是遇到很多列表的顯示。當上數量級別的列表渲染于瀏覽器,終會導致瀏覽器的性能下降。如果數據量過大,首先渲染極慢,其次頁面直接卡死。當然,你可以選擇其他方式避免。例如分頁,或者下載文件等等。我們這里討論如果使用虛擬列表來解決這個問題。
最簡單的描述:列表滾動時,變更可視區域內的渲染元素。

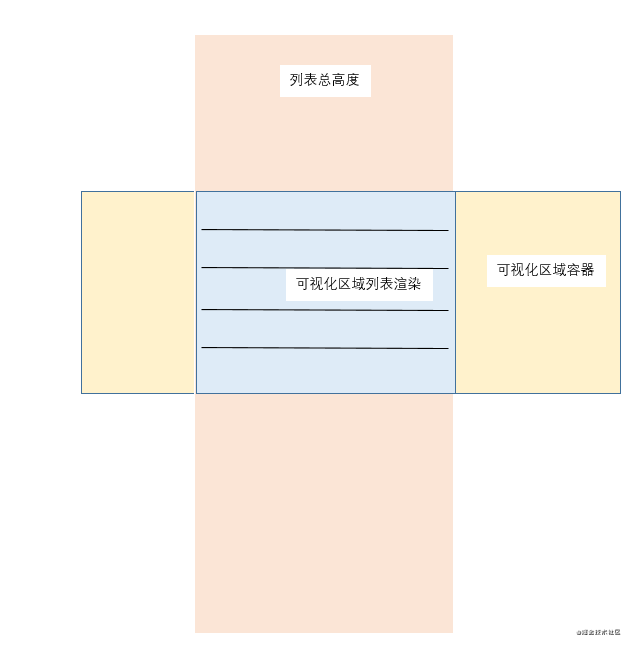
通過 [單條數據預估高度] 計算出 [列表總高度]和[可視化區域高度 ]。并在[可視化區域高度]內按需渲染列表。
下面介紹在組件中,很重要的一些參數信息,這里先進行了解,有個印象,后續在使用的時候才比較明朗。
[單條數據預估高度]: 列表中具體某一條列表的具體高度,它可以是 [固定高度],也可以是[動態高度]
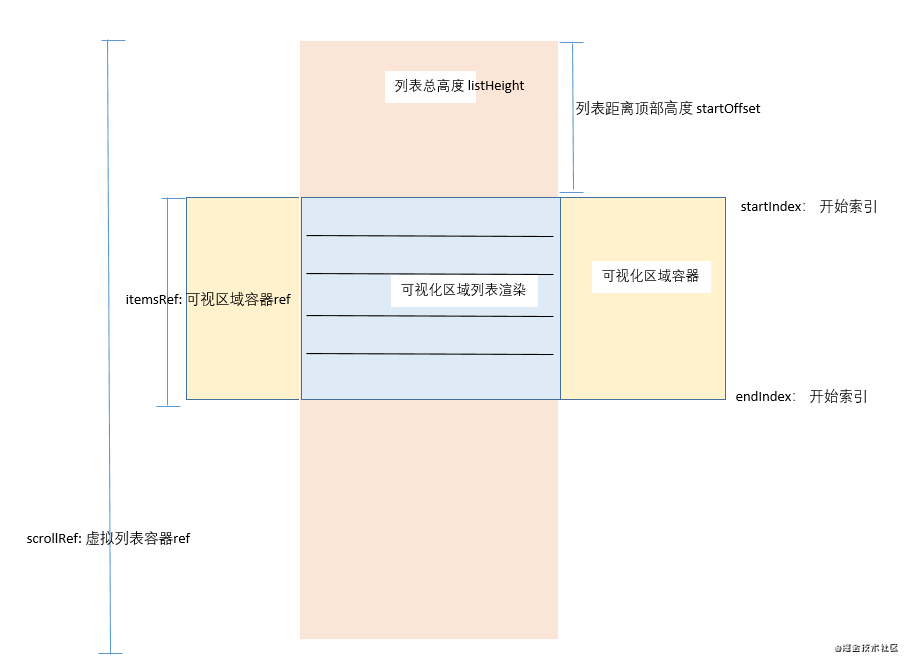
[列表總高度]: 當所有數據渲染時,列表的[總高度]
[可視化區域高度]: 掛在虛擬列表的容器。即列表可見的區域
[預估顯示條數]: 在 [可視化區域高度] 按照 [單條數據預估高度],可見的數據條數
[開始索引]: [可視化區域高度] 顯示的數據的第一條數據的索引
[結束索引]: [可視化區域高度] 顯示的數據的最后一條數據的索引
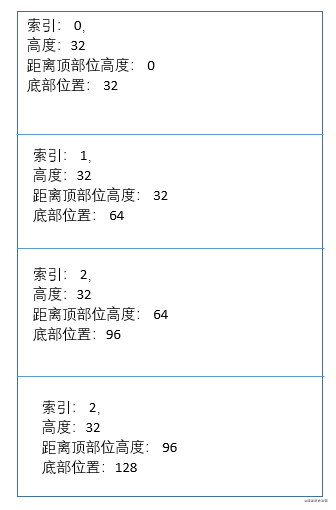
[每條Item 位置緩存]: 因為列表的高度不一定,因此會對每條數據的高度位置進行記錄,包括 index索引,top, bottom, lineHeight屬性
虛擬列表可以簡單理解為:當列表發生滾動時,變更[可視化區域高度 ]內的渲染元素,根據上面介紹的相關概念,我們依據這些屬性,按照以下步驟進行:
傳入組件數據 [數據列表(resources)] 和 [預估高度(estimatedItemSize]
根據 [數據列表(resources)]和 [預估高度(estimatedItemSize] 計算出每條數據的初始位置(當全部渲染時每條數據的占位)
計算出 [列表總高度]
[可視化區域高度] 通過css控制
根據 [可視化區域高度],計算出可視化區域預估顯示條數
初始化可視窗口的 [頭掛載元素]和[尾掛載元素],當發生滾動時,根據滾動差值和滾動方向,重新計算[頭掛載元素]和[尾掛載元素]。
依據以上的簡介步驟,下面開始來實現一個虛擬列表吧。
| 參數 | 說明 | 類型 | 默認值 |
|---|---|---|---|
| resources | 源數據數組 | Array | [] |
| estimatedItemSize | 每條數據的預估高度 | number | 32px |
| extrea | 用于自定義ItemRender,傳遞其他參數 | any | none |
| ItemRender | 每一條數據渲染的組件 | React.FC | const ItemRender = ({ data }: Data) => (<React.Fragment>{String(data) }</React.Fragment>) |
| key | 作為遍歷時,生成item 的唯一key。需要是resources的數據具體的某個唯一值的字段。用于提高性能。 | string | 默認順序 自定義 -> id -> key -> index |
4.1.1 ItemRender
import React, { useState } from 'react';
import { VirtualList } from 'biz-web-library';
// 定義每一條數據顯示的組件
const ItemRender = ({ data }) => {
  let dindex = parseInt(data);
  let lineHeight = dindex % 2 ? '40px' : '80px';
  return (
    <div style={{ lineHeight, background: dindex % 2 ? '#f5f5f5' : '#fff' }}>
      <h4>#{dindex} title name</h4>
      <p>盡情地書寫你想編寫的內容,不局限于頁面高度</p>
    </div>
  );
};
const ItemRenderMemo = React.memo(ItemRender);
4.1.2 數據列表初始化
// 初始化列表數據
const getDatas = () => {
  const datas = [];
  for (let i = 0; i < 100000; i++) {
    datas.push(`${i} Item`);
  }
  return datas;
};
4.1.3 如何使用
// 使用虛擬列表
export default () => {
  let [resources, setResources] = useState([]);
  const changeResources = () => {
    setResources(getDatas());
  };

  return (
    <div>
      <button onClick={changeResources}>click me </button>

      <div
        style={{
          height: '400px',
          overflow: 'auto',
          border: '1px solid #f5f5f5',
          padding: '0 10px',
        }}
      >
        <VirtualList
          ItemRender={ItemRenderMemo}
          resources={resources}
          estimatedItemSize={60}
        />
      </div>
    </div>
  );
};現在,如何使用已經知道,那么開始實現我們的組件吧。根據傳入的數據源resources和預估高度estimatedItemSize,計算出每一條數據的初始化位置。

// 循環緩存列表的總體初始化高度
export const initPositinoCache = (
  estimatedItemSize: number = 32,
  length: number = 0,
) => {
  let index = 0,
  positions = Array(length);
  while (index < length) {
    positions[index] = {
      index,
      height: estimatedItemSize,
      top: index * estimatedItemSize,
      bottom: (index++ + 1) * estimatedItemSize,
    };
  }
  return positions;
};
如果列表每條數據的高度一致,那么這個高度確實是不會改變的。如果每一條數據的高度不固定,那么該位置會在滾動的過程中進行更新。下面統計一些其他需要初始化的參數:
| 參數 | 說明 | 類型 | 默認值 |
|---|---|---|---|
| resources | 源數據數組 | Array | [] |
| startOffset | 可視區域距離頂部的偏移量 | number | 0 |
| listHeight | 所有數據渲染時,容器的高度 | any | none |
| visibleCount | 一頁可視化區域條數 | number | 10 |
| startIndex | 可視化區域開始索引 | number | 0 |
| endIndex | 可視化區域結束索引 | number | 10 |
| visibleData | 可視化區域顯示的數據 | Array | [] |
其實對于每一個屬性,介紹一下就清楚它的意義所在。但是 [startOffset]這個參數需要重點介紹一下。它就是在滾動過程中,模擬無限滾動的重要屬性。它的值,表示我們滾動過程中距離頂部的位置。[startOffset]通過結合[visibleData]達到了無限滾動的效果。
tips: 這里注意 [positions]的位置,相當于一個組件的外部變量。記得不要掛在到組件的static屬性上面。
// 緩存所有item的位置
let positions: Array<PositionType>;

class VirtualList extends React.PureComponent{

  constructor(props) {
    super(props);
    const { resources } = this.props;

    // 初始化緩存
    positions = initPositinoCache(props.estimatedItemSize, resources.length);
    this.state = {
      resources,
      startOffset: 0,
      listHeight: getListHeight(positions),  // positions最后一條數據的bottom屬性

      scrollRef: React.createRef(),  // 虛擬列表容器ref
      items: React.createRef(), // 虛擬列表顯示區域ref
      visibleCount: 10, // 一頁可視區域條數
      startIndex: 0, // 可視區域開始索引
      endIndex: 10, // // 可視區域結束索引
    };
  }
  // TODO: 隱藏一些其他功能。。。。。


  // 布局
  render() {
  const { ItemRender = ItemRenderComponent, extrea } = this.props;
  const { listHeight, startOffset, resources, startIndex, endIndex, items, scrollRef  } = this.state;
  let visibleData = resources.slice(startIndex, endIndex);

  return (
    <div ref={scrollRef} style={{ height: `${listHeight}px` }}>
      <ul
        ref={items}
        style={{
          transform: `translate3d(0,${startOffset}px,0)`,
        }}
      >
        {visibleData.map((data, index) => {
          return (
            <li key={data.id || data.key || index} data-index={`${startIndex + index}`}>
              <ItemRender data={data} {...extrea}/>
            </li>
          );
        })}
      </ul>
    </div>
  );
  }
}
將onScroll通過[componentDidMount]注冊到dom上。滾動事件中,使用的requestAnimationFrame,該方法是利用瀏覽器的空余時間進行執行,可以提高代碼的性能。大家想進行深入理解,可以去查閱該api的具體使用。
componentDidMount() {
  events.on(this.getEl(), 'scroll', this.onScroll, false);
  events.on(this.getEl(), 'mousewheel', NOOP, false);

  // 根據渲染,計算最新的節點
  let visibleCount = Math.ceil(this.getEl().offsetHeight / estimatedItemSize);
  if (visibleCount === this.state.visibleCount || visibleCount === 0) {
    return;
  }
  // 因為 visibleCount變更, 更新endIndex, listHeight/ 偏移量
  this.updateState({ visibleCount, startIndex: this.state.startIndex });
}

getEl = () => {
    let el = this.state.scrollRef || this.state.items;
    let parentEl: any = el.current?.parentElement;
    switch (window.getComputedStyle(parentEl)?.overflowY) {
      case 'auto':
      case 'scroll':
      case 'overlay':
      case 'visible':
        return parentEl;
    }
    return document.body;
};

onScroll = () => {
    requestAnimationFrame(() => {
      let { scrollTop } = this.getEl();
      let startIndex = binarySearch(positions, scrollTop);

      // 因為 startIndex變更, 更新endIndex, listHeight/ 偏移量
      this.updateState({ visibleCount: this.state.visibleCount, startIndex});
    });
  };
接下來我們分析一下重點步驟。當進行滾動時,我們是可以拿到當前[scrollRef]虛擬列表容器的 [scrollTop],通過該距離和[positions](記錄了每個item的所有位置屬性),可以拿到該位置的startIndex。這里為提高性能,我們通過二分法查找:
// 工具函數,放入工具文件
export const binarySearch = (list: Array<PositionType>, value: number = 0) => {
  let start: number = 0;
  let end: number = list.length - 1;
  let tempIndex = null;
  while (start <= end) {
    let midIndex = Math.floor((start + end) / 2);
    let midValue = list[midIndex].bottom;

    // 值相等,則直接返回 查找到的節點(因為是bottom, 因此startIndex應該是下一個節點)
    if (midValue === value) {
      return midIndex + 1;
    }
    // 中間值 小于 傳入值,則說明 value對應的節點 大于 start, start往后移動一位
    else if (midValue < value) {
      start = midIndex + 1;
    }
    // 中間值 大于 傳入值,則說明 value 在 中間值之前,end 節點移動到 mid - 1
    else if (midValue > value) {
      // tempIndex存放最靠近值為value的所有
      if (tempIndex === null || tempIndex > midIndex) {
        tempIndex = midIndex;
      }
      end = midIndex - 1;
    }
  }
  return tempIndex;
};
獲取到startIndex,那么我們就依據startIndex來更新組件State中所有的屬性的值。
 updateState = ({ visibleCount, startIndex }) => {
    // 根據新計算的節點,更新data數據
    this.setState({
      startOffset: startIndex >= 1 ? positions[startIndex - 1]?.bottom : 0,
      listHeight: getListHeight(positions),
      startIndex,
      visibleCount,
      endIndex: getEndIndex(this.state.resources, startIndex, visibleCount)
    });
  };

// 下面是工具函數,放在其他文件中的
export const getListHeight = (positions: Array<PositionType>) => {
    let index = positions.length - 1;
    return index < 0 ? 0 : positions[index].bottom;
  };

export const getEndIndex = (
  resources: Array<Data>,
  startIndex: number,
  visibleCount: number,
) => {
  let resourcesLength = resources.length;
  let endIndex = startIndex + visibleCount;
  return resourcesLength > 0 ? Math.min(resourcesLength, endIndex) : endIndex;
}至此,我們對于基本的dom進行滾動,數據更新等邏輯完成。但是在測試過程中,會發現,如果高度不等,還沒進行更新position等操作呢?這些放在哪里呢?
這里,我們的[componentDidUpdate]就該派上用場了。每一次dom完成渲染,那么此時就應該將顯示出來的item的 位置高度信息更新到 [position]屬性中。當前 總高度[istHeight] 和偏移量[startOffset]也得同時進行更新。
 componentDidUpdate() {
  this.updateHeight();
}


updateHeight = () => {
  let items: HTMLCollection = this.state.items.current?.children;
  if (!items.length) return;

  // 更新緩存
  updateItemSize(positions, items);

  // 更新總高度
  let listHeight = getListHeight(positions);

  // 更新總偏移量
  let startOffset = getStartOffset(this.state.startIndex, positions);

  this.setState({
    listHeight,
    startOffset,
  });
};

// 下面是工具函數,放在其他文件中的
export const updateItemSize = (
  positions: Array<PositionType>,
  items: HTMLCollection,
) => {
  Array.from(items).forEach(item => {
    let index = Number(item.getAttribute('data-index'));
    let { height } = item.getBoundingClientRect();
    let oldHeight = positions[index].height;

    //存在差值, 更新該節點以后所有的節點
    let dValue = oldHeight - height;
    if (dValue) {
      positions[index].bottom = positions[index].bottom - dValue;
      positions[index].height = height;

      for (let k = index + 1; k < positions.length; k++) {
        positions[k].top = positions[k - 1].bottom;
        positions[k].bottom = positions[k].bottom - dValue;
      }
    }
  });
};

//獲取當前的偏移量
export const getStartOffset = (
  startIndex: number,
  positions: Array<PositionType> = [],
) => {
  return startIndex >= 1 ? positions[startIndex - 1]?.bottom : 0;
};

export const getListHeight = (positions: Array<PositionType>) => {
  let index = positions.length - 1;
  return index < 0 ? 0 : positions[index].bottom;
};當前最后一步,如果我們傳入的外部數據源等進行了變更,那么我們就得同步數據。該操作當然是發放在 getDerivedStateFromProps方法完成。
 static getDerivedStateFromProps(
    nextProps: VirtualListProps,
    prevState: VirtualListState,
  ) {
    const { resources, estimatedItemSize } = nextProps;
    if (resources !== prevState.resources) {
      positions = initPositinoCache(estimatedItemSize, resources.length);

      // 更新高度
      let listHeight = getListHeight(positions);

      // 更新總偏移量
      let startOffset = getStartOffset(prevState.startIndex, positions);


      let endIndex = getEndIndex(resources, prevState.startIndex, prevState.visibleCount);

      return {
        resources,
        listHeight,
        startOffset,
        endIndex,
      };
    }
    return null;
  }
感謝各位的閱讀!關于“React虛擬列表的實現方法”這篇文章就分享到這里了,希望以上內容可以對大家有一定的幫助,讓大家可以學到更多知識,如果覺得文章不錯,可以把它分享出去讓更多的人看到吧!
免責聲明:本站發布的內容(圖片、視頻和文字)以原創、轉載和分享為主,文章觀點不代表本網站立場,如果涉及侵權請聯系站長郵箱:is@yisu.com進行舉報,并提供相關證據,一經查實,將立刻刪除涉嫌侵權內容。