您好,登錄后才能下訂單哦!
您好,登錄后才能下訂單哦!
本文小編為大家詳細介紹“如何使用JavaScript實現簡單圖像放大鏡效果”,內容詳細,步驟清晰,細節處理妥當,希望這篇“如何使用JavaScript實現簡單圖像放大鏡效果”文章能幫助大家解決疑惑,下面跟著小編的思路慢慢深入,一起來學習新知識吧。
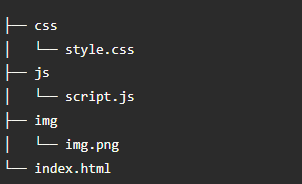
目錄結構如下:

使用以下 HTML 和 CSS 代碼,首先在網頁上為此圖像放大鏡 HTML創建了一個框。您可以在此框中看到圖像。這里框的寬度:650px,高度:400 像素已經用過。它被一個 5px 的邊框包圍。
<div class="container">

</div>
body,
html {
  height: 100%;
  width: 100%;
  display: flex;
  justify-content: center;
  align-items: center;
  overflow: hidden;
  position: relative;
  min-width: 700px;
  background: rgb(202, 201, 201);
}
.container {
  width: 650px;
  height: 400px;
  background: #fff;
  display: flex;
  align-items: center;
  justify-content: center;
  border: 5px solid rgb(244, 254, 255);
}
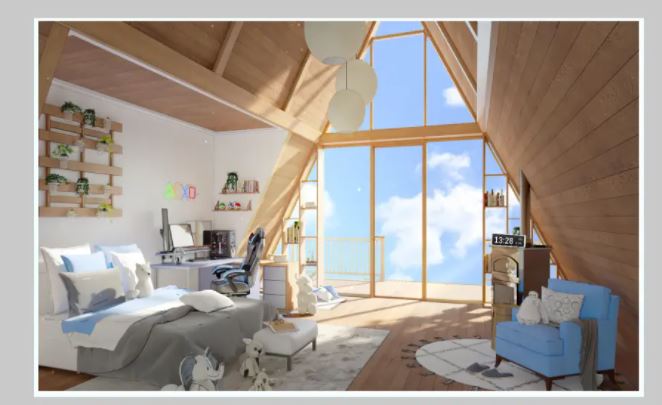
現在,一個圖像已添加到這個簡單的圖像放大鏡項目中。在這里,您可以使用您選擇的圖像。
<div id="zoom">
  <img src="https://img-blog.csdnimg.cn/c43ca410ce4a40e4836664f7dbe98ad5.png" alt="">
</div>
#zoom img{
  width: 650px;
  height: 400px;
}
現在已經創建了放大鏡玻璃,可以在其中通過縮放看到圖像。我將通過 JavaScript 添加這個元素。現在我只是在設計。
#lens {
  position: absolute;
  border: 2px solid grey;
  border-radius: 50%;
  overflow: hidden;
  cursor: none;
  box-shadow: inset 0 0 10px 2px grey;
  filter: drop-shadow(0 0 2px grey);
}

#lens > * {
  cursor: none;
}這個CSS 圖像放大鏡需要一些 JavaScript 才能工作。沒有使用 jQuery 或外部庫。因此,如果您了解基本的 JavaScript,您就可以構建它。
//lensSize => 寬度和高度
const lensSize = 200;

function magnify(id, zoom){
  const el = document.getElementById(id);
//cloneNode() 方法創建一個節點的副本,并返回克隆
  const copy = el.cloneNode(true);
//createElement() 方法創建由 tagName 指定的 HTML 元素
  const lens = document.createElement("div");

//setAttribute() 設置指定元素的屬性值
  lens.setAttribute("id","lens")
  lens.style.width = lensSize + "px";
  lens.style.height = lensSize + "px";

//appendChild() 方法用于插入一個新節點
  el.appendChild(lens);
//getBoundingClientRect() 方法返回元素的大小及其位置
  el.getBoundingClientRect();
  copy.style.zoom = zoom;
  lens.appendChild(copy);

  copy.style.width = (el.offsetWidth * zoom) + "px";
  copy.style.heigth = (el.offsetHeight * zoom) + "px";
  copy.style.position = "absolute";

//當指針在元素上移動時執行 MouseMove
  el.addEventListener("mousemove", (ev) => {
//preventDefault() 方法停止選定元素的默認操作
    ev.preventDefault();
    ev.stopPropagation();
    const pos = getCursorPos(ev);
    lens.style.left =  - (lensSize/2) + pos.x + "px";
    lens.style.top = - (lensSize/2) + pos.y + "px";
    copy.style.left = - (pos.x - el.offsetLeft) + (lensSize/zoom)*0.5 + "px";
    copy.style.top = - (pos.y - el.offsetTop) + (lensSize/zoom)*0.5  + "px";
  })
}

  function getCursorPos(e) {
    var x = (window.Event) ? e.pageX : event.clientX + (document.documentElement.scrollLeft ? document.documentElement.scrollLeft : document.body.scrollLeft);
    var y = (window.Event) ? e.pageY : event.clientY + (document.documentElement.scrollTop ? document.documentElement.scrollTop : document.body.scrollTop);
    return {x : x , y : y};
  }
//放大值
magnify("zoom", 4)
JavaScript 圖像放大鏡在很多網站中都扮演著非常重要的角色。如果你需要放大項目中的任何圖像,則可以使用這種 javascript 類型的圖像放大鏡 。
讀到這里,這篇“如何使用JavaScript實現簡單圖像放大鏡效果”文章已經介紹完畢,想要掌握這篇文章的知識點還需要大家自己動手實踐使用過才能領會,如果想了解更多相關內容的文章,歡迎關注億速云行業資訊頻道。
免責聲明:本站發布的內容(圖片、視頻和文字)以原創、轉載和分享為主,文章觀點不代表本網站立場,如果涉及侵權請聯系站長郵箱:is@yisu.com進行舉報,并提供相關證據,一經查實,將立刻刪除涉嫌侵權內容。