您好,登錄后才能下訂單哦!
您好,登錄后才能下訂單哦!
本文小編為大家詳細介紹“Java怎么實現登錄與注冊頁面”,內容詳細,步驟清晰,細節處理妥當,希望這篇“Java怎么實現登錄與注冊頁面”文章能幫助大家解決疑惑,下面跟著小編的思路慢慢深入,一起來學習新知識吧。
用java實現的登錄與注冊頁面,實現了客戶端(瀏覽器)到服務器(Tomcat)再到后端(servlet程序)數據的交互。這里在注冊頁面加入了驗證碼驗證。
注冊的html代碼
<body>
<fieldset id="">
  <legend>注冊頁面</legend>
  <form action="/day02/register2" method="post" id="form" ">
    <table>
      <tr>
        <td>用戶名:</td>
        <td><input type="text" name="userName" /><span id="span1"></span></td>
      </tr>
      <tr>
        <td>
          密碼:
        </td>
        <td>
          <input type="password" name="password" />
        </td>
      </tr>
      <tr>
        <td>
          確認密碼:
        </td>
        <td>
          <input type="password" name="repassword" />
          <span id="span2"></span>
        </td>

      </tr>
      <tr id="tr4">
        <td>
          性別:
        </td>
        <td>
          <input type="radio" name="sex" value="男" />男
          <input type="radio" name="sex" value="女" />女
          <span id="span3"></span>
        </td>
      </tr>
      <tr>
        <td>愛好:</td>
        <td>
          <input type="checkbox" name="hobby" value="唱" />唱
          <input type="checkbox" name="hobby" value="跳" />跳
          <input type="checkbox" name="hobby" value="rap" />rap
          <input type="checkbox" name="hobby" value="籃球" />籃球
          <span id="span4"></span>
        </td>
      </tr>
      <tr>
        <td>國籍:</td>
        <td>
          <select name="country" id="country">
            <option value="none">--請選擇國籍--</option>
            <option value="中國">中國</option>
            <option value="韓國">韓國</option>
            <option value="日本">日本</option>
            <option value="美國">美國</option>
          </select>
          <span id="span5"></span>
        </td>
      </tr>
      <tr>
        <td>自我評價:</td>
        <td>
          <textarea rows="10px" cols="20px" id="textarea" name="describe" ></textarea>
        </td>
      </tr>
    <tr>
        <td>
          驗證碼:
        </td>
        <td>
          <input type="text" name="check"/>
          <img src="/day02/demo" id="img" onclick="checkImg()" style = "cursor: pointer">
          <a href="javascript:void(0);" onclick="checkImg()">換一張</a>
        </td>
      </tr>
    </table>
    <input type="submit" id="btn2" value="提交" />
    <input type="button" id="btn1" value="驗證" />
  </form>

</fieldset>
</body>
<script type="text/javascript">
  function checkImg() {
    var img = document.getElementById("img");
    img.src ="/day02/demo?"+new Date().getTime()

  }
</script>
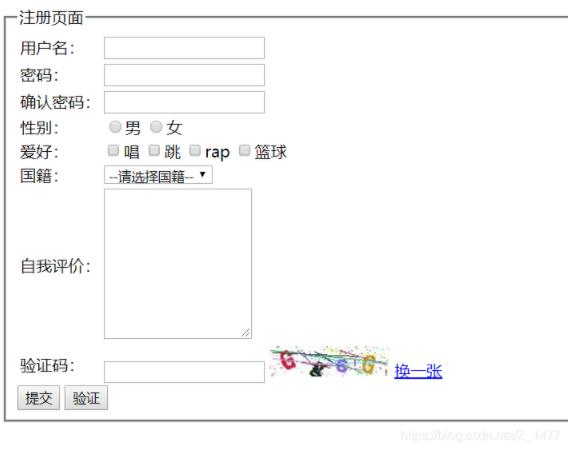
注冊頁面截圖

這里需要注意的是我用的是Tomcat服務器,因為它其中沒有mysql驅動,所以需要手動添加到Tomcat的lib目錄下。
還有在web.xml中添加了全局配置主要是為了項目中需要改編碼的方便
<context-param>
        <param-name>encode</param-name>
        <param-value>UTF-8</param-value>
    </context-param>
這里是生成驗證碼的程序,在我的上篇文章有詳細講解
@WebServlet(urlPatterns = "/demo")
public class CheckImg extends HttpServlet {
    //復寫HttpServlet中的doGet方法
    public void doGet(HttpServletRequest req, HttpServletResponse resp) throws ServletException,
            IOException{
        //準備一張畫紙,將驗證碼中的數字字母寫到這張畫紙中
        int width = 120;
        int height = 30;
        BufferedImage bufi = new BufferedImage(width, height, BufferedImage.TYPE_INT_RGB);
        //這里面的width、height、就是這張畫紙的長寬。BufferedImage.TYPE_INT_RGB就是這張畫紙基于
        //RGB三原色來進行畫
        //獲取一個畫筆對象,給圖片上畫畫
        Graphics2D g = (Graphics2D) bufi.getGraphics();
        //設置畫筆顏色
        g.setColor(Color.WHITE);
        //將這個顏色填充到整個畫紙
        g.fillRect(0,0,width,height);
        //定義圖片上可以寫什么數據
        String data = "QWERTYUIOPASDFGHJKLZXCVBNMqwertyuiopasdfghjklzxcvbnm1234567890";
        //定義書寫在畫紙上的起始位置
        int x =15;
        int y =25;
        //定義一個隨機數
        Random r = new Random();
        //創建一個字符串緩沖區
        StringBuilder sb = new StringBuilder();
        //定義一個循環給畫紙上寫四個數
        for(int i = 0; i < 4; i++){
            //從data中隨機獲取一個下標的數據
            char c = data.charAt(r.nextInt(data.length()));
            sb.append(c+"");
            //隨機生成畫筆的顏色,RGB三原色隨機在0-256中隨機生成
            g.setColor(new Color(r.nextInt(256),r.nextInt(256),r.nextInt(256)));
            //設置字體
            g.setFont(new Font("黑體",Font.BOLD,26));
            double theta =(30 - (r.nextInt(60)))*Math.PI/180;
            g.rotate(theta,x,24);
            //設置數據旋轉
            //g.rotate((20)*Math.PI/180,x,y);

            //將數據寫到畫紙上
            g.drawString(c+"",x,y);
            g.rotate(-theta,x,24);
            //設置完旋轉要調回,防止數據旋轉的看不到
            //g.rotate(-((20)*Math.PI/180),x,y);
            //每寫完一個調整下一個數據寫的位置
            x += 25;
        }
        HttpSession session = req.getSession();
        session.setAttribute("checkNum",sb.toString());
        //添加線類型的干擾信息
        for(int i = 0; i < 15 ; i++){
            //同樣設置線的顏色
            g.setColor(new Color(r.nextInt(256),r.nextInt(256),r.nextInt(256)));
            //開始劃線,這里需要的四個參數中前兩個是線開頭的左邊,后邊兩個是線結束的坐標
            g.drawLine(r.nextInt(width),r.nextInt(height),r.nextInt(width),r.nextInt(height));
        }
        //添加點類型干擾信息
        for (int i = 0 ; i < 150 ; i++){
            //設置點的顏色
            g.setColor(new Color(r.nextInt(256),r.nextInt(256),r.nextInt(256)));
            //開始畫點,實質上這是畫橢圓,將上半軸半徑,左半軸半徑設置為0就可以看成是一個點
            g.drawOval(r.nextInt(width),r.nextInt(height),0,0);
        }


        //這個時候并沒有在這張紙上書寫任何內容,但是已經可以像客戶端響應請求了
        ImageIO.write(bufi, "jpg", resp.getOutputStream());
    }
}
這是注冊頁面的代碼。
@WebServlet(urlPatterns = "/register2")
public class Register extends HttpServlet {
    //

    @Override
    protected void doGet(HttpServletRequest req, HttpServletResponse resp) throws ServletException, IOException {
        doPost(req,resp);
    }

    @Override
    protected void doPost(HttpServletRequest req, HttpServletResponse resp) throws ServletException, IOException {
        //獲取在web.xml中的配置的全局屬性
        String encode = req.getServletContext().getInitParameter("encode");
        //為了防止亂碼設置編碼
        req.setCharacterEncoding(encode);
        resp.setContentType("text/html;charset="+encode);
        //獲得請求過來的資源
        String userName = req.getParameter("userName");
        String password = req.getParameter("password");
        String repassword = req.getParameter("repassword");
        String sex = req.getParameter("sex");
        String[] hobby = req.getParameterValues("hobby");
        String country = req.getParameter("country");
        String describe = req.getParameter("describe");
        //這里將獲取到的請求數據都在控制臺上打印了一遍
        //看是否拿到了這些數據
        System.out.println(userName);
        System.out.println(password);
        System.out.println(repassword);
        System.out.println(sex);
        System.out.println(hobby[0]);
        System.out.println(country);
        System.out.println(describe);
        //這里只加了簡單的判斷,判斷帳號是否填寫,以及兩次密碼是否一致
        //判斷信息是否填寫
        if(userName==null||password==null||repassword==null||sex==null||hobby==null||country==null||describe==null){
            resp.getWriter().write("所有的數據都不能為空,請重新<a href = '/day02'>填寫</a>");
            return;
        }
        //判斷兩次密碼是否一致
        if(!password.equals(repassword)){
            resp.getWriter().write("兩次密碼輸入不一致,請重新<a href = '/day02'>填寫</a>");
            return;
        }
         //判斷驗證碼輸入是否正確
         if(!checkImg.equalsIgnoreCase(check)){
            resp.getWriter().write("驗證碼輸入錯誤");
            return;
        }
        try {
            //加載MySQL的數據庫驅動
            Class.forName("com.mysql.jdbc.Driver");
            //這里我在數據庫中添加了一個名為day02的數據庫
            String url = "jdbc:mysql:///day02";
            //默認是系統管理員的賬戶
            String user = "root";
            //這里你自己設置的數據庫密碼
            String passw = "xxxxxx";
            //獲取到數據庫的連接
            Connection connection = DriverManager.getConnection(url, user, passw);
            //獲取到執行器
            Statement stmt = connection.createStatement();
            //需要執行的sql語句
            String sql = "insert into users values (null,'"+userName+"','"+password+"','"+repassword+"','"+sex+"','"+ Arrays.toString(hobby)+"','"+country+"','"+describe+"')";
            //建議打印一下sql語句,放在數據庫中看是否能將數據添加到數據庫中
            System.out.println(sql);
            //執行sql語句
            int i = stmt.executeUpdate(sql);
            //添加成功上邊這個執行器就會返回1
            if(i==1){
                resp.getWriter().write("注冊成功,請<a href = '/day02/login.html'>登錄</a>");
            }else{
                resp.getWriter().write("注冊失敗,請返回重新<a href = '/day02/'></a>");
            }
            stmt.close();
            connection.close();
        }catch (Exception e){
            e.printStackTrace();
        }
    }
}
登錄頁面,同樣非常丑。就是簡單的三個input標簽

登錄頁面的html代碼
<body>
<form action="login">
    用戶名:<input type="text" name="user"><br/>
    密碼:<input type="password" name="password"><br/>
    <input type="submit" name="提交">
    <a href="/register2" rel="external nofollow" >注冊</a>
</form>
</body>
登錄頁面的java代碼,因為只有帳號密碼,就只和數據庫中的帳號密碼進行判斷
@WebServlet(urlPatterns = "/login")
public class login extends HttpServlet {
    @Override
    protected void doGet(HttpServletRequest req, HttpServletResponse resp) throws ServletException, IOException {
        doPost(req,resp);
    }

    @Override
    protected void doPost(HttpServletRequest req, HttpServletResponse resp) throws ServletException, IOException {
        //先獲取到全局配置中的設置的編碼
        String encode = req.getServletContext().getInitParameter("encode");
        //設置請求和響應的編碼
        req.setCharacterEncoding(encode);
        resp.setContentType("text/html;charset="+encode);
        try {
            //從登錄頁面拿到用戶輸入的用戶名
            String name = req.getParameter("user");
            //從登錄頁面拿到用戶輸入的密碼
            String pwd = req.getParameter("password");
            //還是在控制臺上輸出看是否拿到的帳號密碼
            System.out.println("用戶名:" +name);
            System.out.println("密碼:"+ pwd);
            //下邊就是加載數據庫的過程
            Class.forName("com.mysql.jdbc.Driver");
            String url = "jdbc:mysql:///day02";
            String user = "root";
            String password = "xxxxxxx";
            String sql = "select * from users where userName = '"+name+"'";
            String sql2 = "select * from users where password = '"+pwd+"'";
            Connection conn = DriverManager.getConnection(url, user, password);
            //這里我選擇是創建了兩個執行器,如果一個執行器執行兩個sql語句。就會出現異常

            Statement stmt = conn.createStatement();
            Statement stmt2 =conn.createStatement();
            ResultSet rs = stmt.executeQuery(sql);
            ResultSet rs2 = stmt2.executeQuery(sql2);
            //判斷用戶輸入的帳號是否在數據庫中
            if (rs.next()){
                System.out.print("用戶名:" + rs.getString("userName") + "\t");
            }else{
                resp.getWriter().write("對不起你帳號名有誤,請<a href='/day02'>注冊</a>");
            }
            //通過了帳號的判斷,就對密碼進行判斷,同樣是判斷密碼是否與數據庫中的密碼匹配
            if(rs2.next()){
                resp.getWriter().write("登錄成功,點擊跳轉<a href='http://www.baidu.com'>首頁</a>");
                System.out.print("密碼:" + rs.getString("password") + "\t");
            }else{
                resp.getWriter().write("對不起你密碼有誤,請<a href='/day02'>注冊</a>");
            }


        }catch (Exception e){
            e.printStackTrace();
        }
    }
}
讀到這里,這篇“Java怎么實現登錄與注冊頁面”文章已經介紹完畢,想要掌握這篇文章的知識點還需要大家自己動手實踐使用過才能領會,如果想了解更多相關內容的文章,歡迎關注億速云行業資訊頻道。
免責聲明:本站發布的內容(圖片、視頻和文字)以原創、轉載和分享為主,文章觀點不代表本網站立場,如果涉及侵權請聯系站長郵箱:is@yisu.com進行舉報,并提供相關證據,一經查實,將立刻刪除涉嫌侵權內容。