您好,登錄后才能下訂單哦!
您好,登錄后才能下訂單哦!
本篇內容介紹了“Python機器視覺怎么實現基于OpenCV的手勢檢測”的有關知識,在實際案例的操作過程中,不少人都會遇到這樣的困境,接下來就讓小編帶領大家學習一下如何處理這些情況吧!希望大家仔細閱讀,能夠學有所成!
今天學長向大家介紹一個機器視覺項目
基于機器視覺opencv的手勢檢測 手勢識別 算法
普通機器視覺手勢檢測的基本流程如下:
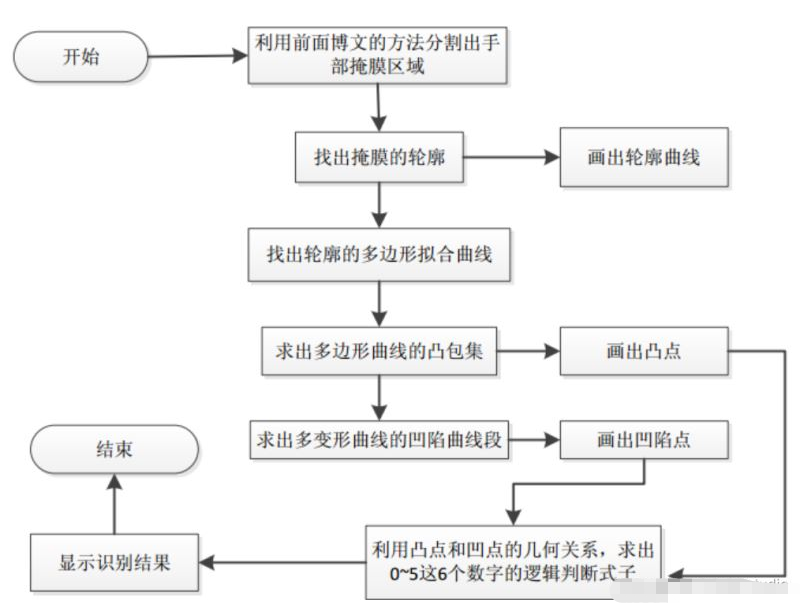
其中輪廓的提取,多邊形擬合曲線的求法,凸包集和凹陷集的求法都是采用opencv中自帶的函數。手勢數字的識別是利用凸包點以及凹陷點和手部中心點的幾何關系,簡單的做了下邏輯判別了(可以肯定的是這種方法很爛),具體的做法是先在手部定位出2個中心點坐標,這2個中心點坐標之間的距離閾值由程序設定,其中一個中心點就是利用OpenNI跟蹤得到的手部位置。有了這2個中心點的坐標,在程序中就可以分別計算出在這2個中心點坐標上的凸凹點的個數。當然了,這樣做的前提是用人在做手勢表示數字的同時應該是將手指的方向朝上(因為沒有像機器學習那樣通過樣本來訓練,所以使用時條件要苛刻很多)。利用上面求出的4種點的個數(另外程序中還設置了2個輔助計算點的個數,具體見代碼部分)和簡單的邏輯判斷就可以識別出數字0~5了。其它的數字可以依照具體的邏輯去設計(還可以設計出多位數字的識別),只是數字越多設計起來越復雜,因為要考慮到它們之間的干擾性,且這種不通用的設計方法也沒有太多的實際意義。
使用 void convexityDefects(InputArray contour, InputArray convexhull, OutputArray convexityDefects) 方法
該函數的作用是對輸入的輪廓contour,凸包集合來檢測其輪廓的凸型缺陷,一個凸型缺陷結構體包括4個元素,缺陷起點坐標,缺陷終點坐標,缺陷中離凸包線距離最遠的點的坐標,以及此時最遠的距離。參數3即其輸出的凸型缺陷結構體向量。
其凸型缺陷的示意圖如下所示:
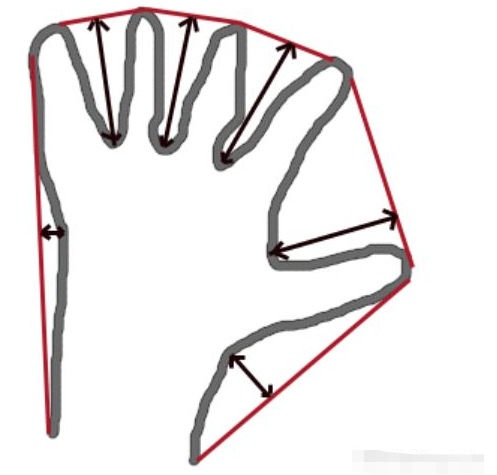
第1個參數雖然寫的是contour,字面意思是輪廓,但是本人實驗過很多次,發現如果該參數為目標通過輪廓檢測得到的原始輪廓的話,則程序運行到onvexityDefects()函數時會報內存錯誤。因此本程序中采用的不是物體原始的輪廓,而是經過多項式曲線擬合后的輪廓,即多項式曲線,這樣程序就會順利地運行得很好。另外由于在手勢識別過程中可能某一幀檢測出來的輪廓非常小(由于某種原因),以致于少到只有1個點,這時候如果程序運行到onvexityDefects()函數時就會報如下的錯誤:
int Mat::checkVector(int _elemChannels, int _depth, bool _requireContinuous) const

{

    return (depth() == _depth || _depth <= 0) &&

        (isContinuous() || !_requireContinuous) &&

        ((dims == 2 && (((rows == 1 || cols == 1) && channels() == _elemChannels) || (cols == _elemChannels))) ||

        (dims == 3 && channels() == 1 && size.p[2] == _elemChannels && (size.p[0] == 1 || size.p[1] == 1) &&

         (isContinuous() || step.p[1] == step.p[2]*size.p[2])))

    ? (int)(total()*channels()/_elemChannels) : -1;

}
該函數源碼大概意思就是說對應的Mat矩陣如果其深度,連續性,通道數,行列式滿足一定條件的話就返回Mat元素的個數和其通道數的乘積,否則返回-1;而本文是要求其返回值大于3,有得知此處輸入多邊形曲線(即參數1)的通道數為2,所以還需要求其元素的個數大于1.5,即大于2才滿足ptnum > 3。簡單的說就是用convexityDefects()函數來對多邊形曲線進行凹陷檢測時,必須要求參數1曲線本身至少有2個點(也不知道這樣分析對不對)。因此本人在本次程序convexityDefects()函數前加入了if(Mat(approx_poly_curve).checkVector(2, CV_32S) > 3)來判斷,只有滿足該if條件,才會進行后面的凹陷檢測。這樣程序就不會再出現類似的bug了。
第2個參數一般是由opencv中的函數convexHull()獲得的,一般情況下該參數里面存的是凸包集合中的點在多項式曲線點中的位置索引,且該參數以vector的形式存在,因此參數convexhull中其元素的類型為unsigned int。在本次凹陷點檢測函數convexityDefects()里面根據文檔,要求該參數為Mat型。因此在使用convexityDefects()的參數2時,一般將vector直接轉換Mat型。
參數3是一個含有4個元素的結構體的集合,如果在c++的版本中,該參數可以直接用vector來代替,Vec4i中的4個元素分別表示凹陷曲線段的起始坐標索引,終點坐標索引,離凸包集曲線最遠點的坐標索引以及此時的最遠距離值,這4個值都是整數。在c版本的opencv中一般不是保存的索引,而是坐標值。
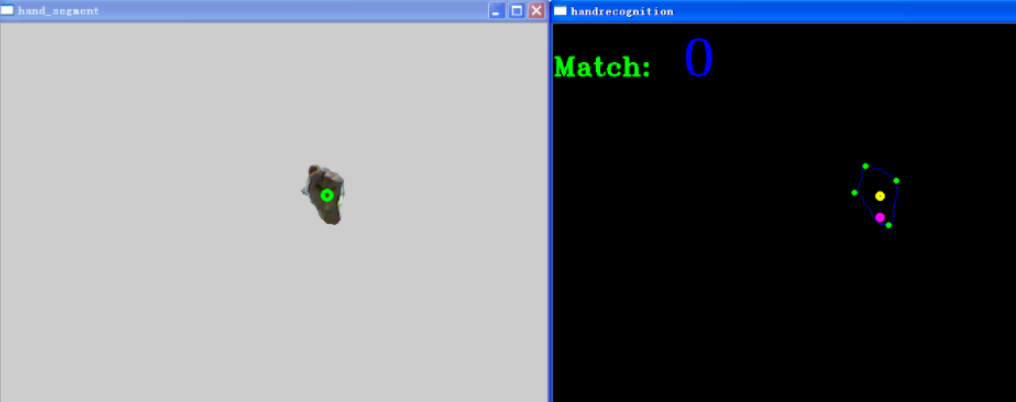
數字“0”的識別結果:
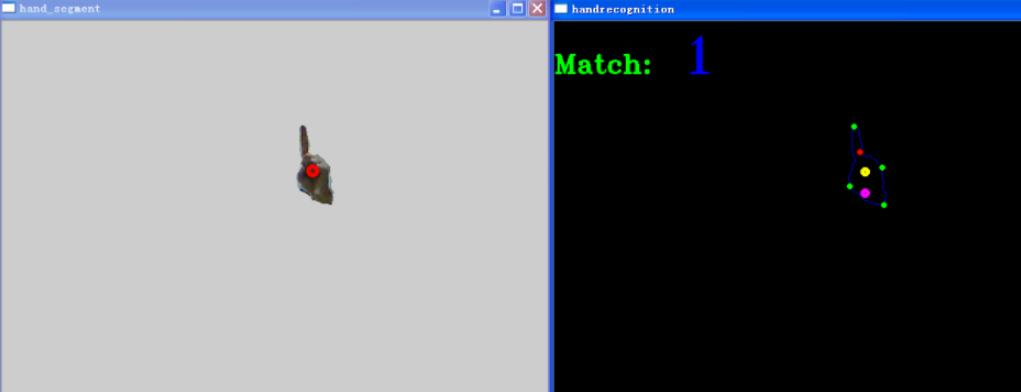
數字“1”的識別結果
數字“2”的識別結果
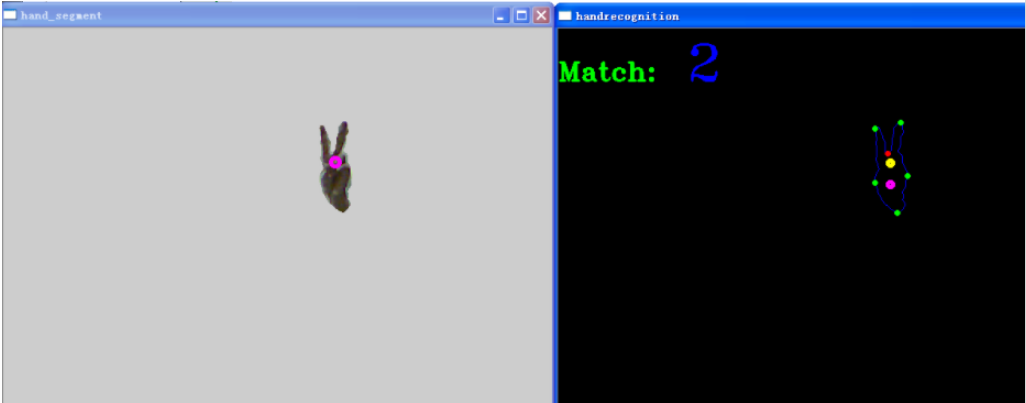
數字“3”的識別結果:

數字“4”的識別結果:
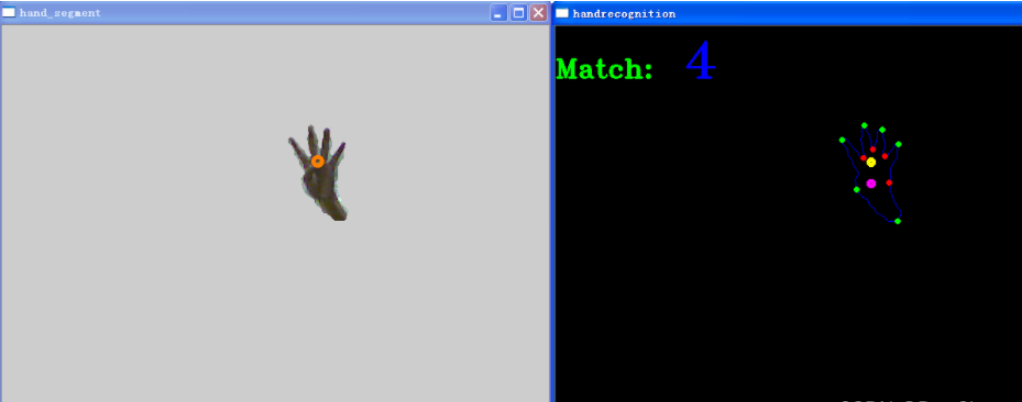
數字“5”的識別結果:
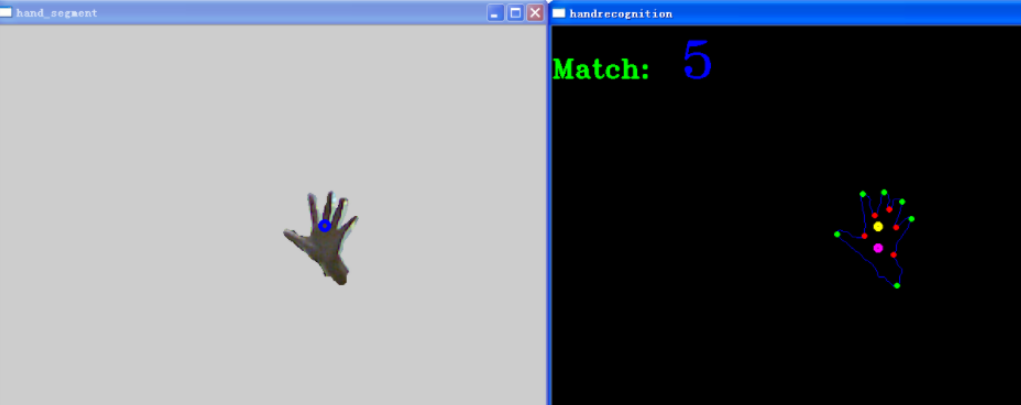
2.3.1 算法流程
學長實現過程和上面的系統流程圖類似,大概過程如下:
1. 求出手部的掩膜
2. 求出掩膜的輪廓
3. 求出輪廓的多變形擬合曲線
4. 求出多邊形擬合曲線的凸包集,找出凸點
5. 求出多變形擬合曲線的凹陷集,找出凹點
6. 利用上面的凸凹點和手部中心點的幾何關系來做簡單的數字手勢識別
(這里用的是C語言寫的,這個代碼是學長早期寫的,同學們需要的話,學長出一個python版本的)
#include <iostream>

#include "opencv2/highgui/highgui.hpp"
#include "opencv2/imgproc/imgproc.hpp"
#include <opencv2/core/core.hpp>
#include "copenni.cpp"

#include <iostream>

#define DEPTH_SCALE_FACTOR 255./4096.
#define ROI_HAND_WIDTH 140
#define ROI_HAND_HEIGHT 140
#define MEDIAN_BLUR_K 5
#define XRES  640
#define YRES  480
#define DEPTH_SEGMENT_THRESH 5
#define MAX_HANDS_COLOR 10
#define MAX_HANDS_NUMBER  10
#define HAND_LIKELY_AREA 2000
#define DELTA_POINT_DISTENCE 25     //手部中心點1和中心點2距離的閾值
#define SEGMENT_POINT1_DISTANCE 27  //凸點與手部中心點1遠近距離的閾值
#define SEGMENT_POINT2_DISTANCE 30  //凸點與手部中心點2遠近距離的閾值

using namespace cv;
using namespace xn;
using namespace std;


int main (int argc, char **argv)
{
    unsigned int convex_number_above_point1 = 0;
    unsigned int concave_number_above_point1 = 0;
    unsigned int convex_number_above_point2 = 0;
    unsigned int concave_number_above_point2 = 0;
    unsigned int convex_assist_above_point1 = 0;
    unsigned int convex_assist_above_point2 = 0;
    unsigned int point_y1 = 0;
    unsigned int point_y2 = 0;
    int number_result = -1;
    bool recognition_flag = false;  //開始手部數字識別的標志

    vector<Scalar> color_array;//采用默認的10種顏色
    {
        color_array.push_back(Scalar(255, 0, 0));
        color_array.push_back(Scalar(0, 255, 0));
        color_array.push_back(Scalar(0, 0, 255));
        color_array.push_back(Scalar(255, 0, 255));
        color_array.push_back(Scalar(255, 255, 0));
        color_array.push_back(Scalar(0, 255, 255));
        color_array.push_back(Scalar(128, 255, 0));
        color_array.push_back(Scalar(0, 128, 255));
        color_array.push_back(Scalar(255, 0, 128));
        color_array.push_back(Scalar(255, 128, 255));
    }
    vector<unsigned int> hand_depth(MAX_HANDS_NUMBER, 0);
    vector<Rect> hands_roi(MAX_HANDS_NUMBER, Rect(XRES/2, YRES/2, ROI_HAND_WIDTH, ROI_HAND_HEIGHT));

    namedWindow("color image", CV_WINDOW_AUTOSIZE);
    namedWindow("depth image", CV_WINDOW_AUTOSIZE);
    namedWindow("hand_segment", CV_WINDOW_AUTOSIZE);    //顯示分割出來的手的區域
    namedWindow("handrecognition", CV_WINDOW_AUTOSIZE); //顯示0~5數字識別的圖像

    COpenNI openni;
    if(!openni.Initial())
        return 1;

    if(!openni.Start())
        return 1;
    while(1) {
        if(!openni.UpdateData()) {
            return 1;
        }
        /*獲取并顯示色彩圖像*/
        Mat color_image_src(openni.image_metadata_.YRes(), openni.image_metadata_.XRes(),
                            CV_8UC3, (char *)openni.image_metadata_.Data());
        Mat color_image;
        cvtColor(color_image_src, color_image, CV_RGB2BGR);
        Mat hand_segment_mask(color_image.size(), CV_8UC1, Scalar::all(0));

        for(auto itUser = openni.hand_points_.cbegin(); itUser != openni.hand_points_.cend(); ++itUser) {

            point_y1 = itUser->second.Y;
            point_y2 = itUser->second.Y + DELTA_POINT_DISTENCE;
            circle(color_image, Point(itUser->second.X, itUser->second.Y),
                   5, color_array.at(itUser->first % color_array.size()), 3, 8);

            /*設置不同手部的深度*/
            hand_depth.at(itUser->first % MAX_HANDS_COLOR) = (unsigned int)(itUser->second.Z* DEPTH_SCALE_FACTOR);//itUser->first會導致程序出現bug

            /*設置不同手部的不同感興趣區域*/
            hands_roi.at(itUser->first % MAX_HANDS_NUMBER) = Rect(itUser->second.X - ROI_HAND_WIDTH/2, itUser->second.Y - ROI_HAND_HEIGHT/2,
                                               ROI_HAND_WIDTH, ROI_HAND_HEIGHT);
            hands_roi.at(itUser->first % MAX_HANDS_NUMBER).x =  itUser->second.X - ROI_HAND_WIDTH/2;
            hands_roi.at(itUser->first % MAX_HANDS_NUMBER).y =  itUser->second.Y - ROI_HAND_HEIGHT/2;
            hands_roi.at(itUser->first % MAX_HANDS_NUMBER).width = ROI_HAND_WIDTH;
            hands_roi.at(itUser->first % MAX_HANDS_NUMBER).height = ROI_HAND_HEIGHT;
            if(hands_roi.at(itUser->first % MAX_HANDS_NUMBER).x <= 0)
                hands_roi.at(itUser->first % MAX_HANDS_NUMBER).x  = 0;
            if(hands_roi.at(itUser->first % MAX_HANDS_NUMBER).x > XRES)
                hands_roi.at(itUser->first % MAX_HANDS_NUMBER).x =  XRES;
            if(hands_roi.at(itUser->first % MAX_HANDS_NUMBER).y <= 0)
                hands_roi.at(itUser->first % MAX_HANDS_NUMBER).y = 0;
            if(hands_roi.at(itUser->first % MAX_HANDS_NUMBER).y > YRES)
                hands_roi.at(itUser->first % MAX_HANDS_NUMBER).y =  YRES;
        }
        imshow("color image", color_image);

        /*獲取并顯示深度圖像*/
        Mat depth_image_src(openni.depth_metadata_.YRes(), openni.depth_metadata_.XRes(),
                            CV_16UC1, (char *)openni.depth_metadata_.Data());//因為kinect獲取到的深度圖像實際上是無符號的16位數據
        Mat depth_image;
        depth_image_src.convertTo(depth_image, CV_8U, DEPTH_SCALE_FACTOR);
        imshow("depth image", depth_image);

        //取出手的mask部分
        //不管原圖像時多少通道的,mask矩陣聲明為單通道就ok
        for(auto itUser = openni.hand_points_.cbegin(); itUser != openni.hand_points_.cend(); ++itUser) {
            for(int i = hands_roi.at(itUser->first % MAX_HANDS_NUMBER).x; i < std::min(hands_roi.at(itUser->first % MAX_HANDS_NUMBER).x+hands_roi.at(itUser->first % MAX_HANDS_NUMBER).width, XRES); i++)
                for(int j = hands_roi.at(itUser->first % MAX_HANDS_NUMBER).y; j < std::min(hands_roi.at(itUser->first % MAX_HANDS_NUMBER).y+hands_roi.at(itUser->first % MAX_HANDS_NUMBER).height, YRES); j++) {
                    hand_segment_mask.at<unsigned char>(j, i) = ((hand_depth.at(itUser->first % MAX_HANDS_NUMBER)-DEPTH_SEGMENT_THRESH) < depth_image.at<unsigned char>(j, i))
                                                                & ((hand_depth.at(itUser->first % MAX_HANDS_NUMBER)+DEPTH_SEGMENT_THRESH) > depth_image.at<unsigned char>(j,i));
                }
         }
        medianBlur(hand_segment_mask, hand_segment_mask, MEDIAN_BLUR_K);
        Mat hand_segment(color_image.size(), CV_8UC3);
        color_image.copyTo(hand_segment, hand_segment_mask);

        /*對mask圖像進行輪廓提取,并在手勢識別圖像中畫出來*/
        std::vector< std::vector<Point> > contours;
        findContours(hand_segment_mask, contours, CV_RETR_LIST, CV_CHAIN_APPROX_SIMPLE);//找出mask圖像的輪廓
        Mat hand_recognition_image = Mat::zeros(color_image.rows, color_image.cols, CV_8UC3);

        for(int i = 0; i < contours.size(); i++) {  //只有在檢測到輪廓時才會去求它的多邊形,凸包集,凹陷集
            recognition_flag = true;
            /*找出輪廓圖像多邊形擬合曲線*/
            Mat contour_mat = Mat(contours[i]);
            if(contourArea(contour_mat) > HAND_LIKELY_AREA) {   //比較有可能像手的區域
                std::vector<Point> approx_poly_curve;
                approxPolyDP(contour_mat, approx_poly_curve, 10, true);//找出輪廓的多邊形擬合曲線
                std::vector< std::vector<Point> > approx_poly_curve_debug;
                approx_poly_curve_debug.push_back(approx_poly_curve);

                 drawContours(hand_recognition_image, contours, i, Scalar(255, 0, 0), 1, 8); //畫出輪廓
    //            drawContours(hand_recognition_image, approx_poly_curve_debug, 0, Scalar(256, 128, 128), 1, 8); //畫出多邊形擬合曲線

                /*對求出的多邊形擬合曲線求出其凸包集*/
                vector<int> hull;
                convexHull(Mat(approx_poly_curve), hull, true);
                for(int i = 0; i < hull.size(); i++) {
                    circle(hand_recognition_image, approx_poly_curve[hull[i]], 2, Scalar(0, 255, 0), 2, 8);

                    /*統計在中心點1以上凸點的個數*/
                    if(approx_poly_curve[hull[i]].y <= point_y1) {
                        /*統計凸點與中心點1的y軸距離*/
                        long dis_point1 = abs(long(point_y1 - approx_poly_curve[hull[i]].y));
                        int dis1 = point_y1 - approx_poly_curve[hull[i]].y;
                        if(dis_point1 > SEGMENT_POINT1_DISTANCE && dis1 >= 0)  {
                            convex_assist_above_point1++;
                        }
                        convex_number_above_point1++;
                    }

                    /*統計在中心點2以上凸點的個數*/
                    if(approx_poly_curve[hull[i]].y <= point_y2)    {
                        /*統計凸點與中心點1的y軸距離*/
                        long dis_point2 = abs(long(point_y2 - approx_poly_curve[hull[i]].y));
                        int dis2 = point_y2 - approx_poly_curve[hull[i]].y;
                        if(dis_point2 > SEGMENT_POINT2_DISTANCE && dis2 >= 0)  {
                            convex_assist_above_point2++;
                        }
                        convex_number_above_point2++;
                    }
                }

    //            /*對求出的多邊形擬合曲線求出凹陷集*/
                std::vector<Vec4i> convexity_defects;
                if(Mat(approx_poly_curve).checkVector(2, CV_32S) > 3)
                    convexityDefects(approx_poly_curve, Mat(hull), convexity_defects);
                for(int i = 0; i < convexity_defects.size(); i++) {
                    circle(hand_recognition_image, approx_poly_curve[convexity_defects[i][2]] , 2, Scalar(0, 0, 255), 2, 8);

                    /*統計在中心點1以上凹陷點的個數*/
                    if(approx_poly_curve[convexity_defects[i][2]].y <= point_y1)
                        concave_number_above_point1++;

                    /*統計在中心點2以上凹陷點的個數*/
                    if(approx_poly_curve[convexity_defects[i][2]].y <= point_y2)
                        concave_number_above_point2++;
                }
            }
        }

        /**畫出手勢的中心點**/
        for(auto itUser = openni.hand_points_.cbegin(); itUser != openni.hand_points_.cend(); ++itUser) {
            circle(hand_recognition_image, Point(itUser->second.X, itUser->second.Y), 3, Scalar(0, 255, 255), 3, 8);
            circle(hand_recognition_image, Point(itUser->second.X, itUser->second.Y + 25), 3, Scalar(255, 0, 255), 3, 8);
        }

        /*手勢數字0~5的識別*/
        //"0"的識別
        if((convex_assist_above_point1 ==0 && convex_number_above_point2 >= 2 && convex_number_above_point2 <= 3 &&
                concave_number_above_point2 <= 1 && concave_number_above_point1 <= 1) || (concave_number_above_point1 ==0
                || concave_number_above_point2 == 0) && recognition_flag == true)
            number_result = 0;
        //"1"的識別
        if(convex_assist_above_point1 ==1 && convex_number_above_point1 >=1  && convex_number_above_point1 <=2 &&
                convex_number_above_point2 >=2 && convex_assist_above_point2 == 1)
            number_result = 1;
        //"2"的識別
        if(convex_number_above_point1 == 2 && concave_number_above_point1 == 1 && convex_assist_above_point2 == 2
                /*convex_assist_above_point1 <=1*/ && concave_number_above_point2 == 1)
            number_result = 2;
        //"3"的識別
        if(convex_number_above_point1 == 3 && concave_number_above_point1 <= 3 &&
                concave_number_above_point1 >=1 && convex_number_above_point2 >= 3 && convex_number_above_point2 <= 4 &&
                convex_assist_above_point2 == 3)
            number_result = 3;
        //"4"的識別
        if(convex_number_above_point1 == 4 && concave_number_above_point1 <=3 && concave_number_above_point1 >=2 &&
                convex_number_above_point2 == 4)
            number_result = 4;
        //"5"的識別
        if(convex_number_above_point1 >=4 && convex_number_above_point2 == 5 && concave_number_above_point2 >= 3 &&
                convex_number_above_point2 >= 4)
            number_result = 5;
        if(number_result !=0 && number_result != 1  && number_result != 2 && number_result != 3 && number_result != 4 && number_result != 5)
            number_result == -1;

        /*在手勢識別圖上顯示匹配的數字*/
        std::stringstream number_str;
        number_str << number_result;
        putText(hand_recognition_image, "Match: ", Point(0, 60), 4, 1, Scalar(0, 255, 0), 2, 0 );
        if(number_result == -1)
            putText(hand_recognition_image, " ", Point(120, 60), 4, 2, Scalar(255, 0 ,0), 2, 0);
        else
            putText(hand_recognition_image, number_str.str(), Point(150, 60), 4, 2, Scalar(255, 0 ,0), 2, 0);

        imshow("handrecognition", hand_recognition_image);
        imshow("hand_segment", hand_segment);

        /*一個循環中對有些變量進行初始化操作*/
        convex_number_above_point1 = 0;
        convex_number_above_point2 = 0;
        concave_number_above_point1 = 0;
        concave_number_above_point2 = 0;
        convex_assist_above_point1 = 0;
        convex_assist_above_point2 = 0;
        number_result = -1;
        recognition_flag = false;
        number_str.clear();

        waitKey(20);
    }

}卷積神經網絡的優勢就在于它能夠從常見的視覺任務中自動學習目 標數據的特征, 然后將這些特征用于某種特定任務的模型。 隨著時代的發展, 深度學習也形成了一些經典的卷積神經網絡。
YOLO 系列的網絡模型最早源于 2016 年, 之后幾年經過不斷改進相繼推出YOLOv2、 YOLOv3 等網絡,直到今日yoloV5也誕生了,不得不感慨一句,darknet是真的肝。
最具代表性的yolov3的結構
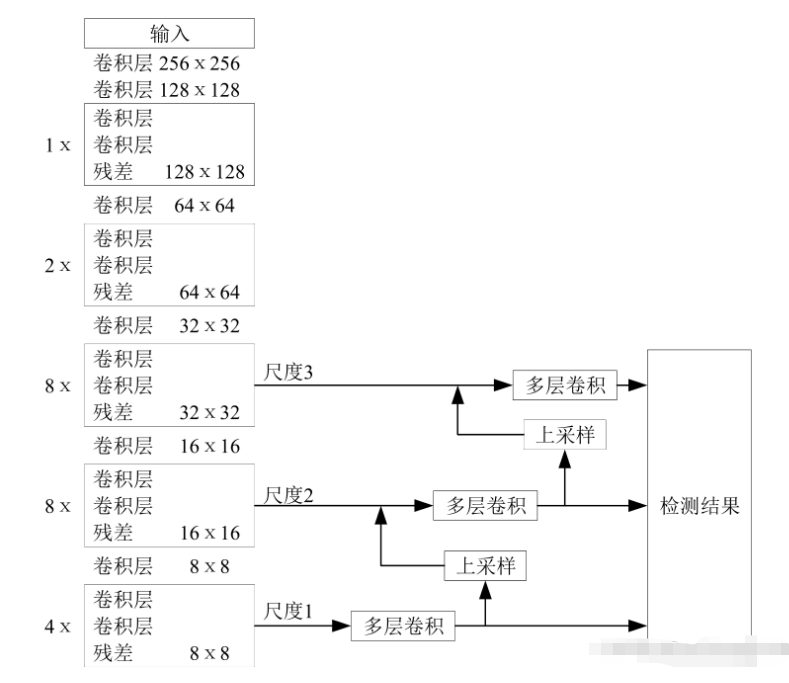
SSD 作為典型的一階段網絡模型, 具有更高的操作性, 端到端的學習模式同樣受到眾多研究者的喜愛

3.4.1 數據集
手勢識別的數據集來自于丹成學長實驗室,由于中國手勢表示3的手勢根據地區有略微差異,按照這個數據集的手勢訓練與測試即可。
圖像大小:100*100
像素顏色空間:RGB種類
圖片種類:6 種(0,1,2,3,4,5)
每種圖片數量:200 張
一共6種手勢,每種手勢200張圖片,共1200張圖片(100x100RGB)

3.4.2 圖像預處理
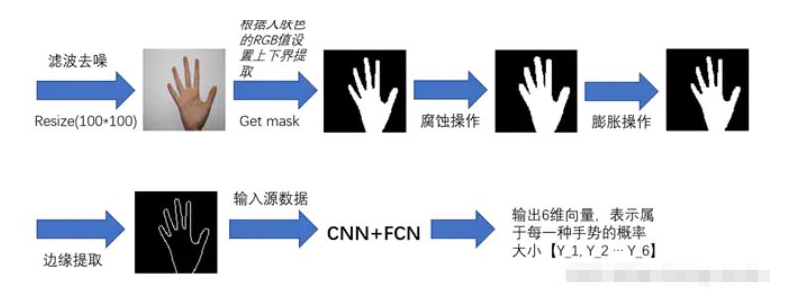
實際圖片處理展示:resize前先高斯模糊,提取邊緣后可以根據實際需要增加一次中值濾波去噪:

3.4.3 構建卷積神經網絡結構
使用tensorflow的框架,構建一個簡單的網絡結構
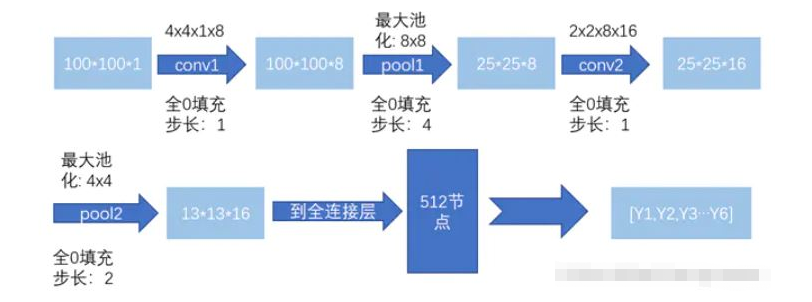
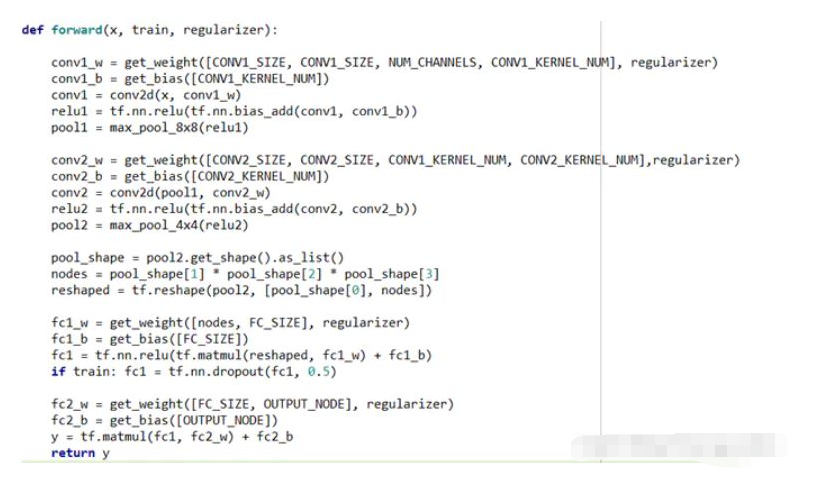
Dropout: 增加魯棒性幫助正則化和避免過擬合
一個相關的早期使用這種技術的論文((ImageNet Classification with Deep Convolutional Neural Networks, by Alex Krizhevsky, Ilya Sutskever, and Geoffrey Hinton (2012).))中啟發性的dropout解釋是:
因為一個神經元不能依賴其他特定的神經元。因此,不得不去學習隨機子集神經元間的魯棒性的有用連接。換句話說。想象我們的神經元作為要給預測的模型,dropout是一種方式可以確保我們的模型在丟失一個個體線索的情況下保持健壯的模型。在這種情況下,可以說他的作用和L1和L2范式正則化是相同的。都是來減少權重連接,然后增加網絡模型在缺失個體連接信息情況下的魯棒性。在提高神經網絡表現方面效果較好。
3.4.4 實驗訓練過程及結果
經過約4800輪的訓練后,loss基本收斂,在0.6左右,在120份的測試樣本上的模型準確率能夠達到約96%


# 作者:丹成學長 Q746876041, 需要完整代碼聯系學長獲取
import tensorflow as tf
IMAGE_SIZE = 100
NUM_CHANNELS = 1
CONV1_SIZE = 4
CONV1_KERNEL_NUM = 8
CONV2_SIZE = 2
CONV2_KERNEL_NUM = 16
FC_SIZE = 512
OUTPUT_NODE = 6

def get_weight(shape, regularizer):
	w = tf.Variable(tf.truncated_normal(shape,stddev=0.1))
	if regularizer != None: tf.add_to_collection('losses', tf.contrib.layers.l2_regularizer(regularizer)(w))
	return w

def get_bias(shape):
	b = tf.Variable(tf.zeros(shape))
	return b

def conv2d(x,w):
	return tf.nn.conv2d(x, w, strides=[1, 1, 1, 1], padding='SAME')

def max_pool_8x8(x):
	return tf.nn.max_pool(x, ksize=[1, 8, 8, 1], strides=[1, 4, 4, 1], padding='SAME')

def max_pool_4x4(x):
	return tf.nn.max_pool(x, ksize=[1, 4, 4, 1], strides=[1, 2, 2, 1], padding='SAME')

def forward(x, train, regularizer):

    conv1_w = get_weight([CONV1_SIZE, CONV1_SIZE, NUM_CHANNELS, CONV1_KERNEL_NUM], regularizer)
    conv1_b = get_bias([CONV1_KERNEL_NUM])
    conv1 = conv2d(x, conv1_w)
    relu1 = tf.nn.relu(tf.nn.bias_add(conv1, conv1_b))
    pool1 = max_pool_8x8(relu1)

    conv2_w = get_weight([CONV2_SIZE, CONV2_SIZE, CONV1_KERNEL_NUM, CONV2_KERNEL_NUM],regularizer)
    conv2_b = get_bias([CONV2_KERNEL_NUM])
    conv2 = conv2d(pool1, conv2_w)
    relu2 = tf.nn.relu(tf.nn.bias_add(conv2, conv2_b))
    pool2 = max_pool_4x4(relu2)

    pool_shape = pool2.get_shape().as_list()
    nodes = pool_shape[1] * pool_shape[2] * pool_shape[3]
    reshaped = tf.reshape(pool2, [pool_shape[0], nodes])

    fc1_w = get_weight([nodes, FC_SIZE], regularizer)
    fc1_b = get_bias([FC_SIZE])
    fc1 = tf.nn.relu(tf.matmul(reshaped, fc1_w) + fc1_b)
    if train: fc1 = tf.nn.dropout(fc1, 0.5)

    fc2_w = get_weight([FC_SIZE, OUTPUT_NODE], regularizer)
    fc2_b = get_bias([OUTPUT_NODE])
    y = tf.matmul(fc1, fc2_w) + fc2_b
    return y
# 作者:丹成學長 Q746876041, 需要完整代碼聯系學長獲取
import tensorflow as tf
import numpy as np
import gesture_forward
import gesture_backward
from image_processing import func5,func6
import cv2
def restore_model(testPicArr):
with tf.Graph().as_default() as tg:
x = tf.placeholder(tf.float32,[
1,
gesture_forward.IMAGE_SIZE,
gesture_forward.IMAGE_SIZE,
gesture_forward.NUM_CHANNELS])
#y_ = tf.placeholder(tf.float32, [None, mnist_lenet5_forward.OUTPUT_NODE])
y = gesture_forward.forward(x,False,None)
preValue = tf.argmax(y, 1)
variable_averages = tf.train.ExponentialMovingAverage(gesture_backward.MOVING_AVERAGE_DECAY)
variables_to_restore = variable_averages.variables_to_restore()
saver = tf.train.Saver(variables_to_restore)
with tf.Session() as sess:
ckpt = tf.train.get_checkpoint_state(gesture_backward.MODEL_SAVE_PATH)
if ckpt and ckpt.model_checkpoint_path:
saver.restore(sess, ckpt.model_checkpoint_path)
#global_step = ckpt.model_checkpoint_path.split('/')[-1].split('-')[-1]
preValue = sess.run(preValue, feed_dict={x:testPicArr})
return preValue
else:
print("No checkpoint file found")
return -1
def application01():
testNum = input("input the number of test pictures:")
testNum = int(testNum)
for i in range(testNum):
testPic = input("the path of test picture:")
img = func5(testPic)
cv2.imwrite(str(i)+'ttt.jpg',img)
# cv2.waitKey(0)
# cv2.destroyAllWindows()
img = img.reshape([1,100,100,1])
img = img.astype(np.float32)
img = np.multiply(img, 1.0/255.0)
# print(img.shape)
# print(type(img))
preValue = restore_model(img)
print ("The prediction number is:", preValue)
def application02():
#vc = cv2.VideoCapture('testVideo.mp4')
vc = cv2.VideoCapture(0)
# 設置每秒傳輸幀數
fps = vc.get(cv2.CAP_PROP_FPS)
# 獲取視頻的大小
size = (int(vc.get(cv2.CAP_PROP_FRAME_WIDTH)),int(vc.get(cv2.CAP_PROP_FRAME_HEIGHT)))
# 生成一個空的視頻文件
# 視頻編碼類型
# cv2.VideoWriter_fourcc('X','V','I','D') MPEG-4 編碼類型
# cv2.VideoWriter_fourcc('I','4','2','0') YUY編碼類型
# cv2.VideoWriter_fourcc('P','I','M','I') MPEG-1 編碼類型
# cv2.VideoWriter_fourcc('T','H','E','O') Ogg Vorbis類型,文件名為.ogv
# cv2.VideoWriter_fourcc('F','L','V','1') Flask視頻,文件名為.flv
#vw = cv2.VideoWriter('ges_pro.avi',cv2.VideoWriter_fourcc('X','V','I','D'), fps, size)
# 讀取視頻第一幀的內容
success, frame = vc.read()
# rows = frame.shape[0]
# cols = frame.shape[1]
# t1 = int((cols-rows)/2)
# t2 = int(cols-t1)
# M = cv2.getRotationMatrix2D((cols/2,rows/2),90,1)
# frame = cv2.warpAffine(frame,M,(cols,rows))
# frame = frame[0:rows, t1:t2]
# cv2.imshow('sd',frame)
# cv2.waitKey(0)
# cv2.destroyAllWindows()
while success:
#90度旋轉
# img = cv2.warpAffine(frame,M,(cols,rows))
# img = img[0:rows, t1:t2]
img = func6(frame)
img = img.reshape([1,100,100,1])
img = img.astype(np.float32)
img = np.multiply(img, 1.0/255.0)
preValue = restore_model(img)
# 寫入視頻
cv2.putText(frame,"Gesture:"+str(preValue),(50,50),cv2.FONT_HERSHEY_PLAIN,2.0,(0,0,255),1)
#vw.write(frame)
cv2.imshow('gesture',frame)
if cv2.waitKey(1) & 0xFF == ord('q'):
break
# 讀取視頻下一幀的內容
success, frame = vc.read()
vc.release()
cv2.destroyAllWindows()
print('viedo app over!')
def main():
#application01()
application02()
if __name__ == '__main__':
main() 我們還可以通過手勢檢測和識別,實現軟件交互,學長錄了一個視頻,效果如下:
“Python機器視覺怎么實現基于OpenCV的手勢檢測”的內容就介紹到這里了,感謝大家的閱讀。如果想了解更多行業相關的知識可以關注億速云網站,小編將為大家輸出更多高質量的實用文章!
免責聲明:本站發布的內容(圖片、視頻和文字)以原創、轉載和分享為主,文章觀點不代表本網站立場,如果涉及侵權請聯系站長郵箱:is@yisu.com進行舉報,并提供相關證據,一經查實,將立刻刪除涉嫌侵權內容。