您好,登錄后才能下訂單哦!
您好,登錄后才能下訂單哦!
Anemometer中怎么可視化Mysql慢查詢日志,針對這個問題,這篇文章詳細介紹了相對應的分析和解答,希望可以幫助更多想解決這個問題的小伙伴找到更簡單易行的方法。
工作原理:
Anemometer: 實現慢查詢sql可視化
pt-query-digest :抽取慢查詢日志
/etc/my.cnf 開啟慢查詢
【
#slow_query
log_queries_not_using_indexes=1
long_query_time=1
slow_query_log=1
】
部署架構(單機部署):
httpd 服務【相當于是tomcat 的用途,去為Anemometer提供服務】
pt-query-digest 慢查詢日志抓取導入【從慢查詢日志里面提取慢sql 寫入到Anemometer 自身的數據庫中,后面會將它寫入定時任務中】
Anemometer 可視化展示【安裝目錄:/var/www/htm】
搭建Anemometer框架
前置工作:
1.關閉selinux
setenforce 0
sed -i 's/enforcing/disabled/g' /etc/sysconfig/selinux
2.打開防火墻的443,13306,80端口
iptables -I INPUT -p tcp --dport 443 -j ACCEPT
iptables -I INPUT -p tcp --dport 80 -j ACCEPT
iptables -I INPUT -p tcp --dport 13306 -j ACCEPT
service iptables save
3.確保時間準確(非必須)
yum install -y ntp ntpdate
cp /usr/share/zoneinfo/Asia/Shanghai /etc/localtime #修改時區為東8區
cp: overwrite `/etc/localtime'? y
service ntpdate start
[root@Master01 ~]# date -R
Tue, 30 Jan 2018 14:45:34 +0800#+0800是東8區
chkconfig ntpdate on
部署工作
1.安裝核心組件pt_query_digest(2.2.14版本)
yum install perl-DBI perl-DBD perl-DBD-MySQL perl-Time-HiRes perl-IO-Socket-SSL perl-TermReadKey -y
wget --no-check-certificate https://www.percona.com/downloads/percona-toolkit/2.2.14/RPM/percona-toolkit-2.2.14-1.noarch.rpm
yum install -y percona-toolkit-2.2.14-1.noarch.rpm
2.安裝php
注意php必須是5.33以上的版本,否則報錯;
安裝環境的OS是CentOS6.8,所以直接yum安裝的php就是5.33版本
yum install -y php php-mysql php-gd libjpeg* php-imap php-ldap php-odbc php-pear php-xml php-xmlrpc php-mbstring php-mcrypt php-bcmath php-mhash libmcrypt libmcrypt-devel php-fpm php-dba
3.安裝httpd
yum install -y httpd
4.修改配置,啟動php(不修改時區的話,啟動httpd時會報500的錯)
vim /etc/php.ini
date.timezone = Asia/Shanghai
service php-fpm start
5.初步配置anemometer:
cp -r anemometer /var/www/html/ #anemometer項目程序自行下載
vim /etc/httpd/conf/httpd.conf
添加ServerName 192.168.214.140:80(anemometer的IP,如果不采用80端口,需要在這里配上其他端口號)
6.執行建庫腳本:
cd /var/www/html/anemometer
mysql -uroot -p密碼 < install.sql #當前主機安裝了Anemometer需要使用的mysql 數據庫
備注:為了簡單直接使用了root 賬號進行授權
7.進一步配置anemometer:
cd /var/www/html/anemometer/conf/
修改第一處:
cp sample.config.inc.php config.inc.php
vim /var/www/html/anemometer/conf/config.inc.php
【$conf['datasources']['mysql56'],$conf['datasources']['localhost_history'],$conf['plugins'] 三處的內容】
$conn['user'] = 'anemometer';
$conn['password'] = '密碼';
修改第二處:
vim /var/www/html/anemometer/conf/datasource_localhost.inc.php
$conf['datasources']['localhost'] = array(
'host' => '192.168.214.140', #根據實際情況進行修改
'port' => 3306,
'db' => 'slow_query_log',
'user' => 'backend',
'password' => 'backend',
'tables' => array(
'global_query_review' => 'fact',
'global_query_review_history' => 'dimension'
),
'source_type' => 'slow_query_log'
);
8.啟動apache:
service httpd start
打開剛才發布的網頁http://192.168.214.140/anemometer
9.添加定時任務:
定時任務腳本如下:
[root@localhost test]# more fetch-slowlog.sh
#!/bin/sh
# turn on debug
set -x
current_host=`/usr/sbin/ip add show eth0 | grep inet | grep -v "inet6" | awk '{print $2}' | cut -d / -f 1`
mysql_cmd=" mysql -uroot -proot -NB "
project=azure-qa-qyd # 項目名稱
hostip=${current_host} #target db IP
#db_name=$3 #數據庫名稱, this can be ignored
#慢查詢文件的絕對路徑
slowfile=`$mysql_cmd -e "show variables like 'slow_query_log_file'" 2>/dev/null | cut -f2`
# the db host where review and history of slow log store
db_host=192.168.214.140
db_port=3306
pt-query-digest --user=root --password=root \
--review h=${db_host},P=${db_port},D=slow_query_log,t=global_query_review \
--history h=${db_host},P=${db_port},D=slow_query_log,t=global_query_review_history \
--charset=utf8 \
--no-report --limit=0\% \
--filter="\$event->{Bytes} = length(\$event->{arg}) and \$event->{hostname}=\"${project}\" and \$event->{hostip}=\"${hostip}\" " \
"${slowfile}"
#clear slow log
echo > $slowfile
$mysql_cmd -e "flush slow logs"
echo "slow log processed!"
[root@localhost test]# crontab -l
*/5 * * * * /opt/test/fetch-slowlog.sh > /tmp/fetch-slowlog.log 2>&1 #每五分鐘運行一次
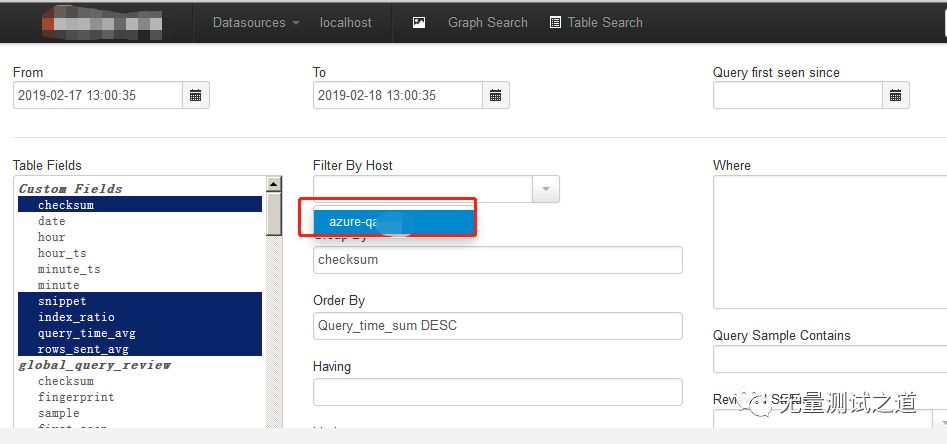
10. 登錄后即可看到慢查詢對應的數據庫的慢sql

關于Anemometer中怎么可視化Mysql慢查詢日志問題的解答就分享到這里了,希望以上內容可以對大家有一定的幫助,如果你還有很多疑惑沒有解開,可以關注億速云行業資訊頻道了解更多相關知識。
免責聲明:本站發布的內容(圖片、視頻和文字)以原創、轉載和分享為主,文章觀點不代表本網站立場,如果涉及侵權請聯系站長郵箱:is@yisu.com進行舉報,并提供相關證據,一經查實,將立刻刪除涉嫌侵權內容。