溫馨提示×
您好,登錄后才能下訂單哦!
點擊 登錄注冊 即表示同意《億速云用戶服務條款》
您好,登錄后才能下訂單哦!
編譯安裝php5.4

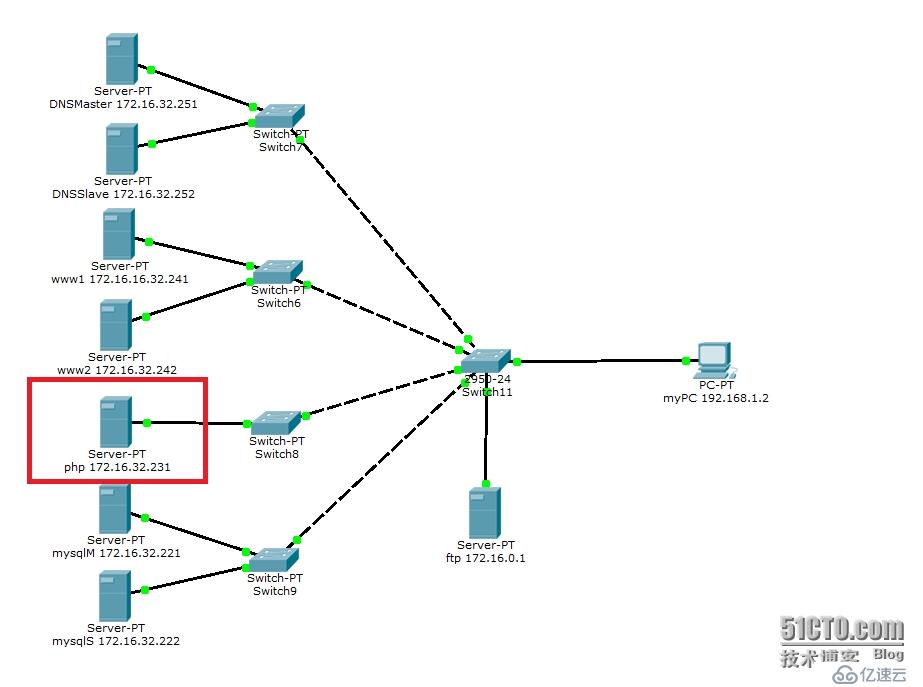
目標:編譯完成php5.4,并安裝xcache。配合http2.4實現一個虛擬主機
操作系統CentOS6.6 x32_64
安裝中使用的文件

/etc/sysconfig/network-scripts/ifcfg-eth0 配置


 開始編譯安裝

安裝完畢啟動服務

按慣例上腳本php.sh
#!/bin/bash
php=php-5.4.31
xcache=xcache-3.1.0
# 本機IP
ip=172.16.32.231
# php安裝路徑
path=/usr/local/php5
# php頁面文件的存放位置
webdire=/web
[ -d $webdire ] || mkdir -p $webdire
yum groupinstall -y "Development tools" "Server Platform Development"
yum install -y bzip2-devel libmcrypt-devel libxml2-devel
tar xf $php.tar.gz
tar xf $xcache.tar.bz2
[ -d /etc/php.d ] || mkdir -p /etc/php.d
cd $php
./configure --prefix=$path --with-mysql=mysqlnd --with-pdo-mysql=mysqlnd --with-mysqli=mysqlnd --with-openssl --enable-mbstring --with-freetype-dir --with-jpeg-dir--with-png-dir --with-zlib --with-libxml-dir=/usr --enable-xml--enable-sockets --enable-fpm --with-mcrypt--with-config-file-path=/etc/php --with-config-file-scan-dir=/etc/php/php.d --with-bz
make && make install
# 配置文件
cp php.ini-production /etc/php.ini
# 開機啟動文件
cp sapi/fpm/init.d.php-fpm /etc/rc.d/init.d/php-fpm
chmod +x /etc/rc.d/init.d/php-fpm
chkconfig --add php-fpm
chkconfig php-fpm on

cp $path/etc/php-fpm.conf.default $path/etc/php-fpm.conf
sed -i "s/listen.*9000/listen = $ip:9000/" $path/etc/php-fpm.conf
# xcache install
cd $xcache
/usr/local/php5/bin/phpize
./configure --enable-xcache --with-php-config=$path/bin/php-config
make && make install > tmp.txt
xca=`grep -o '/.*$' tmp.txt`
sed -i "s@\(xcache.so\)@$xca/\1@" xcache.ini
cp xcache.ini /etc/php.d/
cd -
service php-fpm star
在/web目錄下創建一個php文件 index.php

配置www1主機
web.sh
#!/bin/bash
# 開啟ssl
rpm -ql mod_ssl &>>/dev/null || yum install -y mod_ssl
confile=/etc/httpd24/httpd.conf
[ -f $confile.bak ] && cp $confile.bak $confile
# 加載模塊
sed -i 's@#*\(LoadModule ssl_module modules/mod_ssl.so\)@\1@' $confile
sed -i "s@#*ServerName www.example.com:80@ServerName `echo $HOSTNAME`@" $confile
# php
sed -i 's/DirectoryIndex index.html/DirectoryIndex index.php index.html/' $confile
sed -i "s@#\(LoadModule proxy_module modules/mod_proxy.so\)@\1@" $confile
sed -i "s@#\(LoadModule proxy_fcgi_module modules/mod_proxy_fcgi.so\)@\1@" $confile
grep 'x-httpd-php' $confile || sed -i "s@\(AddType application/x-gzip .gz .tgz\)@\1\n    AddType application/x-httpd-php  .php\n    AddType application/x-httpd-php-source  .phps@" $confile

# 虛擬主機目錄
docroot=/web/vhosts
# 日志目錄
logpath=/var/log/httpd
# php服務器的ip地址
phpip=172.16.32.231
# 虛擬主機名
web1=vul.test.com

cat >> $confile <<EOF
<VirtualHost *:80>
	DocumentRoot $docroot/www1
	ServerName $web1
	ErrorLog $logpath/www1.err
	CustomLog $logpath/www1.access combined
	<Directory $docroot/www1 >
		Options None
		Require ip 172.16
	</Directory>
	ProxyRequests Off
  	ProxyPassMatch ^/(.*\.php)$ fcgi://$phpip:9000/web/$1
</VirtualHost>
EOF

[ -d $docroot/www1 ] || mkdir -p $docroot/www1
[ -d $logpath ] || mkdir -p $logpath
cat > $docroot/www1/index.html <<EOF
this is $web1
EOF

# 如果開啟selinux的話運行下面的語句
#chcon -R -u system_u -r object_r -t httpd_sts_content_t /web
service httpd24 restart
在DNSMaster添加vul=172.16.32.241 并將序列號+1
修改腳本dns.sh

/var/named/test.com.zone

ok,已正常工作。

免責聲明:本站發布的內容(圖片、視頻和文字)以原創、轉載和分享為主,文章觀點不代表本網站立場,如果涉及侵權請聯系站長郵箱:is@yisu.com進行舉報,并提供相關證據,一經查實,將立刻刪除涉嫌侵權內容。