溫馨提示×
您好,登錄后才能下訂單哦!
點擊 登錄注冊 即表示同意《億速云用戶服務條款》
您好,登錄后才能下訂單哦!
這篇文章將為大家詳細講解有關react如何封裝自定義組件,小編覺得挺實用的,因此分享給大家做個參考,希望大家閱讀完這篇文章后可以有所收獲。
文章背景:
在實際項目中,為了避免寫重復代碼,同時為了方便后期的維護,我們可以通過將相同樣式的代碼自定義封裝成組件,然后只需要在頁面調用自定義組件即可。
下面我們來看看具體的步驟:
1、先封裝自定義組件
1)、新建CardList文件夾
2)、在CardList文件夾里新建index.js文件,并在index.js文件里書寫如下代碼:
//index.js暴露組件CardList
import Card from './card';
import CardList from './cardList';

CardList.Card = Card;
export default CardList;
3)、在CardList文件夾里新建cardList.js文件,并在該文件下書寫如下代碼:
import { Component } from 'react';
import withRouter from 'umi/withRouter';
import style from './index.css';

/**
 * CardList組件內容
 * @param title 組件標題
 * @param extra 描述
 * @param children 內容
 * @param restProps 傳入的自定義屬性
 * @returns {*}
 * @constructor
 */
const CardList = ({title, extra, children, ...restProps})=>{
  return(
    <div>
      <div className={style.card2} {...restProps}>
        <nav>{title} <span className={style.details}>{extra}</span></nav>
        {React.Children.map(
          children,
          child => (child ? React.cloneElement(child, {  }) : child)
        )}
      </div>
    </div>
  )
}
export default CardList;
4)、在CardList文件夾里新建index.css文件,并在該文件里書寫樣式
.card2{
  height: auto;
  background-color: white;
  padding: 16px;
  border-bottom: 1px solid #ddd;
}
.card2 nav{
  color: red;
  text-align: left;
  font-family: 'Arial Normal', 'Arial';
  font-weight: 400;
  font-style: normal;
  font-size: 16px;
  color: #333333;
  margin-bottom: 0.2rem;
}
.card2 div{
  color: #999999;
  font-family: 'Arial Normal', 'Arial';
  font-weight: 400;
  font-style: normal;
  font-size: 14px;
}
.list1{
  text-align: left;
  display: flex;
}
.list1>span{
  /*width: 50%;*/
  display: inline-block;
  vertical-align: top;
  /*white-space:nowrap;*/
  /*overflow:hidden;*/
  /*text-overflow : ellipsis;*/
  flex: 1;
}

.details{
  float: right;
  color:#2DA9FA;
}
5)、在CardList文件夾里新建card.js文件,并在該文件下書寫如下代碼:
import { Component } from 'react';
import withRouter from 'umi/withRouter';
import style from './index.css';

/**
 * 子組件內容
 * @param title 標題
 * @param children 內容
 * @param restProps 傳入的自定義屬性
 * @returns {*}
 * @constructor
 */
const Card = ({title,children,...restProps})=>{
  return(
    <div>
      <div className={style.list1} {...restProps}>
        <span>{title} {children}</span>
      </div>
    </div>
  )
}
export default Card;
6)、用法如下:
import { Component } from 'react';
import withRouter from 'umi/withRouter';
import router from 'umi/router';
import CardList from './CardList/index';
const {Card} = CardList;

class Index extends Component{
    state ={
        loading:false,
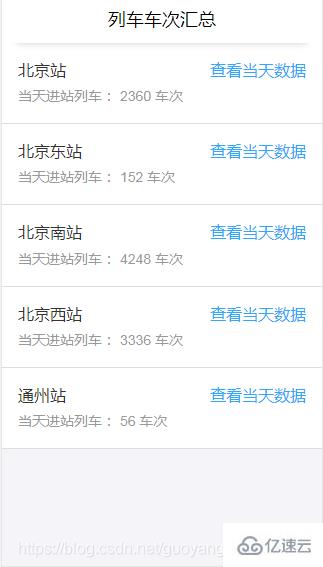
        totalList:[{"trainCount":2360,"stationName":"北京"},{"trainCount":152,"stationName":"北京東"},{"trainCount":4248,"stationName":"北京南"},{"trainCount":3336,"stationName":"北京西"},{"trainCount":56,"stationName":"通州"}],
     }

    render() {
        let info = <div>
                       {
                           this.state.totalList.map((obj,index)=>{
                               return <CardList title={`${obj.stationName}站`} extra={<span onClick={()=>{this.jump({obj})}}>查看當天數據</span>} key={index}>
                                          <Card title="當天進站列車:">{obj.trainCount||0} 車次</Card>
                                      </CardList>
                            })
                       }
                    </div>
        return (
            <div>
                {info}
            </div>
        )
    }

}
export default withRouter(Index);
7)、效果如下:

關于“react如何封裝自定義組件”這篇文章就分享到這里了,希望以上內容可以對大家有一定的幫助,使各位可以學到更多知識,如果覺得文章不錯,請把它分享出去讓更多的人看到。
免責聲明:本站發布的內容(圖片、視頻和文字)以原創、轉載和分享為主,文章觀點不代表本網站立場,如果涉及侵權請聯系站長郵箱:is@yisu.com進行舉報,并提供相關證據,一經查實,將立刻刪除涉嫌侵權內容。