您好,登錄后才能下訂單哦!
您好,登錄后才能下訂單哦!
這篇文章主要介紹“如何用Android實現下拉刷新效果”的相關知識,小編通過實際案例向大家展示操作過程,操作方法簡單快捷,實用性強,希望這篇“如何用Android實現下拉刷新效果”文章能幫助大家解決問題。
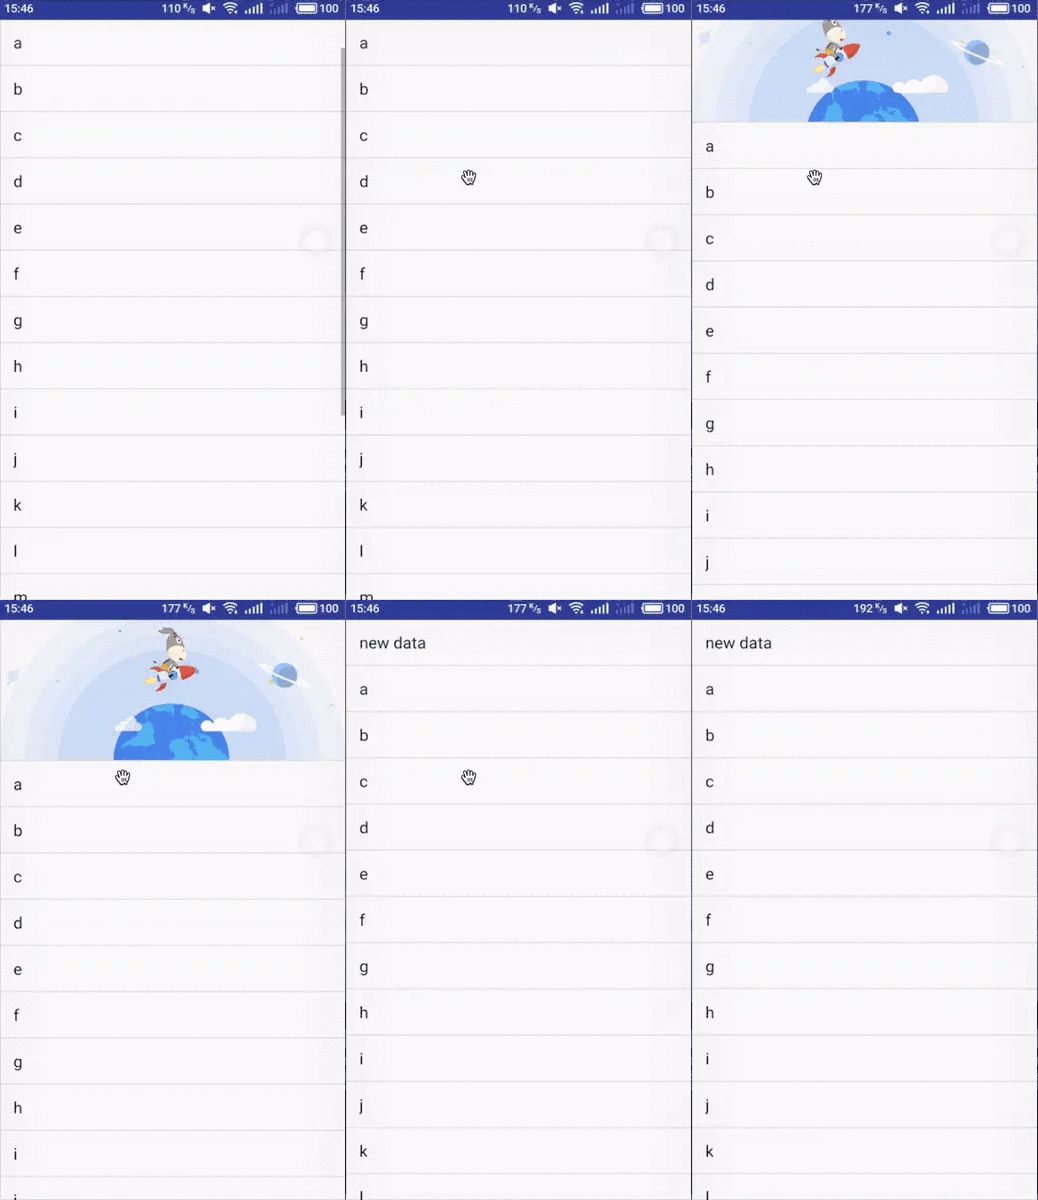
效果:

可以將動畫分解成:
睜眼毛驢繞著中心地球旋轉,并且在到達地球中心時,切換為閉眼毛驢,最后發射出去
地球自我旋轉,隨著下拉而緩緩上升,達到半徑距離后停止上升
一顆上下來回移動的衛星
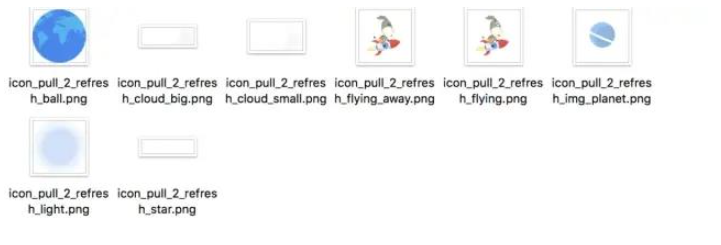
(1)下載趕集app,然后將其后綴名改為zip解壓獲取我們需要的資源圖片:

(2) 我們先實現衛星的上下移動
核心代碼:
@Override
    protected void onDraw(Canvas canvas) {
        super.onDraw(canvas);
        Matrix matrixPlanet = new Matrix();
        matrixPlanet.setScale(0.4f, 0.4f);
        matrixPlanet.postTranslate(locationX / 2 * 3, locationY /4);
        matrixPlanet.postTranslate(0, upDateY);
        canvas.drawBitmap(flyingPlanet,matrixPlanet,null);

    }
    public void startTranslatePlanet(int duration){
        ValueAnimator valueAnimator = new ValueAnimator();
        valueAnimator.setFloatValues(-50.0f, 50.0f);
        valueAnimator.setDuration(duration);
        valueAnimator.addUpdateListener(new ValueAnimator.AnimatorUpdateListener() {
            @Override
            public void onAnimationUpdate(ValueAnimator animation) {
                upDateY = (float) animation.getAnimatedValue();
                invalidate();
            }
        });
        valueAnimator.setRepeatCount(ValueAnimator.INFINITE);
        valueAnimator.setRepeatMode(ValueAnimator.REVERSE);
        valueAnimator.setInterpolator(new LinearInterpolator());
        valueAnimator.start();
    }
思想:使用Matrix來設置圖形變換,調用setScale()設置Bitmap縮放大小,然后調用postTranslate()將Bitmap平移到衛星的初始位置。最后使用ValueAnimator計算衛星上下移動的距離,再調用postTranslate()即可。
(3)地球自我旋轉,隨著下拉而緩緩上升,達到半徑距離后停止上升。
核心代碼:
@Override
    protected void onDraw(Canvas canvas) {
        super.onDraw(canvas);
        Matrix matrixBall = new Matrix();
        matrixBall.setScale(0.2f, 0.2f);
        if ((locationY  + upDateY) > (locationY - flyingBall_Height / 2)) {
            matrixBall.postTranslate(locationX - flyingBall_Width / 2, locationY  + upDateY);
            matrixBall.postRotate(degreeBall, locationX, (locationY +upDateY + flyingBall_Height /2)  );
        }
        else {
            matrixBall.postTranslate(locationX - flyingBall_Width / 2, locationY - flyingBall_Height / 2);
            matrixBall.postRotate(degreeBall, locationX, locationY);

        }

        canvas.drawBitmap(flyingBall, matrixBall, null);
        canvas.drawBitmap(cloudBig , null , rectfCloudBig , null);
        canvas.drawBitmap(cloudSmall , null , rectfCloudSmall ,null);

    }

    public void startBallAnim(long duration) {
        ValueAnimator valueAnimator = new ValueAnimator();
        valueAnimator.setFloatValues(0.0f, 360.0f);
        valueAnimator.setDuration(duration);
        valueAnimator.addUpdateListener(new ValueAnimator.AnimatorUpdateListener() {
            @Override
            public void onAnimationUpdate(ValueAnimator animation) {
                degreeBall = (float) animation.getAnimatedValue();
                invalidate();
            }
        });
        valueAnimator.setRepeatCount(ValueAnimator.INFINITE);
        valueAnimator.setInterpolator(new LinearInterpolator());
        valueAnimator.start();
    }
    public void UpBall(float offsetY){
        if (upDateY!=offsetY) {
            upDateY = offsetY;
            invalidate();
        }
    }

    public void accelerateBall(long duration) {
        clearAnimation();
        startBallAnim(duration);
    }
思想:同樣使用Matrix,先設置縮放大小。調用
matrixBall.postTranslate(locationX - flyingBall_Width / 2, locationY + upDateY);
將bitmap隱藏在view可視范圍的下方,然后通過下拉刷新列表獲取下拉刷新的Y坐標的改變量,調用postTranslate()上移改變量大小的距離即可。自轉動畫的實現,就是調用postRotate()方法 使用ValueAnimator 獲取改變量。因為地球是上升的,所以我們需要動態的設置旋轉的中心。
matrixBall.postRotate(degreeBall, locationX, (locationY +upDateY + flyingBall_Height /2) );
只需要改變減去下拉刷新列表獲取下拉刷新的Y坐標的改變量就可以了。
(3) 睜眼毛驢繞著中心地球旋轉,并且在到達地球中心時,切換為閉眼毛驢,最后發射出去
核心代碼:
@Override
    protected void onDraw(Canvas canvas) {
        super.onDraw(canvas);
        Matrix matrix = new Matrix();
        matrix.setScale(0.3f, 0.3f);
        matrix.postTranslate(pointDonkey.getDx(), pointDonkey.getDy());
        matrix.postRotate(degree, locationX, locationY + flyingBall_Width / 2);
        matrix.postTranslate(0 , upDateY);
        canvas.drawBitmap(flyingDonkey, matrix, null);
    }
思想:與上面一樣,先調用setScale()設置縮放大小,在進行平移旋轉操作的時候。
 matrix.postRotate(degree, locationX, locationY + flyingBall_Width / 2);
 matrix.postTranslate(0 , upDateY);
我們先繞著還沒有移動的地球旋轉,然后調用postTranslate()將其與地球一起上升。
關于“如何用Android實現下拉刷新效果”的內容就介紹到這里了,感謝大家的閱讀。如果想了解更多行業相關的知識,可以關注億速云行業資訊頻道,小編每天都會為大家更新不同的知識點。
免責聲明:本站發布的內容(圖片、視頻和文字)以原創、轉載和分享為主,文章觀點不代表本網站立場,如果涉及侵權請聯系站長郵箱:is@yisu.com進行舉報,并提供相關證據,一經查實,將立刻刪除涉嫌侵權內容。