您好,登錄后才能下訂單哦!
您好,登錄后才能下訂單哦!
小編給大家分享一下關于python識別驗證思路的案例分析,希望大家閱讀完這篇文章后大所收獲,下面讓我們一起去探討吧!
1、介紹
在爬蟲中經常會遇到驗證碼識別的問題,現在的驗證碼大多分計算驗證碼、滑塊驗證碼、識圖驗證碼、語音驗證碼等四種。本文就是識圖驗證碼,識別的是簡單的驗證碼,要想讓識別率更高,識別的更加準確就需要花很多的精力去訓練自己的字體庫。
識別驗證碼通常是這幾個步驟:
(1)灰度處理
(2)二值化
(3)去除邊框(如果有的話)
(4)降噪
(5)切割字符或者傾斜度矯正
(6)訓練字體庫
(7)識別
這6個步驟中前三個步驟是基本的,4或者5可根據實際情況選擇是否需要。
經常用的庫有pytesseract(識別庫)、OpenCV(高級圖像處理庫)、imagehash(圖片哈希值庫)、numpy(開源的、高性能的Python數值計算庫)、PIL的 Image,ImageDraw,ImageFile等。
2、實例
以某網站登錄的驗證碼識別為例:具體過程和上述的步驟稍有不同。

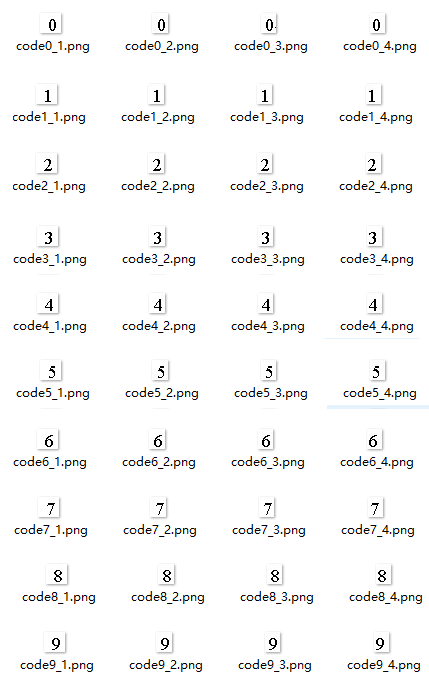
首先分析一下,驗證碼是由4個從0到9等10個數字組成的,那么從0到9這個10個數字沒有數字只有第一、第二、第三和第四等4個位置。那么計算下來共有40個數字位置,如下:

那么接下來就要對驗證碼圖片進行降噪、分隔得到上面的圖片。以這40個圖片集作為基礎。
對要驗證的驗證碼圖片進行降噪、分隔后獲取四個類似上面的數字圖片、通過和上面的比對就可以知道該驗證碼是什么了。
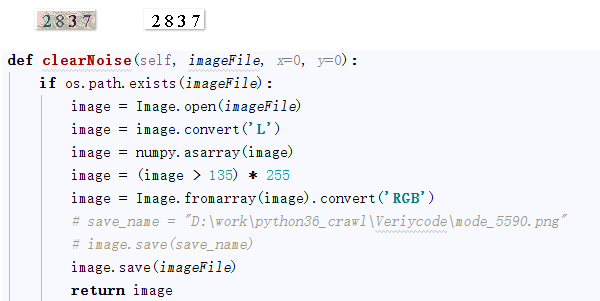
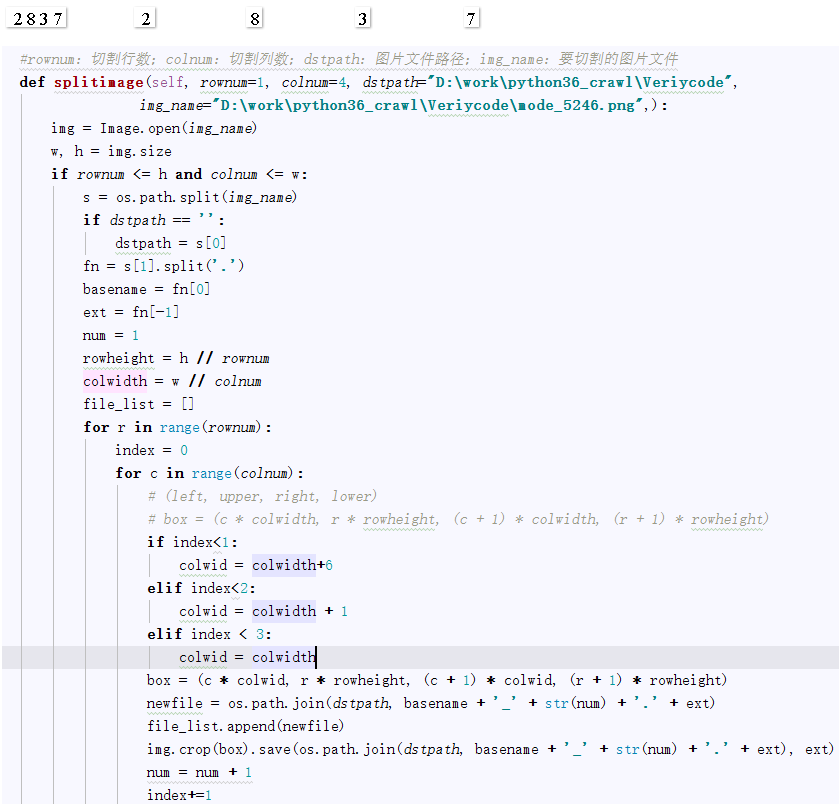
以上面驗證碼2837為例:
1、圖片降噪

2、圖片分隔

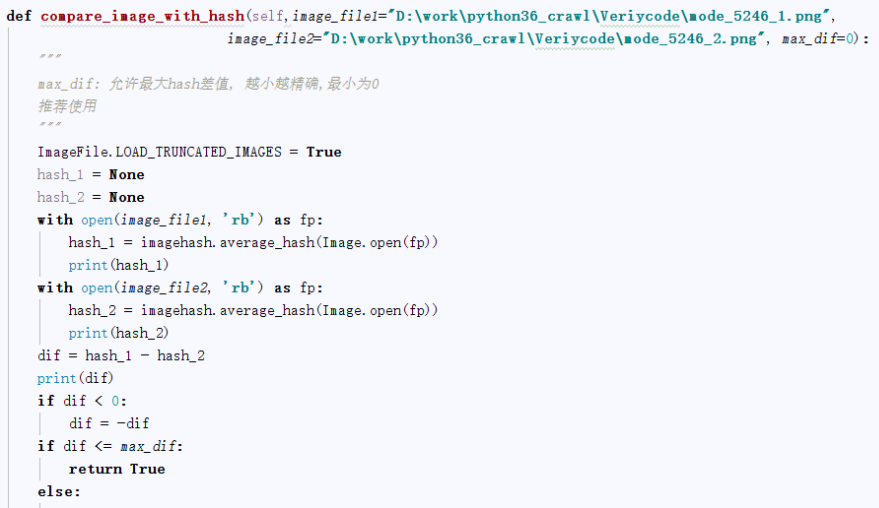
3、圖片比對
通過比驗證碼降噪、分隔后的四個數字圖片,和上面的40個數字圖片進行哈希值比對,設置一個誤差,max_dif:允許最大hash差值,越小越精確,最小為0。

這樣四個數字圖片通過比較后獲取對應是數字,連起來,就是要獲取的驗證碼。
完整代碼如下:
#coding=utf-8
import os
import re
from selenium import webdriver
from selenium.webdriver.common.keys import Keys
import time
from selenium.webdriver.common.action_chains import ActionChains
import collections
import mongoDbBase
import numpy
import imagehash
from PIL import Image,ImageFile
import datetime
class finalNews_IE:
    def __init__(self,strdate,logonUrl,firstUrl,keyword_list,exportPath,codepath,codedir):
        self.iniDriver()
        self.db = mongoDbBase.mongoDbBase()
        self.date = strdate
        self.firstUrl = firstUrl
        self.logonUrl = logonUrl
        self.keyword_list = keyword_list
        self.exportPath = exportPath
        self.codedir = codedir
        self.hash_code_dict ={}
        for f in range(0,10):
            for l in range(1,5):
                file = os.path.join(codedir, "codeLibrary\code" +  str(f) + '_'+str(l) + ".png")
                # print(file)
                hash = self.get_ImageHash(file)
                self.hash_code_dict[hash]= str(f)
    def iniDriver(self):
        # 通過配置文件獲取IEDriverServer.exe路徑
        IEDriverServer = "C:\Program Files\Internet Explorer\IEDriverServer.exe"
        os.environ["webdriver.ie.driver"] = IEDriverServer
        self.driver = webdriver.Ie(IEDriverServer)
    def WriteData(self, message, fileName):
        fileName = os.path.join(os.getcwd(), self.exportPath + '/' + fileName)
        with open(fileName, 'a') as f:
            f.write(message)
    # 獲取圖片文件的hash值
    def get_ImageHash(self,imagefile):
        hash = None
        if os.path.exists(imagefile):
            with open(imagefile, 'rb') as fp:
                hash = imagehash.average_hash(Image.open(fp))
        return hash
    # 點降噪
    def clearNoise(self, imageFile, x=0, y=0):
        if os.path.exists(imageFile):
            image = Image.open(imageFile)
            image = image.convert('L')
            image = numpy.asarray(image)
            image = (image > 135) * 255
            image = Image.fromarray(image).convert('RGB')
            # save_name = "D:\work\python36_crawl\Veriycode\mode_5590.png"
            # image.save(save_name)
            image.save(imageFile)
            return image
    #切割驗證碼
    # rownum:切割行數;colnum:切割列數;dstpath:圖片文件路徑;img_name:要切割的圖片文件
    def splitimage(self, imagePath,imageFile,rownum=1, colnum=4):
        img = Image.open(imageFile)
        w, h = img.size
        if rownum <= h and colnum <= w:
            print('Original image info: %sx%s, %s, %s' % (w, h, img.format, img.mode))
            print('開始處理圖片切割, 請稍候...')
            s = os.path.split(imageFile)
            if imagePath == '':
                dstpath = s[0]
            fn = s[1].split('.')
            basename = fn[0]
            ext = fn[-1]
            num = 1
            rowheight = h // rownum
            colwidth = w // colnum
            file_list =[]
            for r in range(rownum):
                index = 0
                for c in range(colnum):
                    # (left, upper, right, lower)
                    # box = (c * colwidth, r * rowheight, (c + 1) * colwidth, (r + 1) * rowheight)
                    if index < 1:
                        colwid = colwidth + 6
                    elif index < 2:
                        colwid = colwidth + 1
                    elif index < 3:
                        colwid = colwidth
                    box = (c * colwid, r * rowheight, (c + 1) * colwid, (r + 1) * rowheight)
                    newfile = os.path.join(imagePath, basename + '_' + str(num) + '.' + ext)
                    file_list.append(newfile)
                    img.crop(box).save(newfile, ext)
                    num = num + 1
                    index += 1
            return file_list
    def compare_image_with_hash(self, image_hash2,image_hash3, max_dif=0):
        """
                max_dif: 允許最大hash差值, 越小越精確,最小為0
                推薦使用
                """
        dif = image_hash2 - image_hash3
        # print(dif)
        if dif < 0:
            dif = -dif
        if dif <= max_dif:
            return True
        else:
            return False
    # 截取驗證碼圖片
    def savePicture(self):
        self.driver.get(self.logonUrl)
        self.driver.maximize_window()
        time.sleep(1)
        self.driver.save_screenshot(self.codedir +"\Temp.png")
        checkcode = self.driver.find_element_by_id("checkcode")
        location = checkcode.location  # 獲取驗證碼x,y軸坐標
        size = checkcode.size  # 獲取驗證碼的長寬
        rangle = (int(location['x']), int(location['y']), int(location['x'] + size['width']),
                  int(location['y'] + size['height']))  # 寫成我們需要截取的位置坐標
        i = Image.open(self.codedir +"\Temp.png")  # 打開截圖
        result = i.crop(rangle)  # 使用Image的crop函數,從截圖中再次截取我們需要的區域
        filename = datetime.datetime.now().strftime("%M%S")
        filename =self.codedir +"\Temp_code.png"
        result.save(filename)
        self.clearNoise(filename)
        file_list = self.splitimage(self.codedir,filename)
        verycode =''
        for f in file_list:
            imageHash = self.get_ImageHash(f)
            for h,code in self.hash_code_dict.items():
                flag = self.compare_image_with_hash(imageHash,h,0)
                if flag:
                    # print(code)
                    verycode+=code
                    break
        print(verycode)
        self.driver.close()

    def longon(self):
        self.driver.get(self.logonUrl)
        self.driver.maximize_window()
        time.sleep(1)
        self.savePicture()
        accname = self.driver.find_element_by_id("username")
        # accname = self.driver.find_element_by_id("//input[@id='username']")
        accname.send_keys('ctrchina')
        accpwd = self.driver.find_element_by_id("password")
        # accpwd.send_keys('123456')
        code = self.getVerycode()
        checkcode = self.driver.find_element_by_name("checkcode")
        checkcode.send_keys(code)
        submit = self.driver.find_element_by_name("button")
        submit.click()
看完了這篇文章,相信你對關于python識別驗證思路的案例分析有了一定的了解,想了解更多相關知識,歡迎關注億速云行業資訊頻道,感謝各位的閱讀!
免責聲明:本站發布的內容(圖片、視頻和文字)以原創、轉載和分享為主,文章觀點不代表本網站立場,如果涉及侵權請聯系站長郵箱:is@yisu.com進行舉報,并提供相關證據,一經查實,將立刻刪除涉嫌侵權內容。