您好,登錄后才能下訂單哦!
您好,登錄后才能下訂單哦!
無圖言虛空
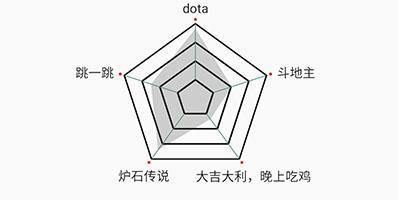
簡單分析一波,確定雷達圖正幾邊形的--正五邊形 int count=5,分為幾個層數--4 層 int layerCount=4
 @Override
 protected void onDraw(Canvas canvas) {
  super.onDraw(canvas);
  drawPolygon(canvas);//畫邊
  drawLines(canvas);//畫線
  drawText(canvas);//描繪文字
  drawRegion(canvas);//覆蓋區域
 }
主要這幾步,開擼!
自定義RadarView繼承View
確定需要使用的變量,初始化paint,計算圓心角
 private int count = 5; //幾邊形
 private int layerCount = 4; //層數
 private float angle; //每條邊對應的圓心角
 private int centerX; //圓心x
 private int centerY; //圓心y
 private float radius; //半徑
 private Paint polygonPaint; //邊框paint
 private Paint linePaint; //連線paint
 private Paint txtPaint; //文字paint
 private Paint circlePaint; //圓點paint
 private Paint regionColorPaint; //覆蓋區域paint
 private Double[] percents = {0.91, 0.35, 0.12, 0.8, 0.5}; //覆蓋區域百分比
 private String[] titles = {"dota", "斗地主", "大吉大利,晚上吃雞", "爐石傳說", "跳一跳"};//文字
public RadarView(Context context) {
  this(context, null, 0);
 }

 public RadarView(Context context, @Nullable AttributeSet attrs) {
  this(context, attrs, 0);
 }

 public RadarView(Context context, @Nullable AttributeSet attrs, int defStyleAttr) {
  super(context, attrs, defStyleAttr);
  //計算圓心角
  angle = (float) (Math.PI * 2 / count);

  polygonPaint = new Paint();
  polygonPaint.setColor(ContextCompat.getColor(context, R.color.radarPolygonColor));
  polygonPaint.setAntiAlias(true);
  polygonPaint.setStyle(Paint.Style.STROKE);
  polygonPaint.setStrokeWidth(4f);

  linePaint = new Paint();
  linePaint.setColor(ContextCompat.getColor(context, R.color.radarLineColor));
  linePaint.setAntiAlias(true);
  linePaint.setStyle(Paint.Style.STROKE);
  linePaint.setStrokeWidth(2f);

  txtPaint = new Paint();
  txtPaint.setColor(ContextCompat.getColor(context, R.color.radarTxtColor));
  txtPaint.setAntiAlias(true);
  txtPaint.setStyle(Paint.Style.STROKE);
  txtPaint.setTextSize(DensityUtil.dpToPx(context, 12));

  circlePaint = new Paint();
  circlePaint.setColor(ContextCompat.getColor(context, R.color.radarCircleColor));
  circlePaint.setAntiAlias(true);

  regionColorPaint = new Paint();
  regionColorPaint.setColor(ContextCompat.getColor(context, R.color.radarRegionColor));
  regionColorPaint.setStyle(Paint.Style.FILL);
  regionColorPaint.setAntiAlias(true);

 }
確定中心點
需要正五邊形得有一個圓,圓內接正五邊形,在onSizeChanged方法里獲取圓心,確定半徑
 @Override
 protected void onSizeChanged(int w, int h, int oldw, int oldh) {
  super.onSizeChanged(w, h, oldw, oldh);
  radius = Math.min(h, w) / 2 * 0.7f;
  centerX = w / 2;
  centerY = h / 2;
 }
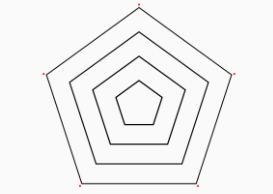
繪制正五邊形
繪制正五邊形同時描繪最外圍的點,確定分為4層,半徑 / 層數 =每層之間的間距,從最里層開始畫正五邊形,每層第一個點位于中心點正上方
private void drawPolygon(Canvas canvas) {
  Path path = new Path();
  float r = radius / layerCount;
  for (int i = 1; i <= layerCount; i++) {
   float curR = r * i; //當前所在層的半徑
   for (int j = 0; j < count; j++) {
    if (j == 0) {
     //每一層第一個點坐標
     path.moveTo(centerX, centerY - curR);
    } else {
     //順時針記錄其余頂角的點坐標
     float x = (float) (centerX + Math.sin(angle * j) * curR);
     float y = (float) (centerY - Math.cos(angle * j) * curR);
     path.lineTo(x, y);
    }
   }
   //最外層的頂角外面的五個小圓點(圖中紅色部分)
   if (i == layerCount) {
    for (int j = 0; j < count; j++) {
     float x = (float) (centerX + Math.sin(angle * j) * (curR + 12));
     float y = (float) (centerY - Math.cos(angle * j) * (curR + 12));
     canvas.drawCircle(x, y, 4, circlePaint);
    }
   }
   path.close();
   canvas.drawPath(path, polygonPaint);
  }
 }
繪制連線
繪制最內層頂角到最外層頂角的連線
 private void drawLines(Canvas canvas) {
  float r = radius / layerCount;
  for (int i = 0; i < count; i++) {
   //起始坐標 從中心開始的話 startx=centerX , startY=centerY
   float startX = (float) (centerX + Math.sin(angle * i) * r);
   float startY = (float) (centerY - Math.cos(angle * i) * r);
   //末端坐標
   float endX = (float) (centerX + Math.sin(angle * i) * radius);
   float endY = (float) (centerY - Math.cos(angle * i) * radius);
   canvas.drawLine(startX, startY, endX, endY, linePaint);
  }
 }
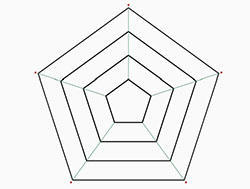
至此簡易雷達圖成型,可以修改正幾邊形,多少層數(后續繼續添加文字)
 //設置幾邊形,**注意:設置幾邊形需要重新計算圓心角**
 public void setCount(int count){
  this.count = count;
  angle = (float) (Math.PI * 2 / count);
  invalidate();
 }

 //設置層數
 public void setLayerCount(int layerCount){
  this.layerCount = layerCount;
  invalidate();
 }
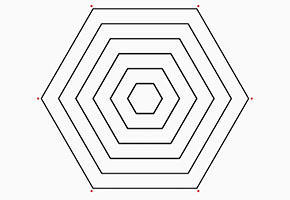
設置正六邊形、六層
 radarView.setCount(6);
 radarView.setLayerCount(6);
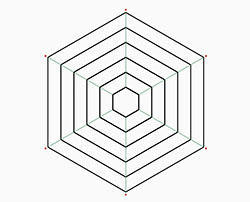
對于以下圖形的,可以設置第一個點坐標位于中心點正右側 (centerX+curR,centerY) ,順時針計算其余頂點坐標 x = (float) (centerX+curR*Math.cos(angle*j)), y = (float) (centerY+curR*Math.sin(angle*j)) ,同理連線等其余坐標相應改變...
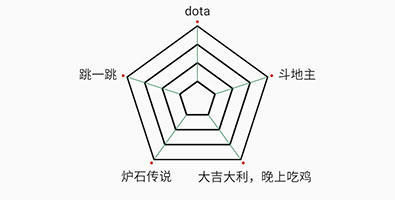
描繪文字
由于各產品維度內容不同,所需雷達圖樣式不一,這里只是描繪下不同位置的文字處理情況,具體需求還得按產品來,因產品而異
private void drawText(Canvas canvas) {
  for (int i = 0; i < count; i++) {
   //獲取到雷達圖最外邊的坐標
   float x = (float) (centerX + Math.sin(angle * i) * (radius + 12));
   float y = (float) (centerY - Math.cos(angle * i) * (radius + 12));
   if (angle * i == 0) {
    //第一個文字位于頂角正上方
    txtPaint.setTextAlign(Paint.Align.CENTER);
    canvas.drawText(titles[i], x, y - 18, txtPaint);
    txtPaint.setTextAlign(Paint.Align.LEFT);
   } else if (angle * i > 0 && angle * i < Math.PI / 2) {
    //微調
    canvas.drawText(titles[i], x + 18, y + 10, txtPaint);
   } else if (angle * i >= Math.PI / 2 && angle * i < Math.PI) {
    //最右下的文字獲取到文字的長、寬,按文字長度百分比向左移
    String txt = titles[i];
    Rect bounds = new Rect();
    txtPaint.getTextBounds(txt, 0, txt.length(), bounds);
    float height = bounds.bottom - bounds.top;
    float width = txtPaint.measureText(txt);
    canvas.drawText(txt, x - width * 0.4f, y + height + 18, txtPaint);
   } else if (angle * i >= Math.PI && angle * i < 3 * Math.PI / 2) {
    //同理最左下的文字獲取到文字的長、寬,按文字長度百分比向左移
    String txt = titles[i];
    Rect bounds = new Rect();
    txtPaint.getTextBounds(txt, 0, txt.length(), bounds);
    float width = txtPaint.measureText(txt);
    float height = bounds.bottom - bounds.top;
    canvas.drawText(txt, x - width * 0.6f, y + height + 18, txtPaint);
   } else if (angle * i >= 3 * Math.PI / 2 && angle * i < 2 * Math.PI) {
    //文字向左移動
    String txt = titles[i];
    float width = txtPaint.measureText(txt);
    canvas.drawText(txt, x - width - 18, y + 10, txtPaint);
   }

  }
 }
繪制覆蓋區域
繪制覆蓋區域,百分比取連線長度的百分比(如果從中心點開始的連線,則是半徑的百分比),此處用半徑radius減去間隔r即連線長度
 private void drawRegion(Canvas canvas) {
  Path path = new Path();
  float r = radius / layerCount;//每層的間距
  for (int i = 0; i < count; i++) {
   if (i == 0) {
    path.moveTo(centerX, (float) (centerY - r - (radius - r) * percents[i]));
   } else {
    float x = (float) (centerX + Math.sin(angle * i) * (percents[i] * (radius - r) + r));
    float y = (float) (centerY - Math.cos(angle * i) * (percents[i] * (radius - r) + r));
    path.lineTo(x, y);
   }
  }
  path.close();
  canvas.drawPath(path, regionColorPaint);
 }
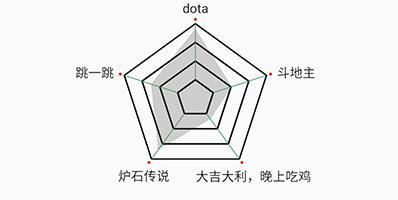
至此,一個簡單的雷達圖完畢。以上就是本文的全部內容,希望對大家的學習有所幫助,也希望大家多多支持億速云。
免責聲明:本站發布的內容(圖片、視頻和文字)以原創、轉載和分享為主,文章觀點不代表本網站立場,如果涉及侵權請聯系站長郵箱:is@yisu.com進行舉報,并提供相關證據,一經查實,將立刻刪除涉嫌侵權內容。