溫馨提示×
您好,登錄后才能下訂單哦!
點擊 登錄注冊 即表示同意《億速云用戶服務條款》
您好,登錄后才能下訂單哦!
小編給大家分享一下iOS如何實現大雪紛飛動畫,相信大部分人都還不怎么了解,因此分享這篇文章給大家參考一下,希望大家閱讀完這篇文章后大有收獲,下面讓我們一起去了解一下吧!
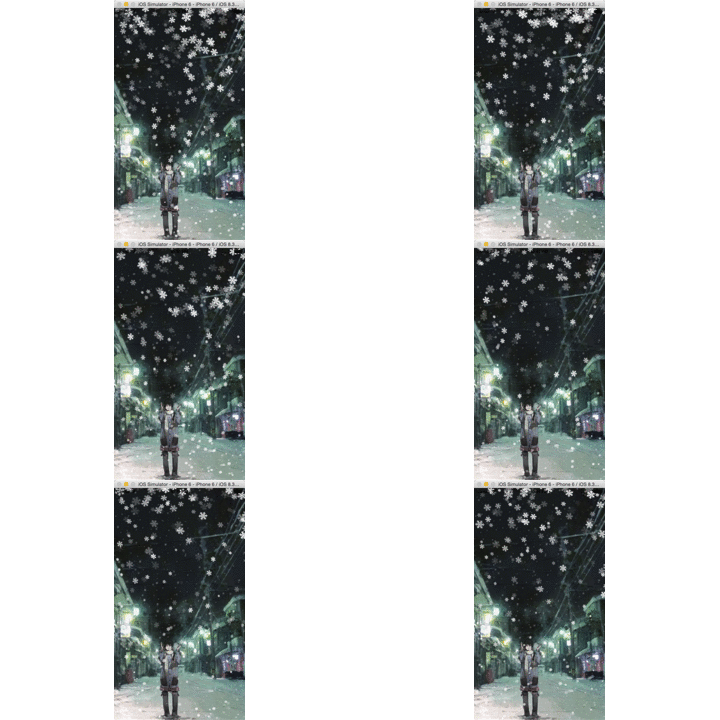
1.結果展示
美麗的雪花,勾起了多少美好的回憶。

2.制作思路
其實創作這樣一個大學紛飛的場景是十分簡單的,簡單到你看了教程之后想不會都不行。OK,下面國際慣例,講解一下思路吧。
1.創建一個數組用來保存大量的雪花
_imagesArray = [[NSMutableArray alloc] init];
  for (int i = 0; i < 1000; ++ i) {
    UIImageView *imageView = [[UIImageView alloc] initWithImage:[UIImage imageNamed:@"snow"]];
    float x = IMAGE_WIDTH;
    imageView.frame = CGRectMake(IMAGE_X, -30, x, x);
    imageView.alpha = IMAGE_ALPHA;
    [self.view addSubview:imageView];
    [_imagesArray addObject:imageView];
  }
2.使用時鐘(CADisplayLink)來控制下雪,為什么不使用NSTimer呢。其實是可以的,只是(CADisplayLink)刷幀更快一些。
//創建時鐘,并且添加到主循環中
CADisplayLink *link = [CADisplayLink displayLinkWithTarget:self selector:@selector(makeSnow)];
[link addToRunLoop:[NSRunLoop mainRunLoop] forMode:NSDefaultRunLoopMode];
3.下雪,就是把數組當做隊列來使用。
每次從數組頭部取出一個雪花并且刪除其在數組中的占位。
讓雪花飄落,通過UIView動畫完成frame,transform等改變。
當動畫完成之后,將取出的雪花再次放進數組的尾部
- (void)makeSnow
{
  if (_imagesArray.count > 0) {
    UIImageView *imageView = _imagesArray[0];
    [_imagesArray removeObjectAtIndex:0];
    [self snowFall:imageView];
  }
}

- (void)snowFall:(UIImageView *)imageView
{
  [UIView animateWithDuration:10 animations:^{
    imageView.frame = CGRectMake(imageView.frame.origin.x, Main_Screen_Height, imageView.frame.size.width, imageView.frame.size.height);
    imageView.transform = CGAffineTransformMakeScale(0.3, 0.3);
    imageView.transform = CGAffineTransformRotate(imageView.transform, M_PI);
  } completion:^(BOOL finished) {
    float x = IMAGE_WIDTH;
    imageView.frame = CGRectMake(IMAGE_X, -30, x, x);
    [_imagesArray addObject:imageView];
  }];
}
3.有代碼有真相
#define IMAGE_X        arc4random()%(int)Main_Screen_Width
#define IMAGE_ALPHA      ((float)(arc4random()%10))/10
#define IMAGE_WIDTH      arc4random()%20 + 10
#define PLUS_HEIGHT      Main_Screen_Height/25

#define Main_Screen_Height   [[UIScreen mainScreen] bounds].size.height
#define Main_Screen_Width    [[UIScreen mainScreen] bounds].size.width

#import "ViewController.h"

@interface ViewController ()
@property (nonatomic ,strong) NSMutableArray *imagesArray;
@property (nonatomic , strong) UIImageView *imageView;
@end

@implementation ViewController

- (void)loadView
{
  UIImageView *imageView = [[UIImageView alloc]initWithFrame:[UIScreen mainScreen].bounds];
  imageView.image = [UIImage imageNamed:@"backgound.jpg"];
  imageView.contentMode = UIViewContentModeScaleAspectFill;
  self.view = imageView;

}

- (void)viewDidLoad
{
  [super viewDidLoad];

  _imagesArray = [[NSMutableArray alloc] init];
  for (int i = 0; i < 1000; ++ i) {
    UIImageView *imageView = [[UIImageView alloc] initWithImage:[UIImage imageNamed:@"snow"]];
    float x = IMAGE_WIDTH;
    imageView.frame = CGRectMake(IMAGE_X, -30, x, x);
    imageView.alpha = IMAGE_ALPHA;
    [self.view addSubview:imageView];
    [_imagesArray addObject:imageView];
  }

  //創建時鐘,并且添加到主循環中
  CADisplayLink *link = [CADisplayLink displayLinkWithTarget:self selector:@selector(makeSnow)];
  [link addToRunLoop:[NSRunLoop mainRunLoop] forMode:NSDefaultRunLoopMode];
}


- (void)makeSnow
{
  if (_imagesArray.count > 0) {
    UIImageView *imageView = _imagesArray[0];
    [_imagesArray removeObjectAtIndex:0];
    [self snowFall:imageView];
  }
}

- (void)snowFall:(UIImageView *)imageView
{
  [UIView animateWithDuration:10 animations:^{
    imageView.frame = CGRectMake(imageView.frame.origin.x, Main_Screen_Height, imageView.frame.size.width, imageView.frame.size.height);
    imageView.transform = CGAffineTransformMakeScale(0.3, 0.3);
    imageView.transform = CGAffineTransformRotate(imageView.transform, M_PI);
  } completion:^(BOOL finished) {
    float x = IMAGE_WIDTH;
    imageView.frame = CGRectMake(IMAGE_X, -30, x, x);
    [_imagesArray addObject:imageView];
  }];
}
以上是“iOS如何實現大雪紛飛動畫”這篇文章的所有內容,感謝各位的閱讀!相信大家都有了一定的了解,希望分享的內容對大家有所幫助,如果還想學習更多知識,歡迎關注億速云行業資訊頻道!
免責聲明:本站發布的內容(圖片、視頻和文字)以原創、轉載和分享為主,文章觀點不代表本網站立場,如果涉及侵權請聯系站長郵箱:is@yisu.com進行舉報,并提供相關證據,一經查實,將立刻刪除涉嫌侵權內容。