您好,登錄后才能下訂單哦!
您好,登錄后才能下訂單哦!
這篇文章主要介紹怎樣使用js實現百度登錄框鼠標拖拽效果,文中介紹的非常詳細,具有一定的參考價值,感興趣的小伙伴們一定要看完!
知識點:
1.掌握對可拖拽對話框的實現原理
2.了解元素如何觸發腳本方法以及如何編寫偵聽事件
3. 學會設置元素在頁面中居中和全屏
注意區別:
1.screenX:鼠標位置相對于用戶屏幕水平偏移量,而screenY也就是垂直方向的,此時的參照點也就是原點是屏幕的左上角。
2.clientX:跟screenX相比就是將參照點改成了瀏覽器內容區域的左上角,該參照點會隨之滾動條的移動而移動。
3.pageX:參照點也是瀏覽器內容區域的左上角,但它不會隨著滾動條而變動。
鼠標事件:
鼠標事件1 - 在標題欄上按下(要計算鼠標相對拖拽元素的左上角的坐標,并且標記元素為可拖動)
鼠標事件2 - 鼠標移動時(要檢測元素是否標記為可移動,如果是,則更新元素的位置到當前鼠標的位置【ps:要減去第一步中獲得的偏移】)
鼠標事件3 - 鼠標松開的時候(標記元素為不可拖動即可)
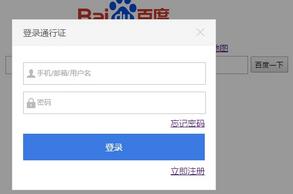
效果:

完整代碼及注釋:
<!DOCTYPE html>
<html>
<head lang="en">
<meta charset="UTF-8">
<title></title>
</head>
<style type="text/css">
*{
margin: 0;
padding: 0;
list-style: none;
}
.main{
width: 600px;
height: 320px;
margin: 0 auto;
margin-top: 80px;
margin-left: 400px;
}
.img{
text-align: center;
}
.item1{
margin-left: 115px;
width: 600px;
}
.item1 li{
float: left;
width: 50px;
}
.text{
width: 600px;
margin-left: 80px;
margin-top: 5px;
}
.text .txt{
width: 450px;
height: 30px;
}
.text .btn{
width: 70px;
height: 30px;
cursor: pointer;
}
.item2{
width: 600px;
margin-left: 200px;
margin-top: 30px;
}
.item2 li{
float: left;
margin-left: 10px;
}
.link{
text-align: right;
line-height: 30px;
padding-right: 40px;
}
.logmove{
width: 380px;
height: auto;
background: #fff;
}
.Box{
width: 380px;
height: auto;
position: absolute;
left: 100px;
top: 100px;
border: 1px solid #d5d5d5;
z-index: 9000;
background: #fff;
display: none;
}
.title{
height: 48px;
line-height: 48px;
color: #535353;
background: #f5f5f5;
padding: 0px 20px;
font-size: 16px;
border-bottom: 1px solid #efefef;
cursor: move;
user-select: none;
}
.title .closebtn{
display: block;
width: 16px;
height: 16px;
position: absolute;
top: 15px;
right: 20px;
background: url("img/close_def.png") no-repeat;
cursor: pointer;
}
.title .closebtn:hover{
background: url("img/close_hov.png");
}
.content{
padding: 15px 20px;
}
.Input{
padding-top: 15px;
}
.txt1,.txt2,.Input{
height: 40px;
line-height: 40px;
text-align: right;
}
.username,.password{
width: 100%;
height: 40px;
margin: 0px;
padding: 0px;
border: 1px solid #c1c1c1;
text-indent: 25px;
outline: none;
}
.username{
background: url("img/input_username.png") no-repeat 2px;
}
.password{
background: url("img/input_password.png") no-repeat 2px;
}
.submit{
width: 100%;
height: 50px;
background: #3b7ae3;
border: none;
font-size: 16px;
color: #fff;
outline: none;
text-decoration: none;
display: block;
text-align: center;
line-height: 50px;
}
.submit:hover{
background: #3f81b0;
}
.mask{
width: 100%;
height: 100%;
background: #000;
position: absolute;
top: 0;
left: 0;
z-index: 8000;
opacity: 0.4;
filter: Alpha(opacity=40);
display: none;
}
</style>
<script type="text/javascript">
window.onload=function(){
//獲取元素對象
function g(id){
return document.getElementById(id);
}
//自動居中 - 登錄浮層 ( el = Element)
function autoCenter(el){
var bodyW = document.documentElement.clientWidth;//網頁可視區域
var bodyH = document.documentElement.clientHeight;
var elW = el.offsetWidth;//登錄框的寬度
var elH = el.offsetHeight;
el.style.left = (bodyW - elW) / 2 + 'px';//實現居中
el.style.top = (bodyH - elH) / 2 + 'px';
}
//自動全屏 - 遮罩
function fillToBody(el){
el.style.width = document.documentElement.clientWidth + 'px';
el.style.height = document.documentElement.clientHeight + 'px';
}
var mouseOffsetX = 0;//鼠標偏移量
var mouseOffsetY = 0;
var isDraging = false;
//鼠標事件1 - 在標題欄上按下(要計算鼠標相對拖拽元素的左上角的坐標,并且標記元素為可拖動)
g('title').addEventListener('mousedown',function(e){
var e = e||window.event;
mouseOffsetX = e.pageX - g('Box').offsetLeft;
mouseOffsetY = e.pageY - g('Box').offsetTop;
isDraging = true;
})
//鼠標事件2 - 鼠標移動時(要檢測元素是否標記為可移動,如果是,則更新元素的位置到當前鼠標的位置【ps:要減去第一步中獲得的偏移】)
document.onmousemove = function(e){
var e = e||window.event;
var mouseX = e.pageX;//鼠標當前位置
var mouseY = e.pageY;
var moveX = 0;//浮層元素的新位置
var moveY = 0;
if(isDraging === true){
moveX = mouseX - mouseOffsetX;
moveY = mouseY - mouseOffsetY;
//拖拽范圍限定 moveX > 0 并且 moveX < (頁面最大寬度 - 浮層的寬度)
// moveY > 0 并且 moveY < (頁面最大高度 - 浮層的高度)
var pageWidth = document.documentElement.clientWidth;//頁面寬度
var pageHeight = document.documentElement.clientHeight;
var BoxWidth = g('Box').offsetWidth;
var BoxHeight = g('Box').offsetHeight;
var maxX = pageWidth - BoxWidth;
var maxY = pageHeight - BoxHeight;
moveX = Math.max(0,moveX);//實際上就是獲得moveX的所有正數值,也就是規定范圍的下限值
moveX = Math.min(maxX,moveX);//實際上就是規定了moveX的上限值
moveY = Math.max(0,moveY);
moveY = Math.min(maxY,moveY);
/*
moveX =Math.min(maxX, Math.max(0,moveX));
moveY =Math.min(maxY, Math.max(0,moveY));
*/
g('Box').style.left = moveX + 'px';
g('Box').style.top = moveY + 'px';
}
}
//鼠標事件3 - 鼠標松開的時候(標記元素為不可拖動即可)
document.onmouseup = function(){
isDraging = false;
}
function showBox(){
g('Box').style.display = 'block';
g('mask').style.display = 'block';
autoCenter(g('Box'));
fillToBody(g('mask'));
}
function hideBox(){
g('Box').style.display = 'none';
g('mask').style.display = 'none';
}
g('log').onclick = function(){
showBox();
}
g('close').onclick = function(){
hideBox();
}
/*窗口改變大小時的處理
1.保持登錄浮層居中
2.保持遮罩的全屏,使之不會出現滾動條
*/
window.onresize = function(){
autoCenter(g('Box'));
fillToBody(g('mask'));
}
}
</script>
<body>
<div class="link"><a href="#" id="log">登錄</a></div>
<div class="main">
<div class="img"><img src="img/baidu.png" /></div>
<div class="item1">
<ul>
<li><a href="#">新聞</a></li>
<li><a href="#">網頁</a></li>
<li><a href="#">貼吧</a></li>
<li><a href="#">知道</a></li>
<li><a href="#">音樂</a></li>
<li><a href="#">圖片</a></li>
<li><a href="#">視頻</a></li>
<li><a href="#">地圖</a></li>
</ul>
</div>
<div class="text">
<br/>
<input type="text" class="txt">
<input type="button" value="百度一下" class="btn">
</div>
<div class="item2">
<ul>
<li><a href="#">百科</a></li>
<li><a href="#">文庫</a></li>
<li><a href="#">hao123</a></li>
<li><a href="#">更多>></a></li>
</ul>
</div>
</div>
<div class="mask" id="mask"></div>
<div class="Box" id="Box">
<div class="logmove" id="logmove" onselect="return false">
<div class="title" id="title">
登錄通行證<a href="#" class="closebtn" id="close"></a>
</div>
</div>
<div class="content">
<div class="Input">
<input class="username" type="text" placeholder="手機/郵箱/用戶名">
</div>
<div class="Input">
<input class="password" type="text" placeholder="密碼">
</div>
<div class="txt1">
<a href="#">忘記密碼</a>
</div>
<div>
<a href="#" class="submit">登錄</a>
</div>
<div class="txt2">
<a href="#">立即注冊</a>
</div>
</div>
</div>
</body>
</html>以上是“怎樣使用js實現百度登錄框鼠標拖拽效果”這篇文章的所有內容,感謝各位的閱讀!希望分享的內容對大家有幫助,更多相關知識,歡迎關注億速云行業資訊頻道!
免責聲明:本站發布的內容(圖片、視頻和文字)以原創、轉載和分享為主,文章觀點不代表本網站立場,如果涉及侵權請聯系站長郵箱:is@yisu.com進行舉報,并提供相關證據,一經查實,將立刻刪除涉嫌侵權內容。