您好,登錄后才能下訂單哦!
您好,登錄后才能下訂單哦!
這篇文章主要介紹基于Vue如何實現商品主圖放大鏡功能,文中介紹的非常詳細,具有一定的參考價值,感興趣的小伙伴們一定要看完!
實現原理
放大鏡的原理用一句話概括,就是根據小圖上的鼠標位置去定位大圖。
圖1 原理圖(以2倍放大為例)
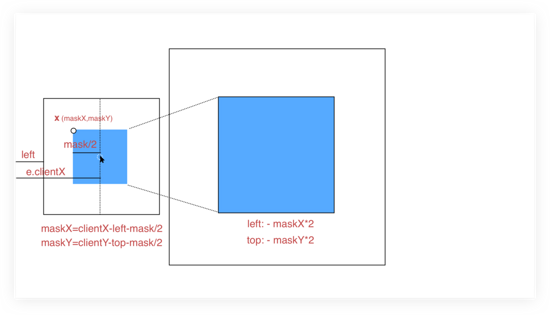
相信原理圖已經畫的很明白了, 圖中,左側框是小圖框,其藍色區域為圖片遮罩層(需放大區域),右側框是整個大圖目前所在區域,其藍色區域是放大區域,設置超出隱藏,就實現了放大遮罩區域的效果。
顯然,兩塊藍色區域存在著某種對應關系,即遮罩的左上角位置(相對于小圖,以下稱 X 坐標)和放大區域(相對于大圖)的左上角位置是成比例的,即放大倍數。計算出 X 坐標后,適當調整背景圖的位置,使大圖向反方向移動 scale 倍的 X 坐標即可。
X 坐標為(maskX,maskY),以計算 maskX 為例:
鼠標移動中會產生 e.clientX ,標識鼠標與瀏覽器左側的距離,小圖與瀏覽器左側的距離是 left ,由于遮罩始終是一個以鼠標為中心的正方形,所以:
maskX = e.clientX - left - mask/2
同理,
maskY = e.clientY - top - mask/2
大圖的對應樣式設置為:
{
 left: - maskX * scale + 'px';
 top: - maskY * scale + 'px';
}
效果演示
圖2 長圖展示
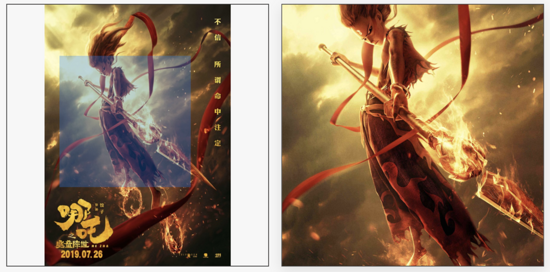
圖3 寬圖展示
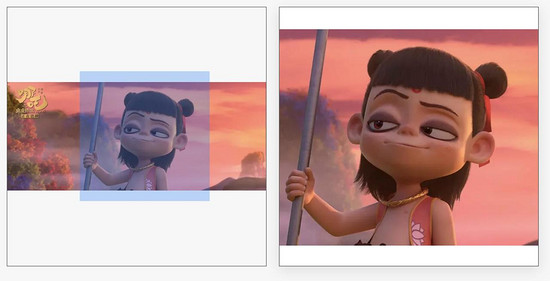
圖4 兩倍放大效果圖
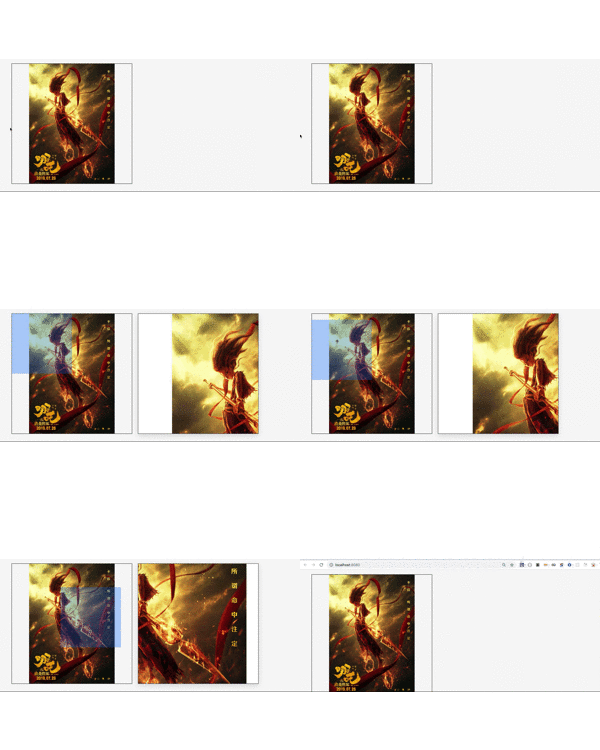
圖5 四倍放大效果圖
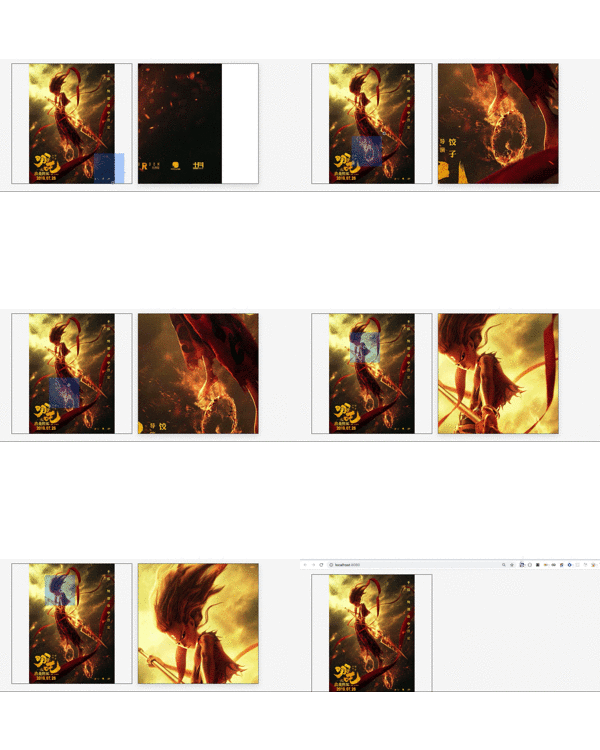
核心代碼
HTML
一般放大鏡實現的是 1:1 等寬等高的正方形圖片,這里兼容了其他比例的圖片,設置圖片為垂直居中對齊,包括小圖,大圖。如果小圖不夠充滿整個小圖框,余留下的空白部分也可以有放大效果,只不過放大結果依然是空白。 這樣只需計算背景圖的移動距離,不用過多的關注圖片定位問題。
<template>
 <div class="magnifier">
 <!-- 小圖 -->
 <div class="small-box" @mouseover="handOver" @mousemove="handMove" @mouseout="handOut">
  <img class="smallPic" :src="`${src}?x-oss-process=image/resize,l_836`" />
  <div class="magnifier-zoom"
  v-show="showMask"
  :style="{
   background: configs.maskColor,
   height: configs.maskWidth + 'px',
   width: configs.maskHeight + 'px',
   opacity: configs.maskOpacity,
   transform: transformMask
  }"
  ></div>
 </div>
 <!-- 大圖, 注意誤差 -->
 <div class="magnifier-layer"
  v-show="showMagnifier"
  :style="{
  width: configs.width + 'px',
  height: configs.height + 'px',
  left: configs.width + 20 + 'px'
  }"
 >
  <div class="big-box"
  :style="{
   width: bigWidth + 'px',
   height: bigHeight + 'px',
   left: moveLeft,
   top: moveTop
  }"
  >
  <div class="big-box-img"
   :style="{
   width: bigWidth - 2 + 'px',
   height: bigHeight - 2 + 'px'
   }"
  >
   <img
   :src="bigSrc"
   :style="{
    maxWidth: bigWidth - 2 + 'px',
    maxHeight: bigHeight -2 + 'px'
   }"
   />
  </div>
  </div>
 </div>
 </div>
</template>
JS
這里主要有三個事件函數。
handOver:鼠標進入到小圖框上的事件,此時顯示遮罩和放大區域,并計算小圖框的位置信息。
handOver() {
 // 計算小圖框在瀏覽器中的位置
 this.imgObj = this.$el.getElementsByClassName('small-box')[0];
 this.imgRectNow = this.imgObj.getBoundingClientRect();
 this.showMagnifier = true;
 this.showMask = true;
}
handMove:鼠標在小圖上的移動事件,此事件發生在 handOver 之后,計算數據,移動遮罩以及背景圖;
handMove(e) {
 // 計算初始的遮罩左上角的坐標
 let objX = e.clientX - this.imgRectNow.left;
 let objY = e.clientY - this.imgRectNow.top;

 // 計算初始的遮罩左上角的坐標
 let maskX = objX - this.configs.maskWidth / 2;
 let maskY = objY - this.configs.maskHeight / 2;

 // 判斷是否超出界限,并糾正
 maskY = maskY < 0 ? 0 : maskY;
 maskX = maskX < 0 ? 0 : maskX;
 if(maskY + this.configs.maskHeight >= this.imgRectNow.height) {
 maskY = this.imgRectNow.height - this.configs.maskHeight;
 }
 if(maskX + this.configs.maskWidth >= this.imgRectNow.width) {
 maskX = this.imgRectNow.width - this.configs.maskWidth;
 }

 // 遮罩移動
 this.transformMask = `translate(${maskX}px, ${maskY}px)`;

 // 背景圖移動
 this.moveLeft = - maskX * this.configs.scale + "px";
 this.moveTop = - maskY * this.configs.scale + "px";
}
handOut:鼠標離開小圖事件,此時無放大鏡效果,隱藏遮罩和放大區域。
handOut() {
 this.showMagnifier = false;
 this.showMask = false;
}
以上三個事件基本上就實現了圖片的放大鏡功能。
但仔細看,你會發現每次移入小圖框都會觸發一次 handOver 事件,并且計算一次小圖框 DOM (imgObj) 。
為了優化此問題,可以用 init 標識是否是頁面加載后首次觸發 handOver 事件,如果是初始化就計算imgObj 信息,否則不計算。
handOver() {
 if (!this.init) {
 this.init = true;
 // 原 handOver 事件
 ...
 }
 this.showMagnifier = true;
 this.showMask = true;
},
在測試的過程中,發現頁面滾動后,會出現遮罩定位錯誤的情況,原來是因為初始化時,我們固定死了小圖框的位置信息(存放在 this.imgRectNow ),導致 handMove 事件中的移動數據計算錯誤。
解決這個問題有兩種方案:
監聽 scroll 事件,更新 this.imgRectNow;
在 handMove 事件中更新 this.imgRectNow。
這里選擇了第二種。
handMove(e) {
 // 動態獲取小圖的位置(或者監聽 scroll )
 let imgRectNow = this.imgObj.getBoundingClientRect();
 let objX = e.clientX - imgRectNow.left;
 let objY = e.clientY - imgRectNow.top;
 // 原 handMove 事件剩余內容
 ...
},
綜合以上,我們已經實現了一個完美的圖片放大鏡功能。最終的 js 如下所示:
data() {
 return {
 imgObj: {},
 moveLeft: 0,
 moveTop: 0,
 transformMask:`translate(0px, 0px)`,
 showMagnifier:false,
 showMask:false,
 init: false,
 };
},
computed: {
 bigWidth(){
 return this.configs.scale * this.configs.width;
 },
 bigHeight(){
 return this.configs.scale * this.configs.height;
 }
},
methods: {
 handMove(e) {
 // 動態獲取小圖的位置(或者監聽 scroll )
 let imgRectNow = this.imgObj.getBoundingClientRect();
 let objX = e.clientX - imgRectNow.left;
 let objY = e.clientY - imgRectNow.top;

 // 計算初始的遮罩左上角的坐標
 let maskX = objX - this.configs.maskWidth / 2;
 let maskY = objY - this.configs.maskHeight / 2;

 // 判斷是否超出界限,并糾正
 maskY = maskY < 0 ? 0 : maskY;
 maskX = maskX < 0 ? 0 : maskX;
 if(maskY + this.configs.maskHeight >= imgRectNow.height) {
  maskY = imgRectNow.height - this.configs.maskHeight;
 }
 if(maskX + this.configs.maskWidth >= imgRectNow.width) {
  maskX = imgRectNow.width - this.configs.maskWidth;
 }

 // 遮罩移動
 this.transformMask = `translate(${maskX}px, ${maskY}px)`;

 // 背景圖移動
 this.moveLeft = - maskX * this.configs.scale + "px";
 this.moveTop = - maskY * this.configs.scale + "px";
 },
 handOut() {
 this.showMagnifier = false;
 this.showMask = false;
 },
 handOver() {
 if (!this.init) {
  this.init = true;
  this.imgObj = this.$el.getElementsByClassName('small-box')[0];
 }
 this.showMagnifier = true;
 this.showMask = true;
 }
}
使用方法
本示例中的固定參數:小圖框:420 * 420 。
程序可接受參數:
// 小圖地址
src: {
 type: String,
},
// 大圖地址
bigSrc: {
 type: String,
},
// 配置項
configs: {
 type: Object,
 default() {
 return {
  width:420,//放大區域
  height:420,//放大區域
  maskWidth:210,//遮罩
  maskHeight:210,//遮罩
  maskColor:'rgba(25,122,255,0.5)',//遮罩樣式
  maskOpacity:0.6,
  scale:2,//放大比例
 };
 }
}
文中圖 2 是一張長圖,小圖的最大邊不超過 836px(二倍圖) ,大圖為了視覺效果,分辨率盡量高點,程序會根據配置項自動設置對應的 height , width ,長圖與寬圖的效果對比可參考圖3。
配置項可根據應用場景自行設置,本文示例的配置項是 2 倍放大,效果可參考圖 4,四倍放大效果可參考圖 5。
以上是“基于Vue如何實現商品主圖放大鏡功能”這篇文章的所有內容,感謝各位的閱讀!希望分享的內容對大家有幫助,更多相關知識,歡迎關注億速云行業資訊頻道!
免責聲明:本站發布的內容(圖片、視頻和文字)以原創、轉載和分享為主,文章觀點不代表本網站立場,如果涉及侵權請聯系站長郵箱:is@yisu.com進行舉報,并提供相關證據,一經查實,將立刻刪除涉嫌侵權內容。