溫馨提示×
您好,登錄后才能下訂單哦!
點擊 登錄注冊 即表示同意《億速云用戶服務條款》
您好,登錄后才能下訂單哦!
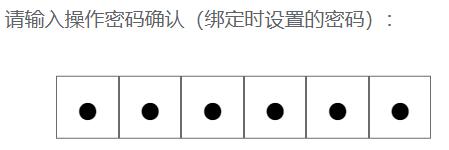
小編這次要給大家分享的是vue怎么實現輸入框自動跳轉功能,文章內容豐富,感興趣的小伙伴可以來了解一下,希望大家閱讀完這篇文章之后能夠有所收獲。
<template>
 <div class="inputClass">
  <div v-for="(item,index) in list" :key="index">
   <input v-model="item.value" type="password" class="inputBorder"    @keyup="jumpNext($event,index,item.value)"
    @keydown="replaceValue(index)">
  </div>
 </div>
</template>
JS:
jumpNext(event, index, val) {
    if (!/[0-9]/.test(val)) {
     this.list[index].value = "";
     this.$message({
      type: 'warning',
      message: '該密碼僅為數字'
     })
     return
    }
    let flag = document.getElementsByClassName("inputBorder"),
     currInput = flag[index],
     nextInput = flag[index + 1],
     lastInput = flag[index - 1];
    if (event.keyCode != 8) {
     if (index < (this.list.length - 1)) {
      nextInput.focus();
     } else {
      currInput.blur();
     }
    } else {
     if (index != 0) {
      lastInput.focus();
     }
    }
    if (index == 0) {
     this.num1 = event.key + ''
    } else if (index == 1) {
     this.num2 = event.key + ''
    } else if (index == 2) {
     this.num3 = event.key + ''
    } else if (index == 3) {
     this.num4 = event.key + ''
    } else if (index == 4) {
     this.num5 = event.key + ''
    } else if (index == 5) {
     this.num6 = event.key + ''
    }
    let str = this.num1 + this.num2 + this.num3 + this.num4 + this.num5 + this.num6
    if (str.length == 6) {
     let params = str
     setUpSVIP(params).then(res => {
      // this.superVipVisible = false
     }).catch(err => {
      // this.superVipVisible = false
      this.$message({
       type: 'error',
       message: '設置超級VIP失敗'
      })
     })
    }
   },
   /*當鍵盤按下的時候清空原有的數*/
   replaceValue(index) {
    this.list[index].value = "";
   }
CSS:
.inputBorder {
  background: #ffffff;
  width: 50px;
  font-size: 50px;
  height: 50px;
  margin-left: 0px;
  margin-right: 0px;
  text-align: center;
  border: 1px solid #706969;
    }
.inputClass {
  margin-top: 31px;
  display: flex;
  justify-content: center;
}
看完這篇關于vue怎么實現輸入框自動跳轉功能的文章,如果覺得文章內容寫得不錯的話,可以把它分享出去給更多人看到。
免責聲明:本站發布的內容(圖片、視頻和文字)以原創、轉載和分享為主,文章觀點不代表本網站立場,如果涉及侵權請聯系站長郵箱:is@yisu.com進行舉報,并提供相關證據,一經查實,將立刻刪除涉嫌侵權內容。