您好,登錄后才能下訂單哦!
您好,登錄后才能下訂單哦!
| 系統 | IP地址 | 主機名 | 所運行的服務 |
|---|---|---|---|
| Centos 7 | 192.168.1.6 | gitlab | gitlab |
| Centos 7 | 192.168.1.7 | jenkins | jenkins |
| Centos 7 | 192.168.1.8 | nginx | nginx |
[root@gitlab ~]#  yum -y install  epel-release curl openssh-server openssh-clients postfix cronie policycoreutils-python patch
#安裝所需依賴
[root@gitlab ~]#  wget https://mirrors.tuna.tsinghua.edu.cn/gitlab-ce/yum/el7/gitlab-ce-12.3.5-ce.0.el7.x86_64.rpm
#對gitlab的版本并沒有什么特殊的限制
[root@gitlab ~]# yum -y localinstall gitlab-ce-12.3.5-ce.0.el7.x86_64.rpm
[root@gitlab ~]# vim /etc/gitlab/gitlab.rb                #便于使用URL路徑訪問
external_url 'http://192.168.1.6'
#下載 中文補丁包
[root@gitlab ~]# head -1 /opt/gitlab/version-manifest.txt           #查看gitlab的版本
gitlab-ce 12.3.5
[root@gitlab ~]# git clone https://gitlab.com/xhang/gitlab.git -b v12.3.5-zh
[root@gitlab ~]# cd gitlab/
[root@gitlab gitlab]#  git diff v12.3.5 v12.3.5-zh > /root/v12.3.5-zh.dif
[root@gitlab gitlab]# patch -d /opt/gitlab/embedded/service/gitlab-rails -p1 <  ../v12.3.5-zh.diff
 #將剛才的diff文件做為補丁導入到gitlab中
#該命令執行過程中,一路回車跳過即可
[root@gitlab ~]# gitlab-ctl  start                 # 啟動gitlab
[root@gitlab ~]# gitlab-ctl reconfigure      #重新配置gitlab
web頁面訪問測試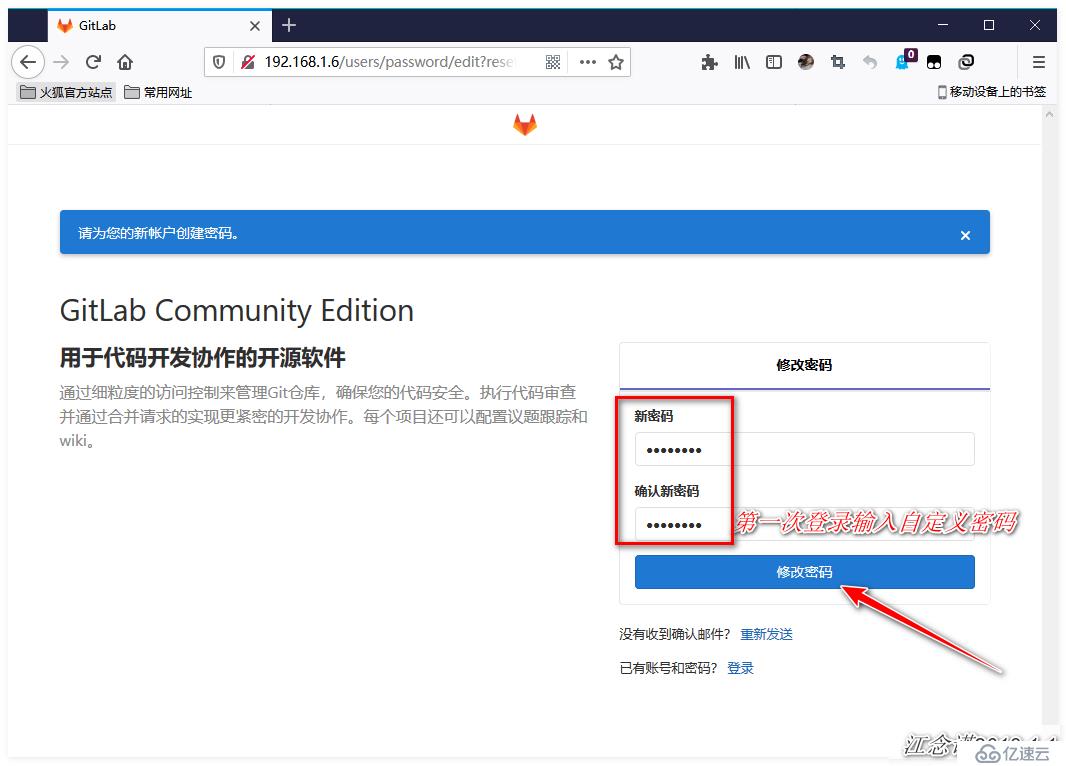
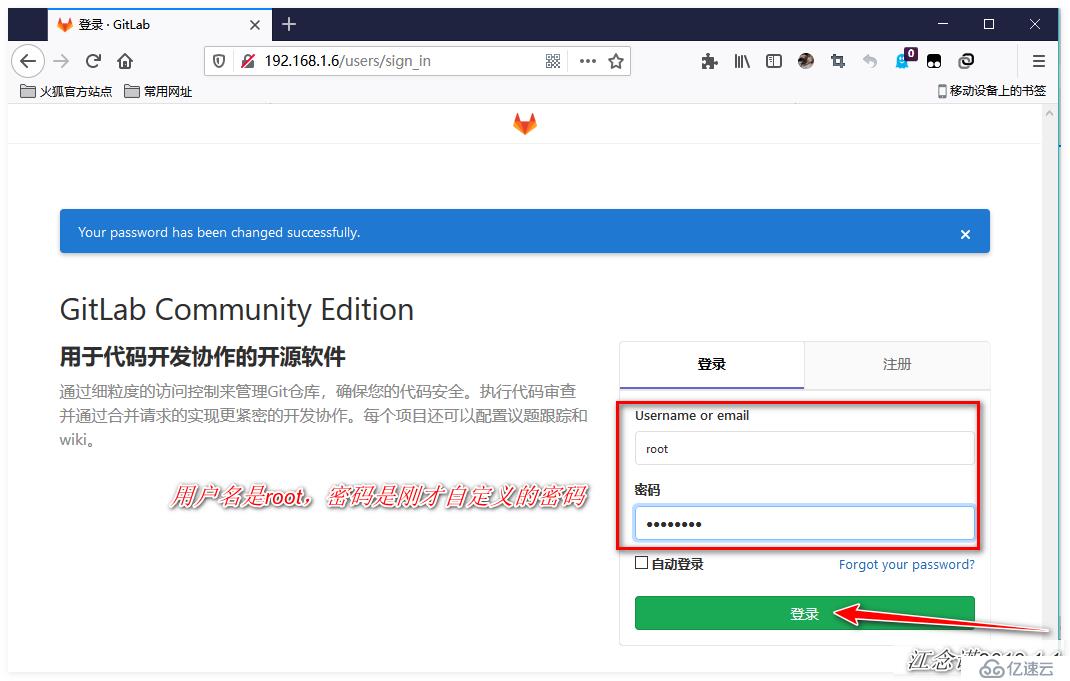

可以看出gitlab的網站頁面已經漢化!
[root@gitlab ~]# ssh-keygen
[root@gitlab ~]#  cat ~/.ssh/id_rsa.pub
ssh-rsa AAAAB3NzaC1yc2EAAAADAQABAAABAQCuWnEReFVhIiODuTO/NzdjuvPMY0tQ89NuYGtMxDJJAXnbChK8dbe0Iu4GNHY9zeSP0OaYJvVV9Nu/qtcZqgg+zKgLohdoI5QKXWcZ1JT/kNpIbnVnUYE0/AYZ8nMbjNiUsSD5BaDy+t9uuRxh+QCOrZDkYZw1EZioDpDoSR1XzrOac69QIag2XUU04rmWkR9/fbfwGzusTzfO2thk3vcZn+DzLqJqYy9ufkZeTGlqJnVC6//caakMtY475NSUKnGT+YoRsStXXI/9CVrpY8cPZ5eiFs34xGZWU1uhsx9UQ50pNeA7iqM6CIKpb4MPtqKDLIb83Bztz1VsfBJRMxer root@gitlab
#本地生成密鑰對,便于ssh登錄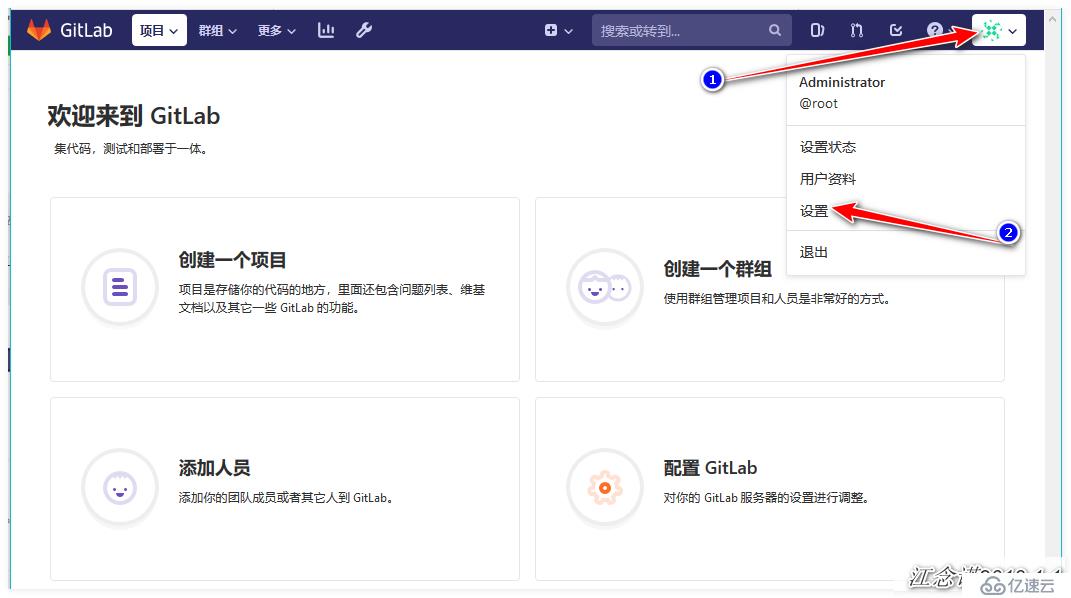

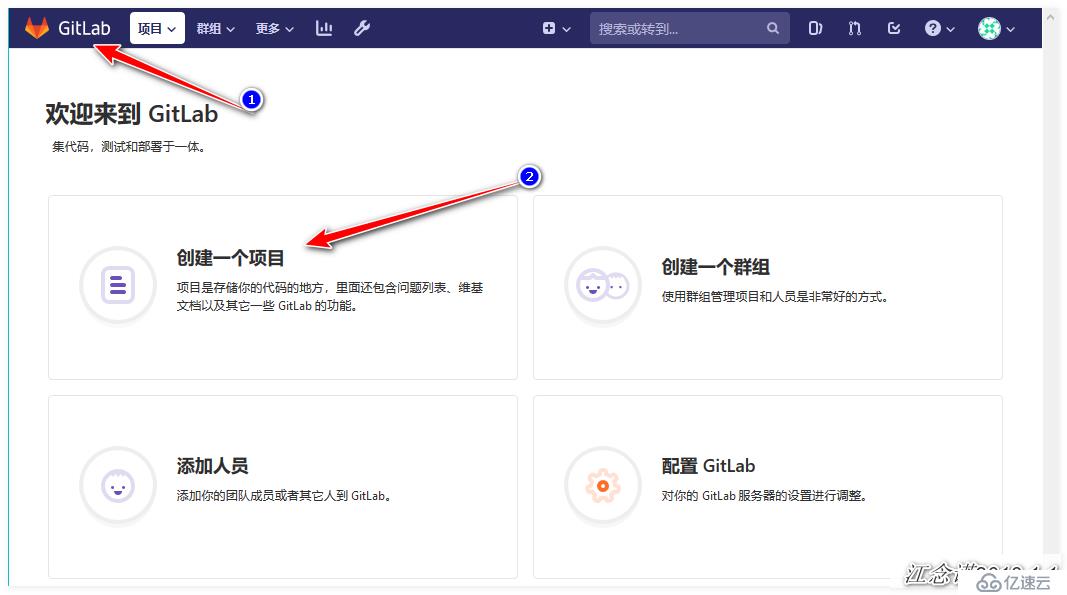
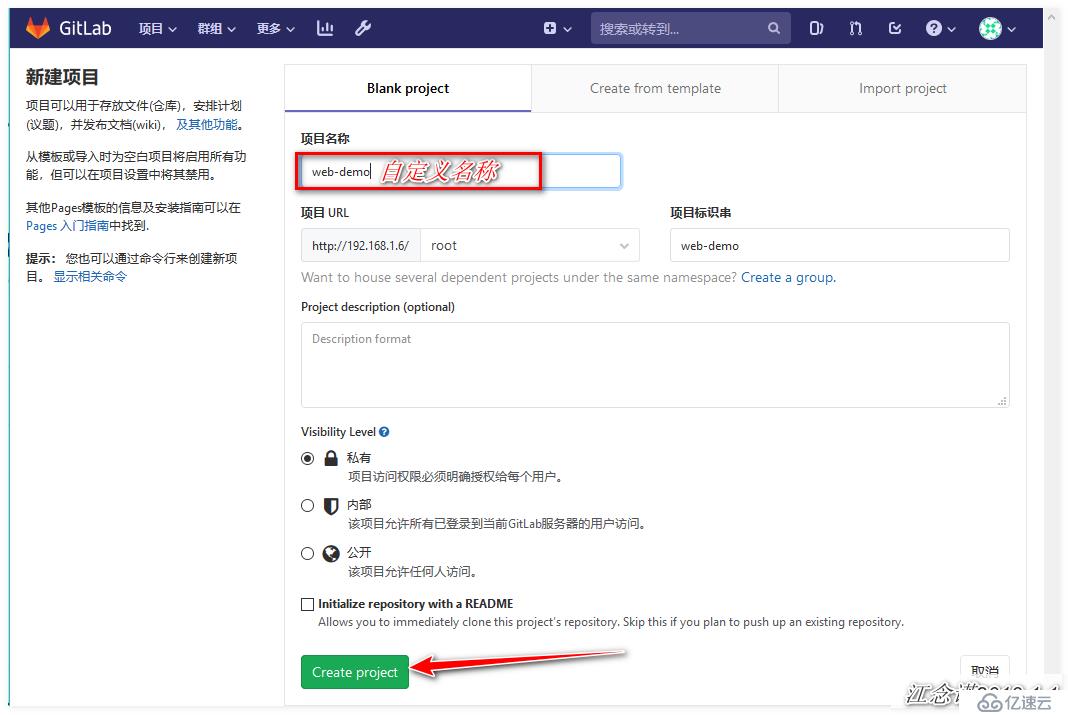

[root@gitlab ~]# git clone git@192.168.1.6:root/web-demo.git
#確認無需輸入密碼[root@jenkins ~]# wget https://mirrors-i.tuna.tsinghua.edu.cn/jenkins/redhat/jenkins-2.172-1.1.noarch.rpm
[root@jenkins ~]# yum -y localinstall jenkins-2.172-1.1.noarch.rpm
#獲取Jenkins軟件包,并安裝
[root@jenkins ~]# systemctl start jenkins #啟動Jenkinsweb頁面訪問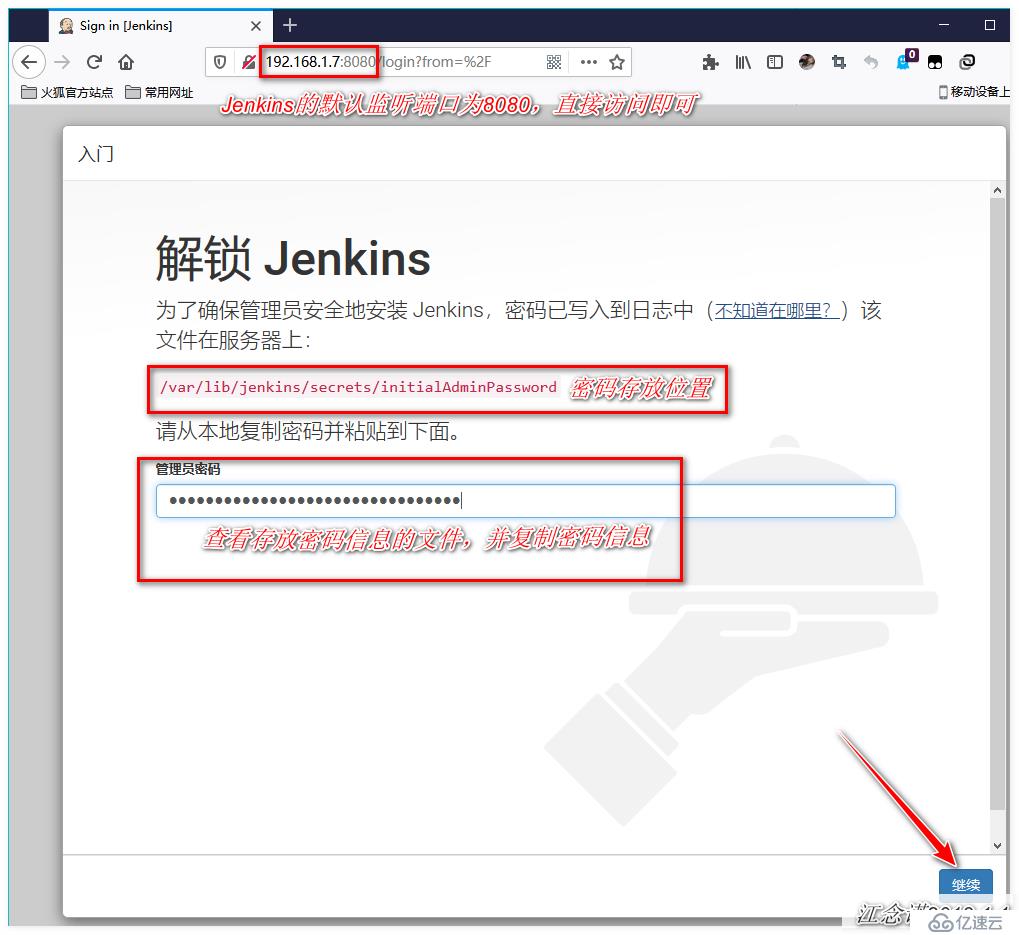
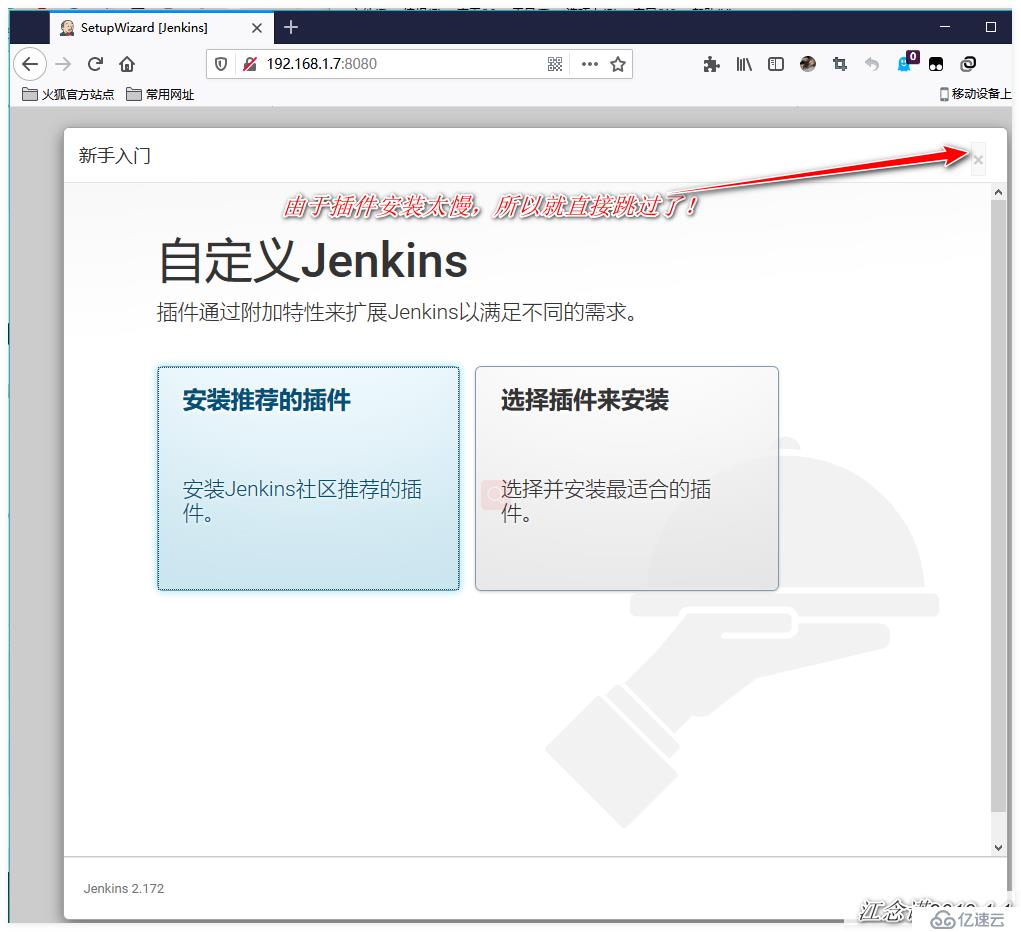


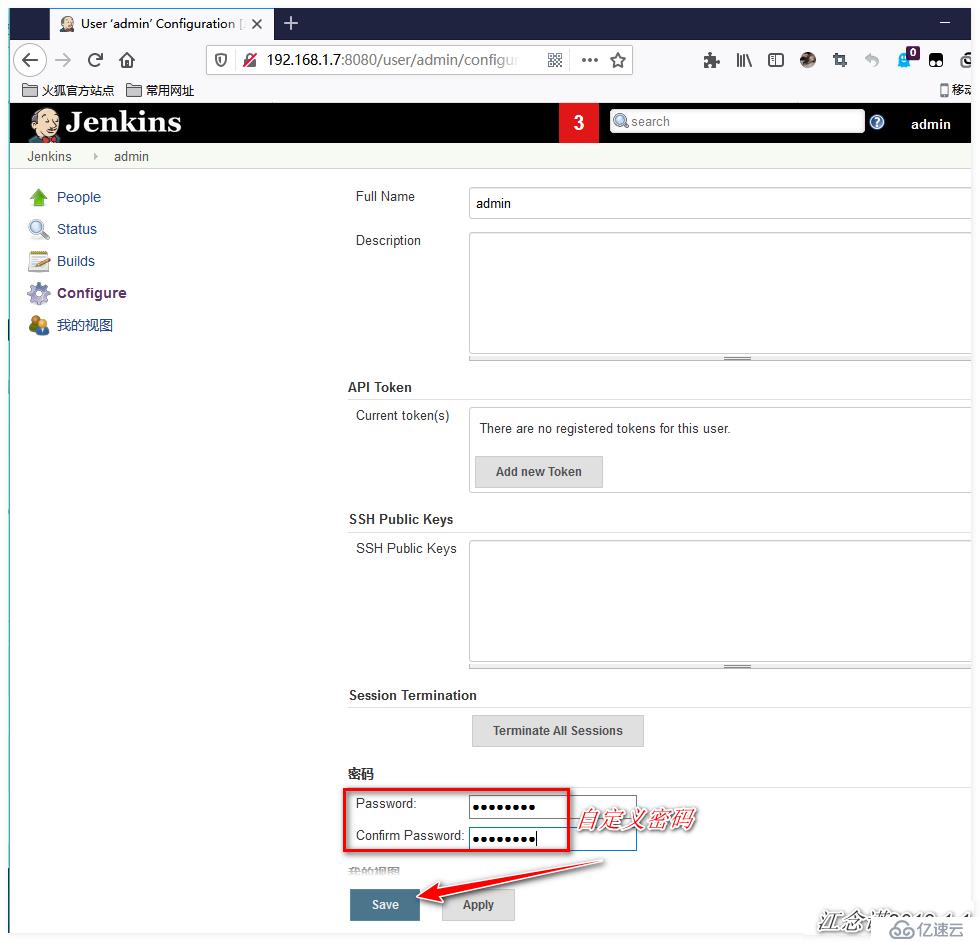
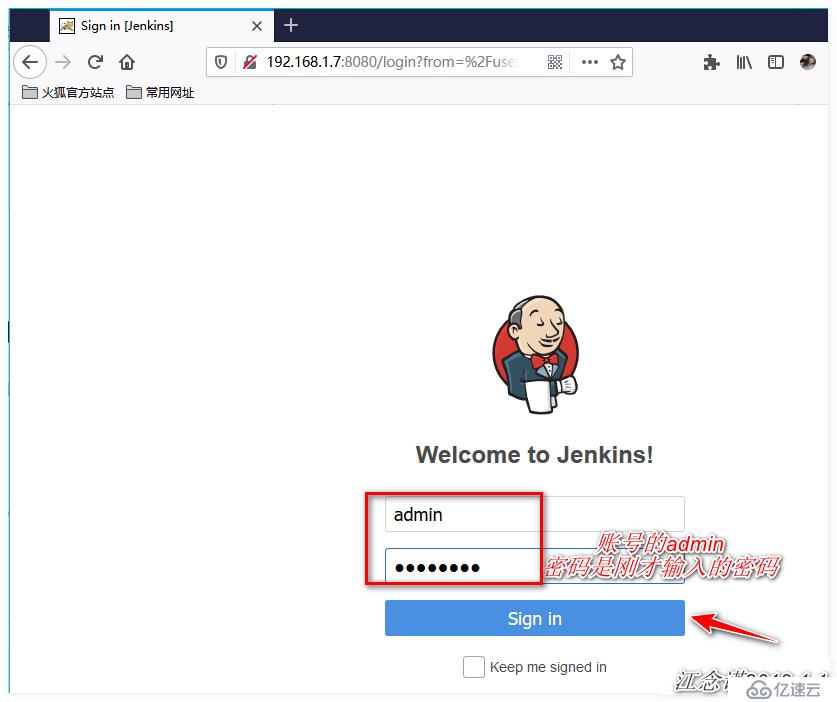
由于剛才跳過了插件安裝,,所以需要自己手動安裝,下載本人提供的插件軟件包,下載鏈接:https://pan.baidu.com/s/16fxH1J0WO6tW1bhPwmd60w
提取碼:432n
[root@jenkins ~]# rm -rf /var/lib/jenkins/plugins/           #將安裝產生的插件目錄進行刪除
[root@jenkins ~]# tar zxf jenkins-plugins.tar.gz -C /var/lib/jenkins/
#將插件軟件包解壓到指定的位置
[root@jenkins ~]# sed -i 's/http:\/\/updates.jenkinsci.org\/download/https:\/\/mirrors.tuna.tsinghua.edu.cn\/jenkins/g' /var/lib/jenkins/updates/default.json && sed -i 's/http:\/\/www.google.com/https:\/\/www.baidu.com/g' /var/lib/jenkins/updates/default.json
#將jenkins下載插件的路徑,更改為國內源
[root@jenkins ~]# systemctl restart jenkins          #重新啟動Jenkins
再次訪問web頁面: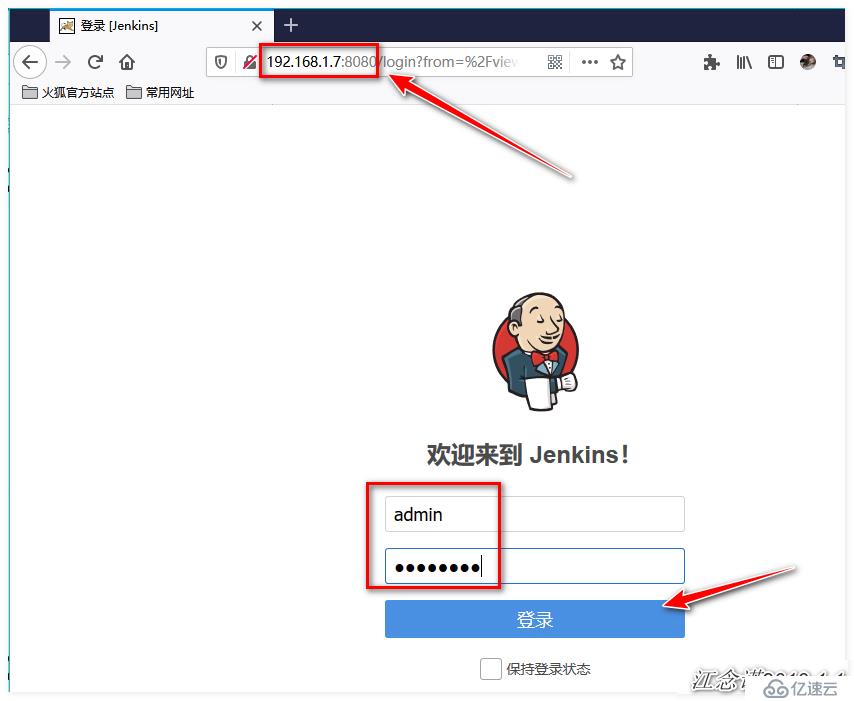
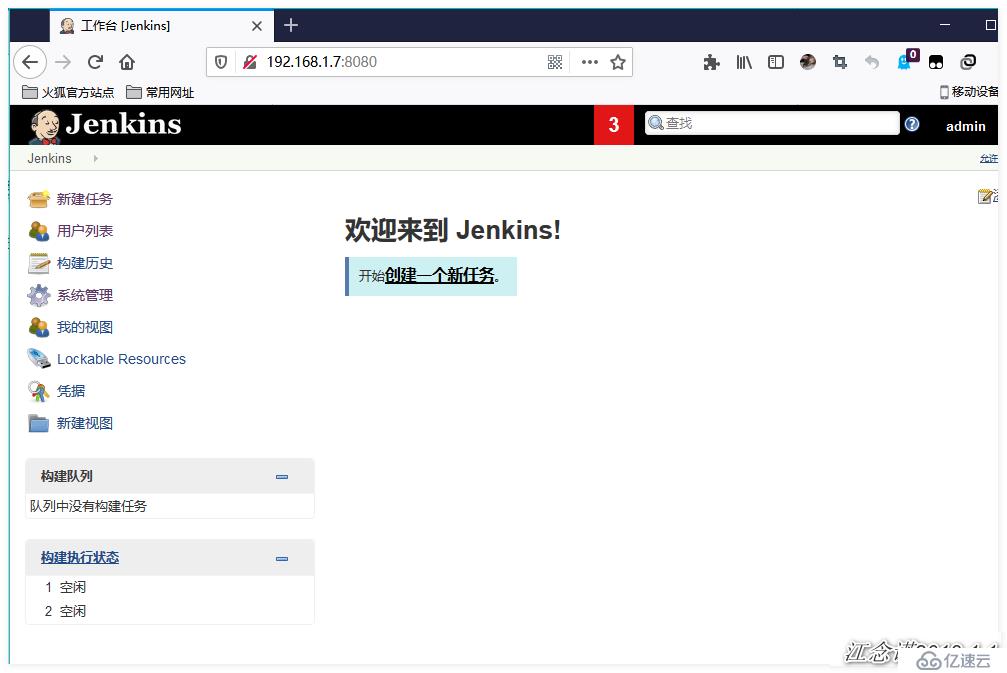
再次訪問Jenkins,可以發現已經變成中文了,因為插件中包含了中文插件!
[root@jenkins ~]# ssh-keygen     #Jenkins服務生成密鑰對
[root@jenkins ~]# cat ~/.ssh/id_rsa.pub      #查看公鑰信息
ssh-rsa AAAAB3NzaC1yc2EAAAADAQABAAABAQDbcFk7tkBes+S6BIVLxzLVj8X7bThDYscpY6uBeauHp+tPTL6CRVQDOlUcMRsyaX7o+a26iPd+yhJUaB+qT4iW1cVjhEiuKiR2NJSJdnEqccgcXWPJzIe+Owj76ofBtIhKqLGzwnYj6Lj0KmjUhn7tASu1bZ8hWubJ2ZQUottOW8KqjvHIb7q8OsGty9tsLVV3gD1XF1cE1s9rXY7XUFxDwtu1kfiA2XhSyJ3EmTWFlFlvaqzhQDBELWSVBz/4CihAfIp2eW7nx8TPXG0d0j+OwQYcccsarwkjHuc2IYRv4gVAhtRyXj8VQ7+LBsjYjfIMBTw4CFwQSTfZnWaa6Fcf root@jenkins
將公鑰信息存放在gitlab上: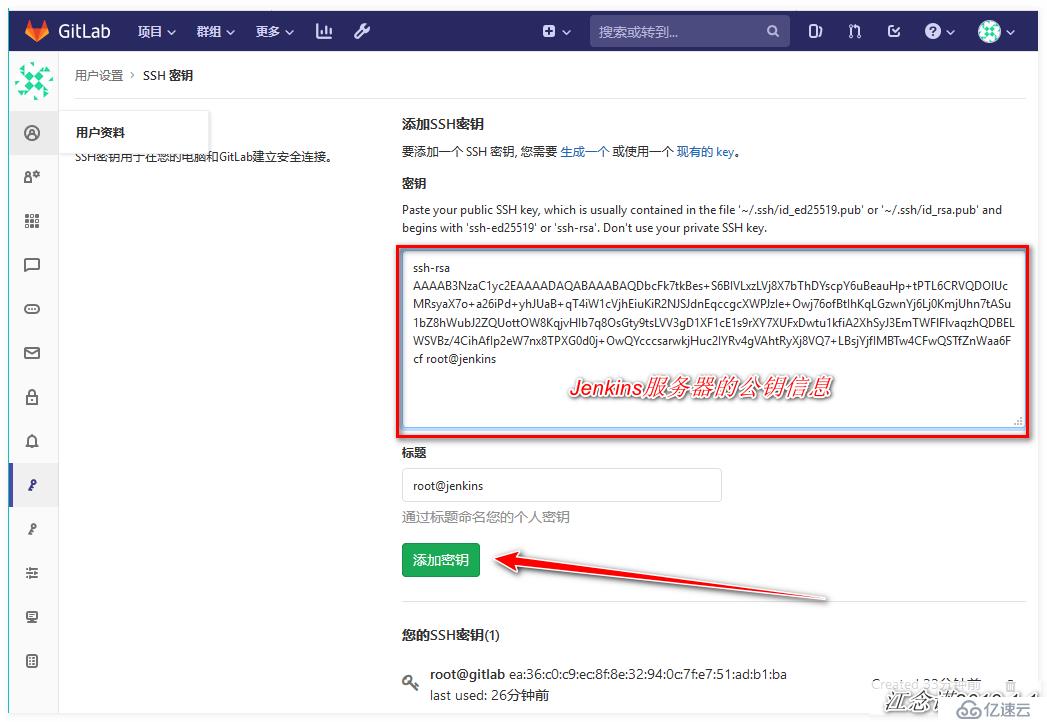
[root@jenkins ~]# cat ~/.ssh/id_rsa
#查看Jenkins服務器的私鑰信息,需要將私鑰信息存放在Jenkins的web頁面上
-----BEGIN RSA PRIVATE KEY-----
MIIEpAIBAAKCAQEA23BZO7ZAXrPkugSFS8cy1Y/F+204Q2LHKWOrgXmrh7frT0y+
gkVUAzpVHDEbMml+6Pmtuoj3fsoSVGgfqk+IltXFY4RIriokdjSUiXZxKnHIHF1j
ycyHvjsI++qHwbSISqixs8J2I+i49Cpo1IZ+7QErtW2fIVrmydmUFKLbTlvCqo7x
yG+6vDrBrcvbbC1Vd4A9VxdXBNbPa12O11BcQ8LbtZH4gNl4UsidxJk1hZRZb2qs
4UAwRC1klQc/+AooQHyKdnlu58fEz1xtHdI/jsEGHHHLGq8JIx7nNiGEb+IFQIbU
cl4/FUO/iwbI2I3yDAU8OAhcEEk32Z1mmuhXHwIDAQABAoIBAQDXcb6qeY1JbaWr
XLTiaXjnZHklGV6cCmcvo8PHIwXd8md9PAPvMtIBOUxGmY/yNtF7O2fuNHuJ6CuG
45PzSpL4RHm/8yjIlmemBomvTLJe0cd+0dIfVsgPZTa03tbav7zwUB/oNYx4RQ0R
7HFv93y2hOe9ARuzS+Q7WXuhpyNaEbvsqQGaeyw0xnBZyopv12CJRtT5PoITeEgv
0meaDiXttkUZd1r3MLutAHsBpvuAUypoOppsUvbJ6Gsv3j4pd6aOHVEomEMaTZf7
hRLNihnTfbj0t3yz/wKZ1FfamHbjRNnML1R+vnv4zEdPFmCJG3mAABQOgja2vwvk
Rxq3/L5BAoGBAO3/ar7ClBgFc09cqz8+jbIOI9pXdP5SoZh9S8B61qi6Nxie192C
nHLc7qjFNCudOBV25+l98ZLCElWjiMcpAD/AH125dE15K+U0qBn0fJvegMWAiTHV
9Av9m39oSnnuu8tVW/AbWjV86EzCRLcpQ+Q5i45HK+d/UIUv8BHGxqG9AoGBAOwJ
juWRuh/+KSw6jJa52sZjkg6m0VAQB7dsQssIhQhQbZvgaLur2bQlf6iJPOHGLnPs
ZVe/LP3VwVgd6+hWo3uPVwjgHyblfLQva7rRXyilv84UMDVHrP1dsg9bEEuckit2
1A9ZMzqdUlAkFZ8aSDq4DRAjggIzf7SnoMt1aTQLAoGAFi116f7BxBdF7oBJKOSQ
WaY9qwv5R/W1Pzt1wqLvu9tWZQHwRaD1KTLzPmDaArJs1ns1Eyn8R9uzz60kgsKM
VmR1x8sPTmTbNUmZ3IlOz0uFnmHi5vTz/+YLBm1We1RGxaTXo2E5H8Da+MQlmRfM
TskZ+xEgwzq26yJTcaSfP9UCgYBwbzUkYcBZUQZnzRP/EFUIP5HpbMkz7A7g7q76
a/qCtV0g7Uq2auvvBhXDQGxB19d03NyBac2StGm/AbHIIM0LJIJ+9dOhAZvfcN9O
REGh7SJuletI1fWvUxxoeCZQ/ioajiYBkan3d80n46hw+2IApn+CeoeJaOKiOV88
y5brdQKBgQCZ3pDpf4wKfR2IYDRLHXsxG4s8Td25HNtIt/ejmnGPWYQgDHl2dLpU
RzTTI6lIFaLTEPAVc4VhlfoltFvLSbm8fUoQfHhPEaGJeDzKSLq52oOQtYMZ/iIR
P6KH210ZgZjuJHQOUqeA954epRnbIosgrWz0G7qNjrpoHZkPcWXxmQ==
-----END RSA PRIVATE KEY-----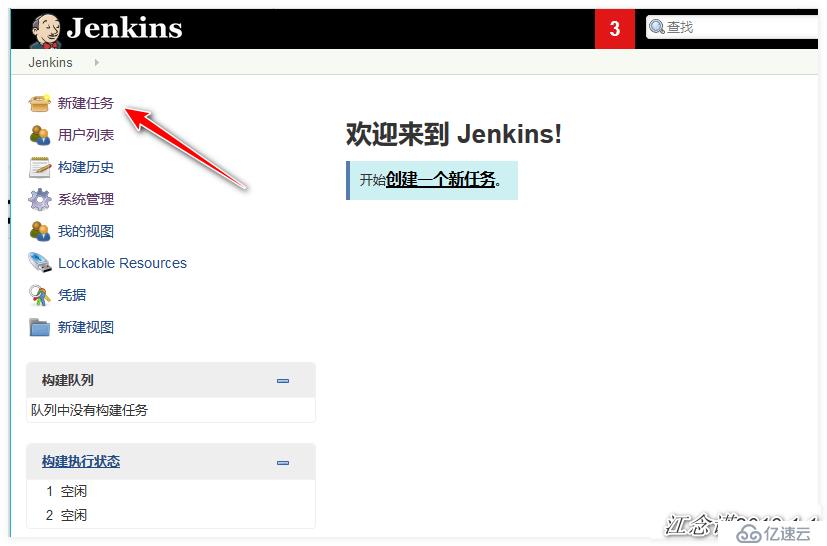
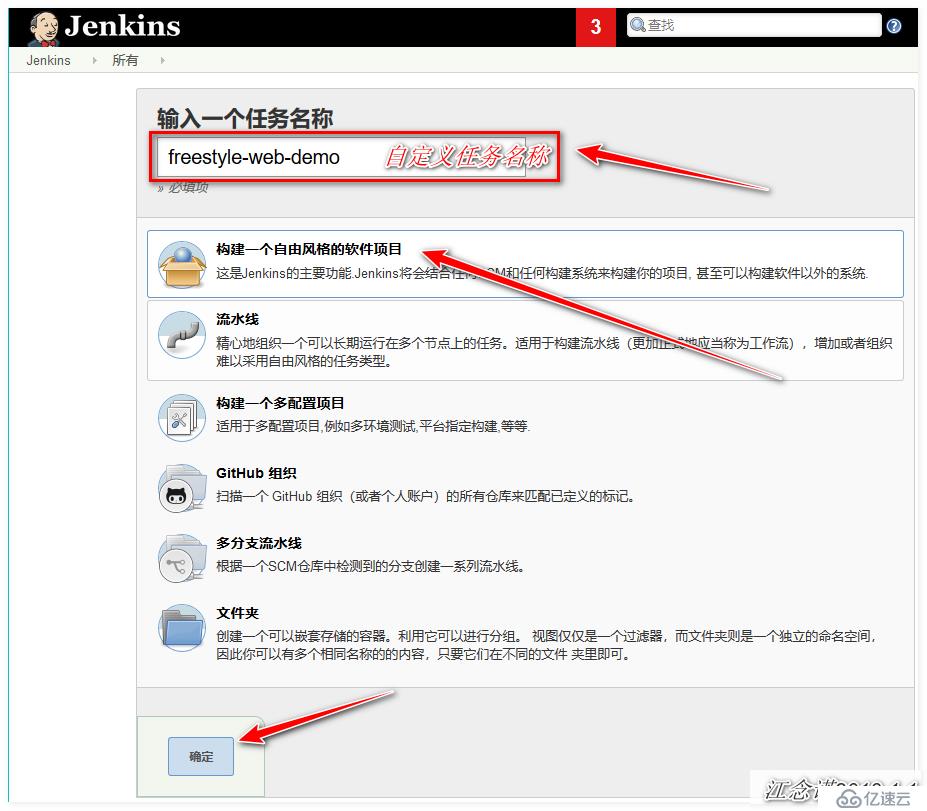
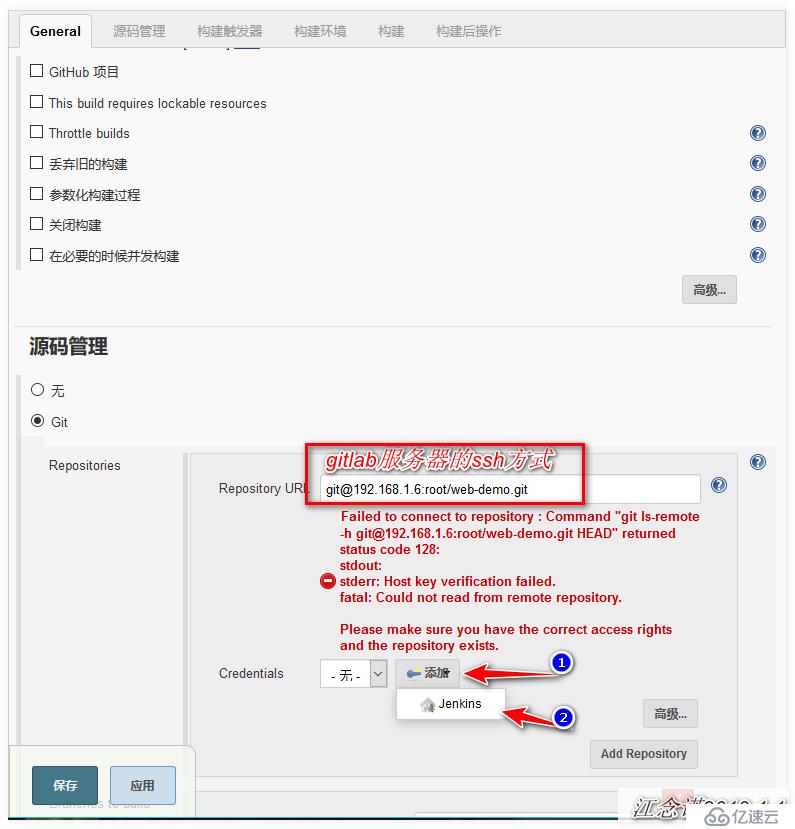

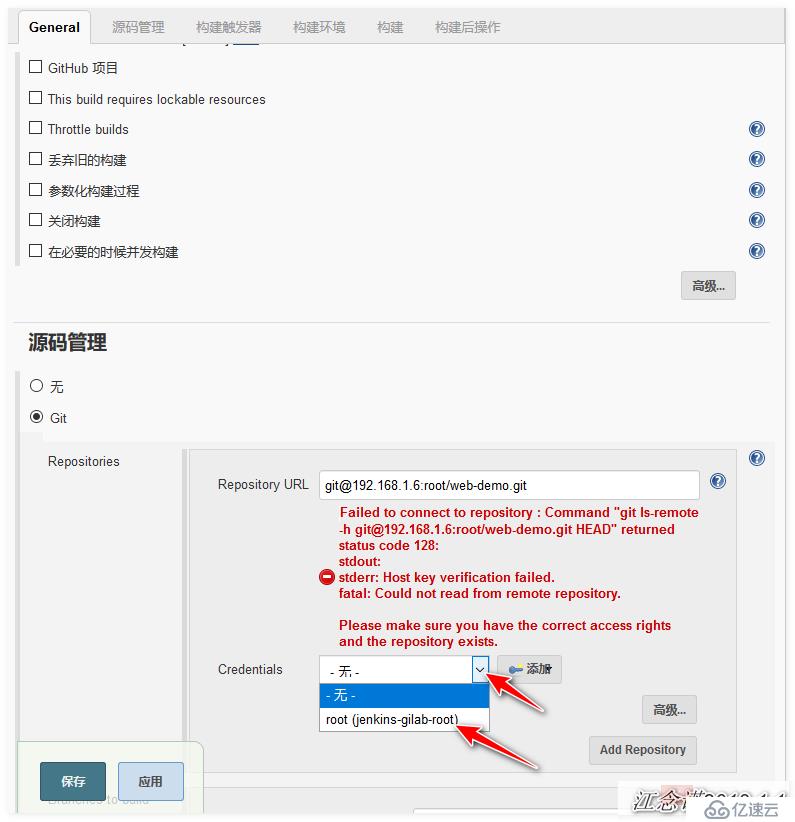
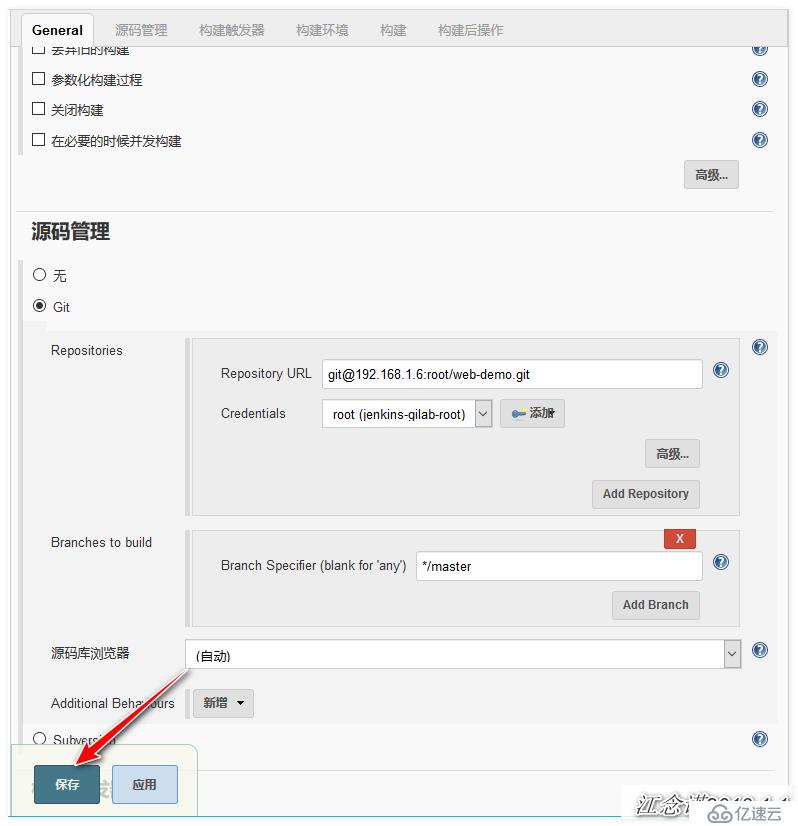
安裝jenkins集成gitlab所需的插件,下載鏈接:https://pan.baidu.com/s/1p_jh8X3ma46SEV_tKLKYbw
提取碼:zoej
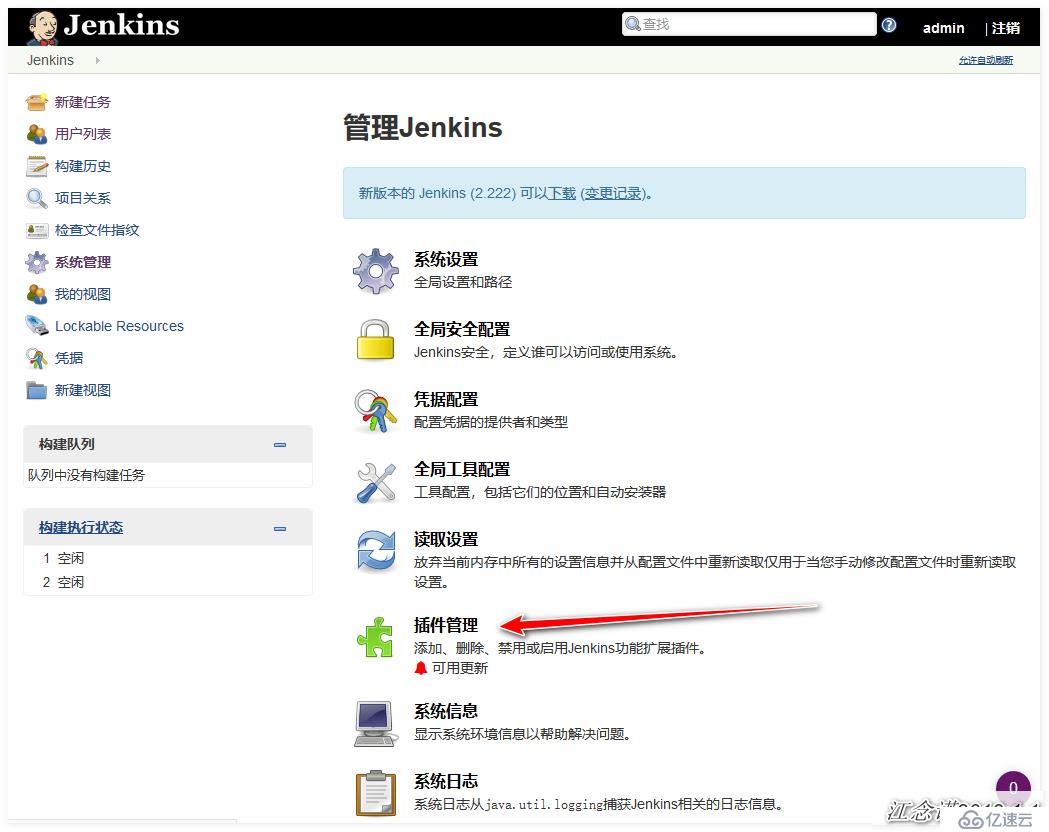
安裝插件,如圖: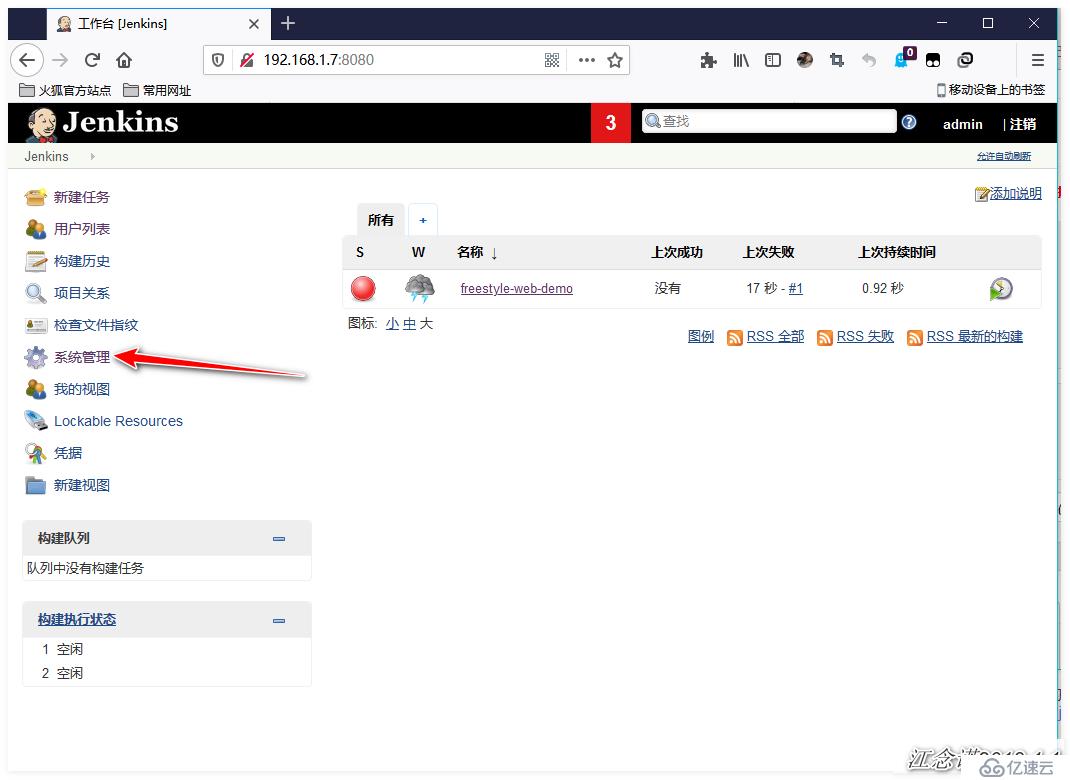
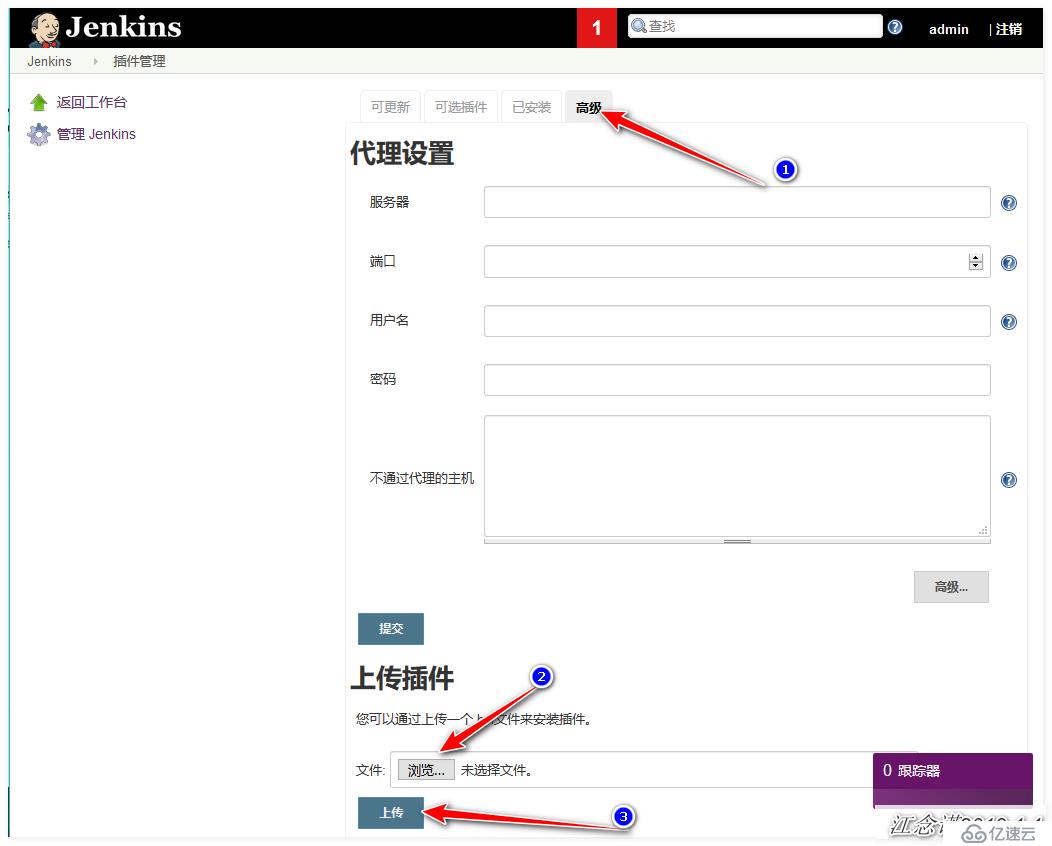
依次上傳我提供的包,順序如下:gitlab-oauth——>gitlab-plugin ——> windows-slaves ——>ruby-runtime ——>gitlab-hook即可!
清華大學Jenkins源:https://mirrors.tuna.tsinghua.edu.cn/jenkins/updates/update-center.json
gitlab服務器提交代碼到gitlab,測試拉取代碼:
[root@gitlab ~]# cd web-demo/
[root@gitlab web-demo]# git config --global user.email "you@example.com"
[root@gitlab web-demo]# git config --global user.name "Your Name"
[root@gitlab web-demo]# echo "123" >> 123.txt
[root@gitlab web-demo]# git add .
[root@gitlab web-demo]# git commit -m '123'
[root@gitlab web-demo]# git push origin master
Jenkins服務器進行構建: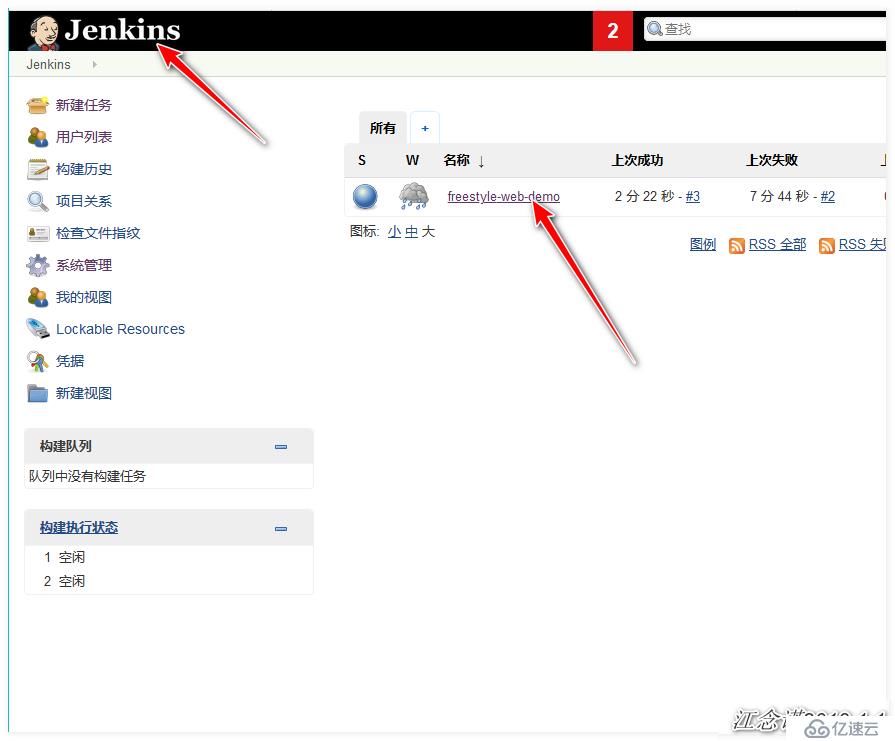
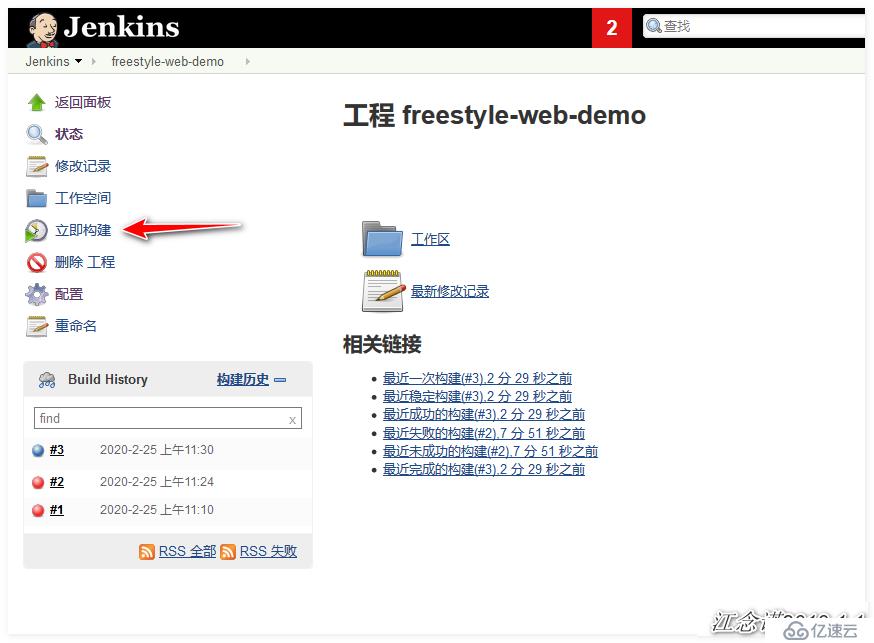
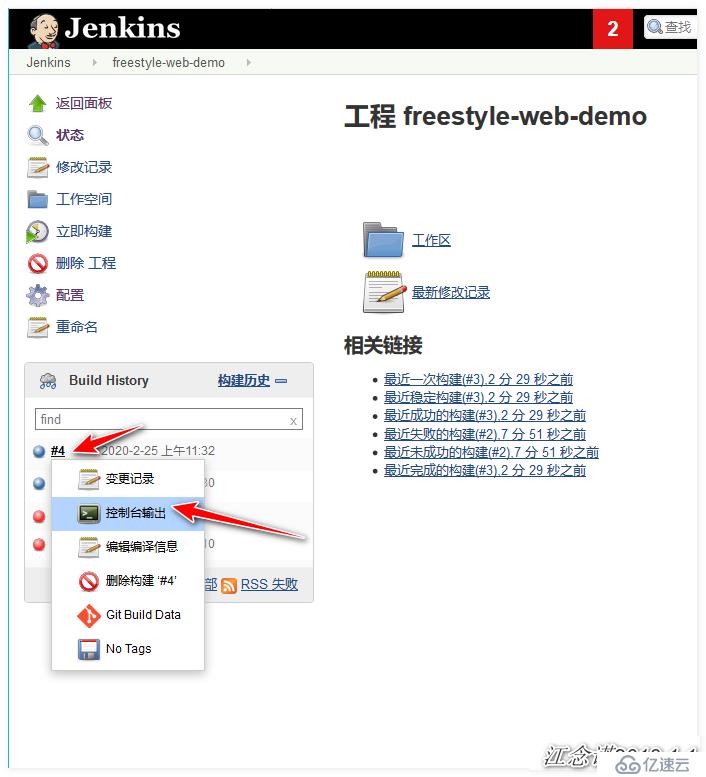
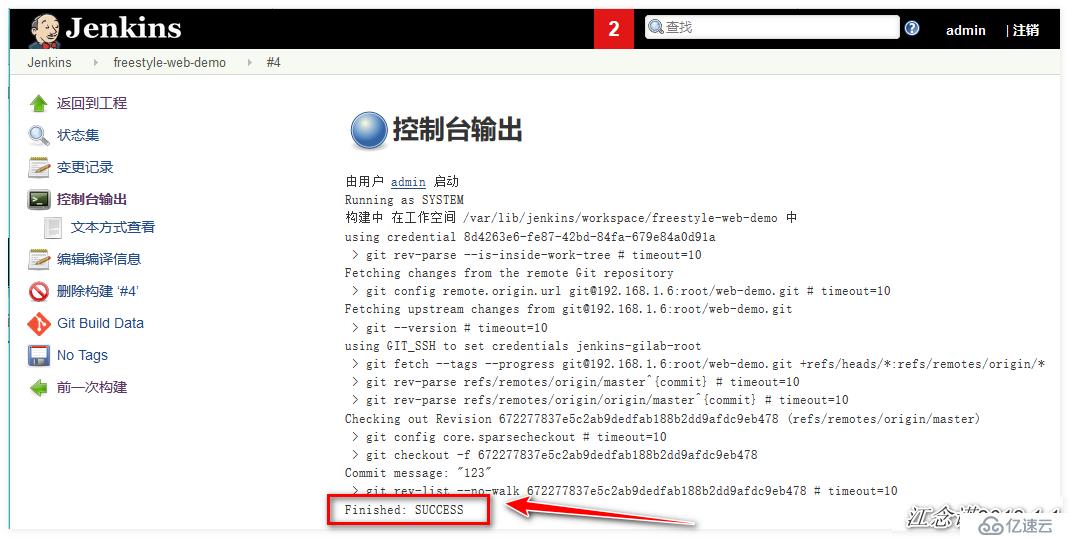
構建成功!
使用Nginx來模擬上線環境!
[root@nginx ~]# yum install -y gcc gcc- c++ autoconf pcre pcre-devel make automake wget httpd-tools vim tree
#由于是最小化安裝的系統,所以安裝一些必要的軟件
[root@nginx ~]# vim /etc/yum.repos.d/nginx.repo
#配置nginx的yum源,Nginx官方也有相應的配置信息
[nginx]
name=nginx_repo
baseurl=http://nginx.org/packages/centos/7/$basearch/
gpgcheck=0
enabled=1
#該yum源默認情況下安裝的是nginx最新的、穩定版
[root@nginx ~]# yum -y install nginx              #安裝nginx
#對nginx的版本沒有要求,只是為了使用訪問效果而已
[root@nginx ~]# rm -rf /etc/nginx/conf.d/default.conf
#刪除默認的配置文件
[root@nginx ~]# vim /etc/nginx/conf.d/server.conf
#新建配置文件
server {
        listen 80;

        location / {
                root /code/web;
                index index.html index.htm;
        }
}
[root@nginx ~]# mkdir -p /code/web
[root@nginx ~]# nginx -t
[root@nginx ~]# systemctl start nginx[root@jenkins ~]#mkdir /scripts && cd /scripts/
[root@jenkins scripts]# vim html_deploy.sh
#!/bin/bash
DATE=$(date +%Y-%m-%d-%H-%M-%S)
web_server="192.168.1.8"
Sdir=/opt
Ddir=/code
#1)進入項目目錄,將內容進行打包,${WORKSPACE}是Jenkins的內置變量,表示構建目錄的絕對路徑
get_code(){
cd ${WORKSPACE} && \
tar zcf ${Sdir}/web-${DATE}.tar.gz ./*
}
#2)將內容通過scp復制到web網頁目錄
scp_web_server(){
for hosts in ${web_server}
do
scp ${Sdir}/web-${DATE}.tar.gz root@${hosts}:/opt
ssh root@${hosts} "mkdir -p ${Ddir}/web-${DATE} && \
tar zxf ${Sdir}/web-${DATE}.tar.gz -C ${Ddir}/web-${DATE}
rm -rf ${Ddir}/web && \
ln -s ${Ddir}/web-${DATE} ${Ddir}/web"
done
}
deploy(){
get_code
scp_web_server
}
deploy
[root@jenkins scripts]# chmod +x html_deploy.sh
[root@jenkins scripts]# ps -ef | grep jenkins
#可以看出jenkins的運行用戶是jenkins
jenkins 58626 1 1 11:23 ? 00:00:39 /etc/alternatives/java -Dcom.sun.akuma.Daemon=daemonized -Djava.awt.headless=true -DJENKINS_HOME=/var/lib/jenkins -jar /usr/lib/jenkinsjenkins.war --logfile=/var/log/jenkins/jenkins.log --webroot=/var/cache/jenkins/war --daemon --httpPort=8080 --debug=5 --handlerCountMax=100 --handlerCountMaxIdle=20
root 61336 2046 0 12:06 pts/0 00:00:00 grep --color=auto jenkins
[root@jenkins scripts]# vim /etc/sysconfig/jenkins
JENKINS_USER="root"
#為了防止權限問題,直接將jenkins的運行用戶改為root
[root@jenkins scripts]# systemctl restart jenkins
#重啟jenkins服務
[root@jenkins scripts]# ssh-copy-id root@192.168.1.8
#配置Jenkins可以免密登錄到nginx服務器[root@gitlab web-demo]# echo "lvzhenjiang" >> index.html
[root@gitlab web-demo]# git add .
[root@gitlab web-demo]# git commit -m "first"
[root@gitlab web-demo]# git push origin master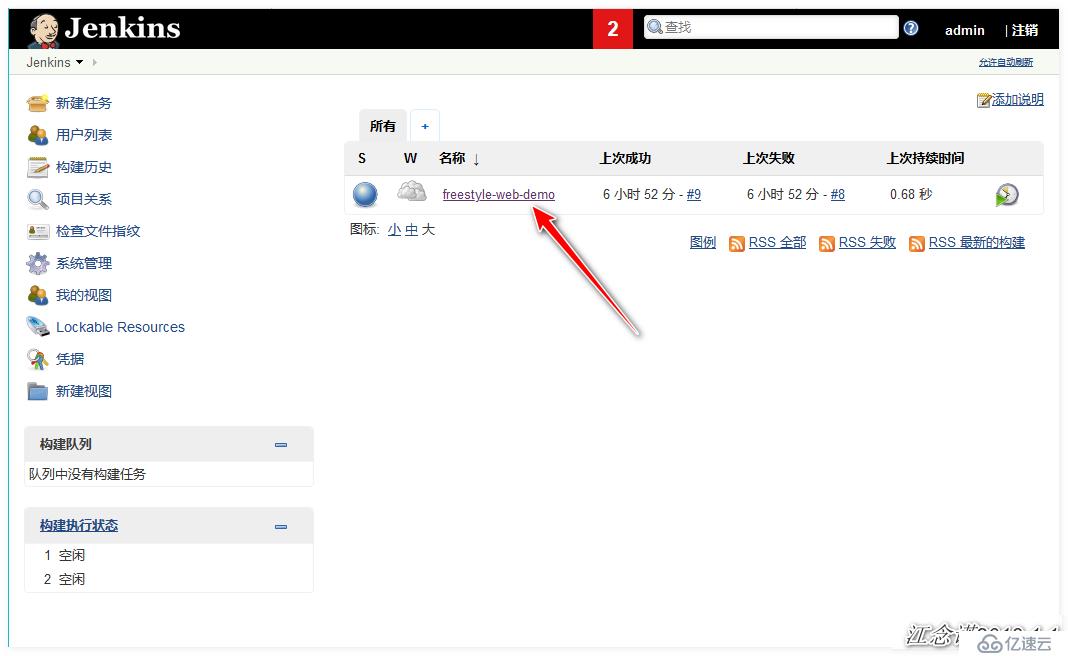
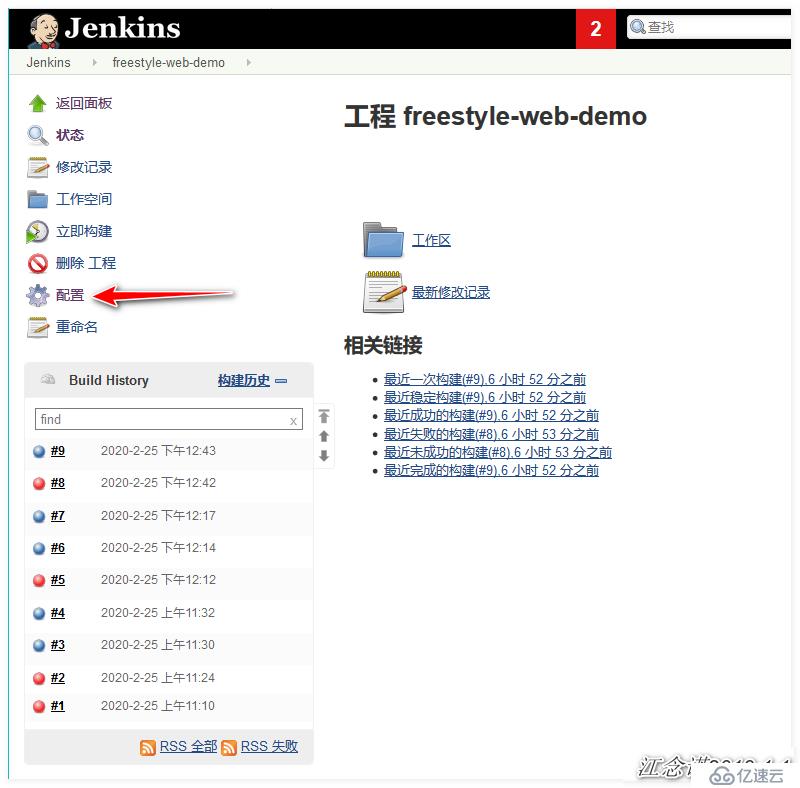
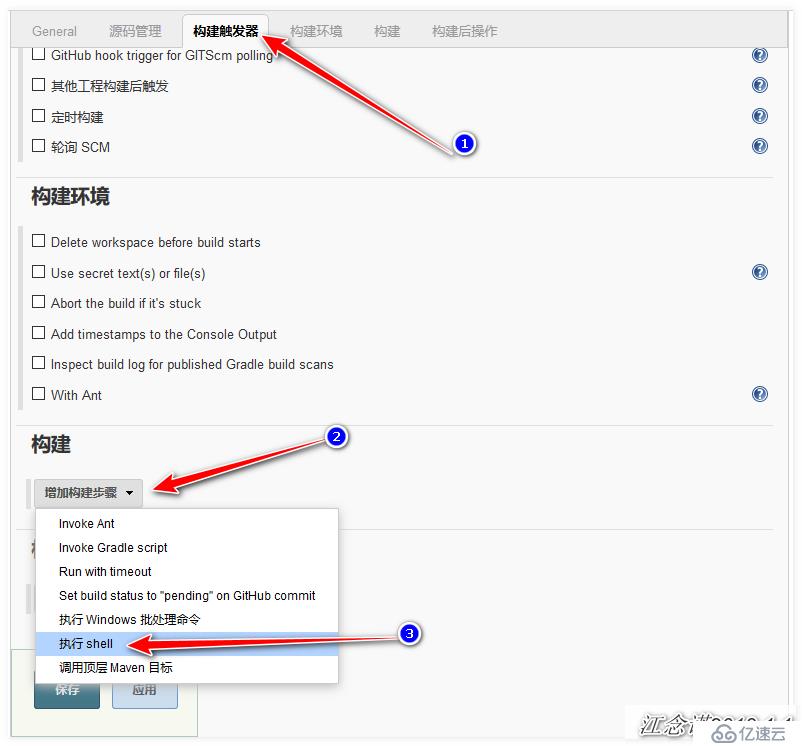

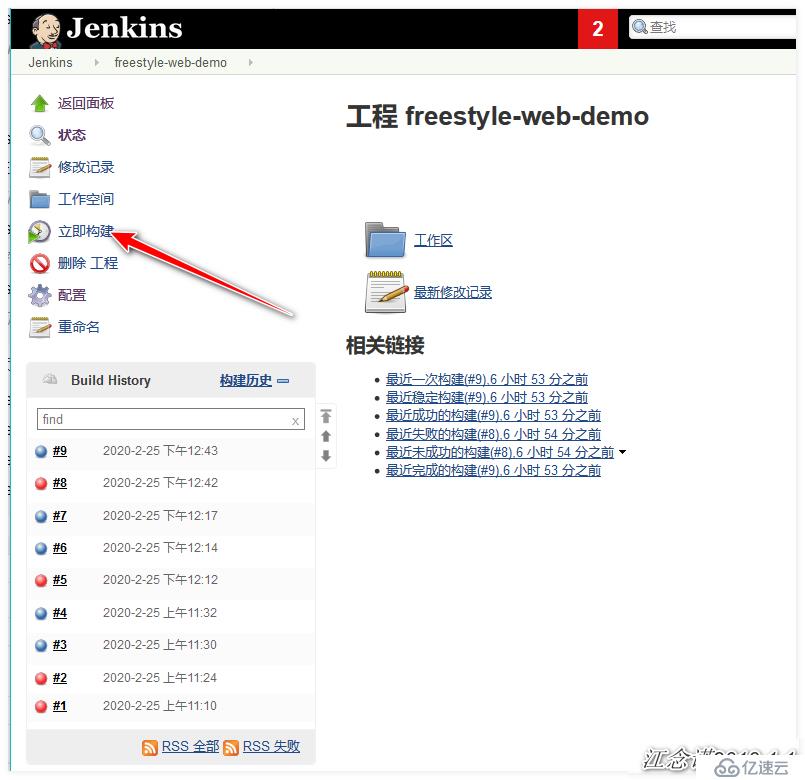
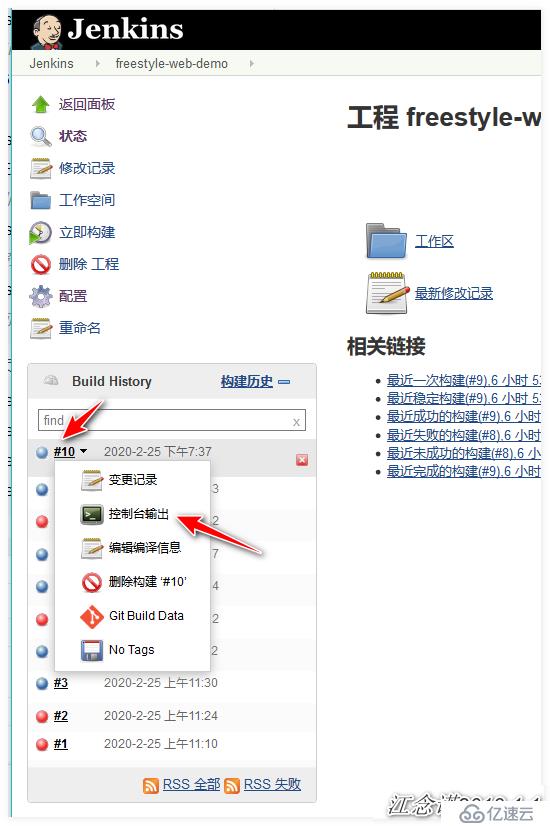
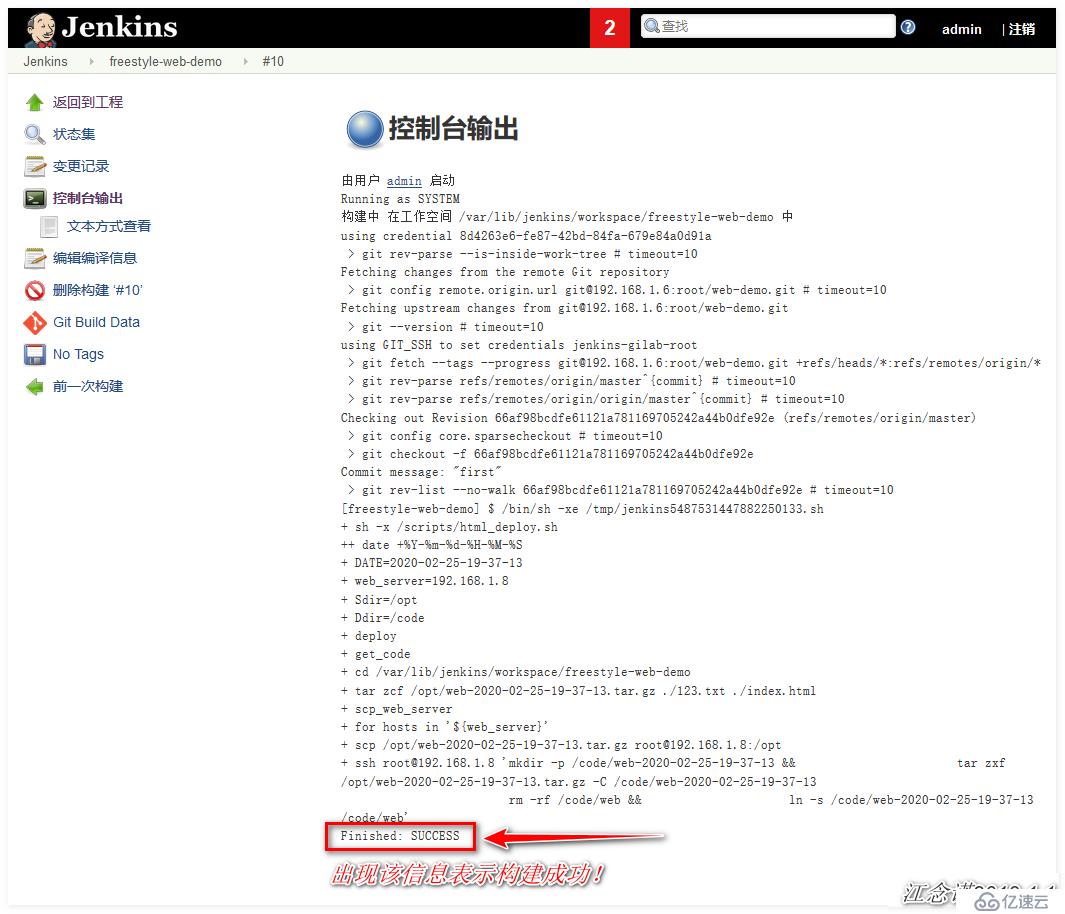
有興趣可以構建時的控制臺輸出!
訪問nginx進行測試!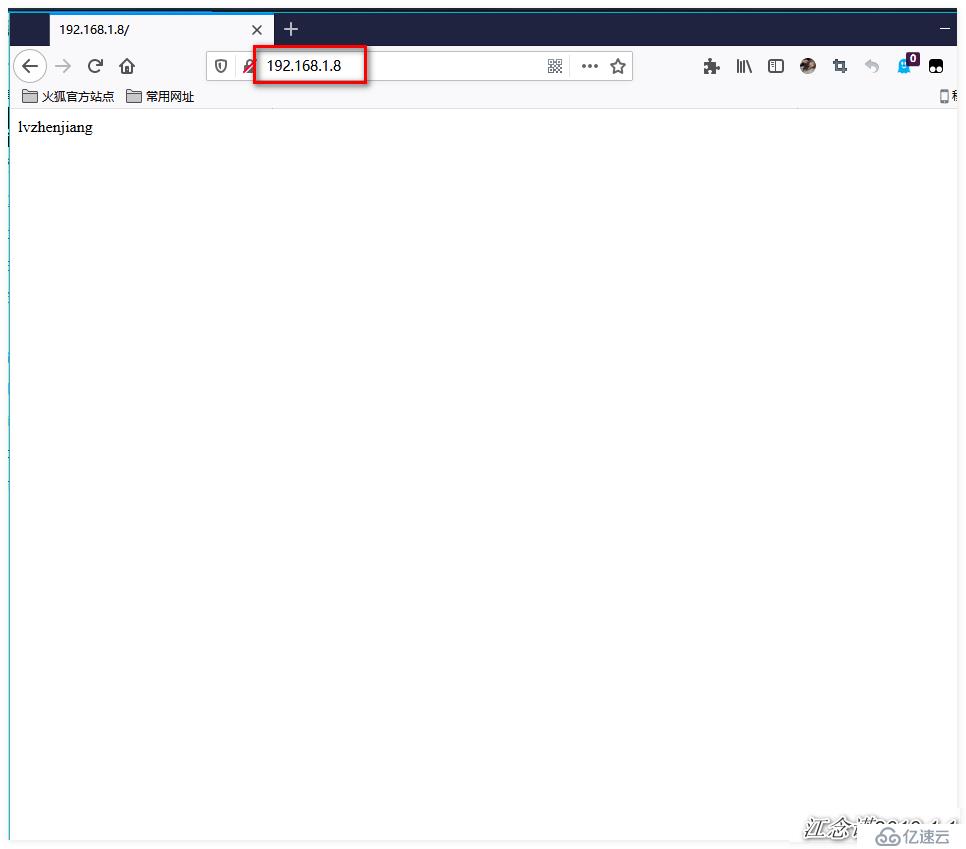
確認是剛才gitlab服務器提交的代碼信息!
[root@nginx ~]# ll /code                    #查看網頁目錄實現的具體過程
#可以查看到真正的網頁目錄是別的目錄鏈接過去的

總用量 0
lrwxrwxrwx 1 root root 29 2月  25 19:37 web -> /code/web-2020-02-25-19-37-13
drwxr-xr-x 2 root root 39 2月  25 19:37 web-2020-02-25-19-37-13
這種方式發布還有很多地方需要完善,比如回退,接下來使用tag的方式發布!
讓項目支持tag的方式上線,便于我們進行區分!
[root@gitlab ~]# cd web-demo/
[root@gitlab web-demo]# echo "<h2>lvzhenjiang-version-v1.1</h2>" > index.html
[root@gitlab web-demo]# git add .
[root@gitlab web-demo]# git commit -m "v1.1"
[root@gitlab web-demo]# git push origin master
[root@gitlab web-demo]# git tag -a "v1.1" -m "v1.1"
[root@gitlab web-demo]# git push origin v1.1
[root@gitlab web-demo]# echo "<h2>lvzhenjiang-version-v1.2</h2>" > index.html
[root@gitlab web-demo]# git add .
[root@gitlab web-demo]# git commit -m "v1.2"
[root@gitlab web-demo]# git push origin master
[root@gitlab web-demo]# git tag -a "v1.2" -m "v1.2"
[root@gitlab web-demo]# git push origin v1.2
[root@gitlab web-demo]# echo "<h2>lvzhenjiang-version-v1.3</h2>" > index.html
[root@gitlab web-demo]# git add .
[root@gitlab web-demo]# git commit -m "v1.3"
[root@gitlab web-demo]# git push origin master
[root@gitlab web-demo]# git tag -a "v1.3" -m "v1.3"
[root@gitlab web-demo]# git push origin v1.3使用該方式就需安裝插件:Git Parameter。
安裝方式:系統管理——>插件管理——>可選插件——搜索Git Parameter——>直接安裝!
[root@jenkins ~]# systemctl restart jenkins
#安裝完成后,需重啟Jenkins!
[root@jenkins ~]# cd /scripts/
[root@jenkins scripts]# vim html_deploy_tag.sh      #優化腳本
#!/bin/bash
DATE=$(date +%Y-%m-%d-%H-%M-%S)
web_server="192.168.1.8"
Sdir=/opt
Ddir=/code
Name=${DATE}-${git_version}                 #${git_version}是在jenkins界面定義的變量

#1)進入項目目錄,將內容進行打包
#${WORKSPACE}是Jenkins的內置變量,表示構建目錄的絕對路徑
get_code(){
        cd ${WORKSPACE} && \
        tar zcf ${Sdir}/web-${Name}.tar.gz ./*
}
#2)將內容通過scp復制到web網頁目錄
scp_web_server(){
for hosts in ${web_server}
do
        scp ${Sdir}/web-${Name}.tar.gz root@${hosts}:/opt
        ssh root@${hosts} "mkdir -p ${Ddir}/web-${Name} && \
                        tar zxf ${Sdir}/web-${Name}.tar.gz -C ${Ddir}/web-${Name}
                        rm -rf ${Ddir}/web && \
                        ln -s ${Ddir}/web-${Name} ${Ddir}/web"
done
}

deploy(){
        get_code
        scp_web_server
}

        deploy
[root@jenkins scripts]# chmod +x html_deploy_tag.sh
接下來: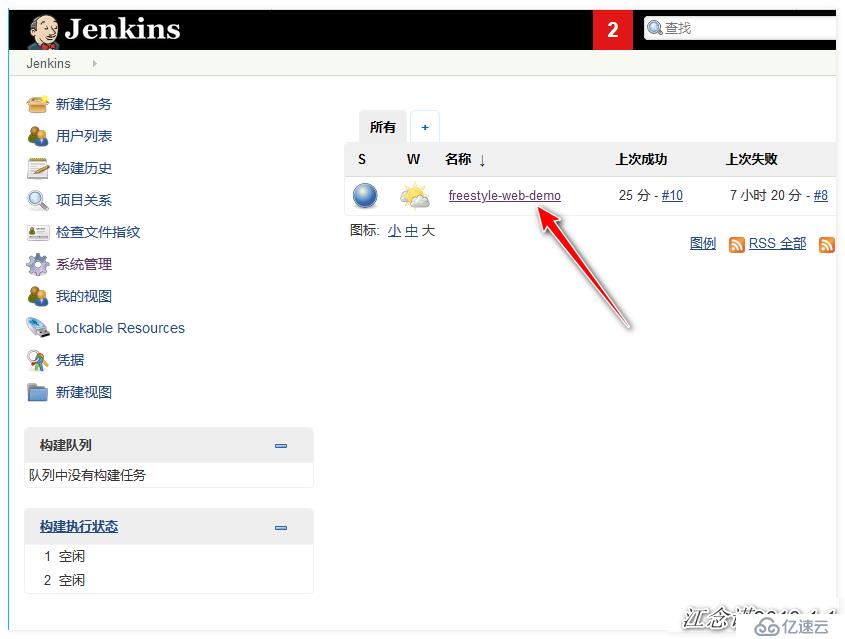
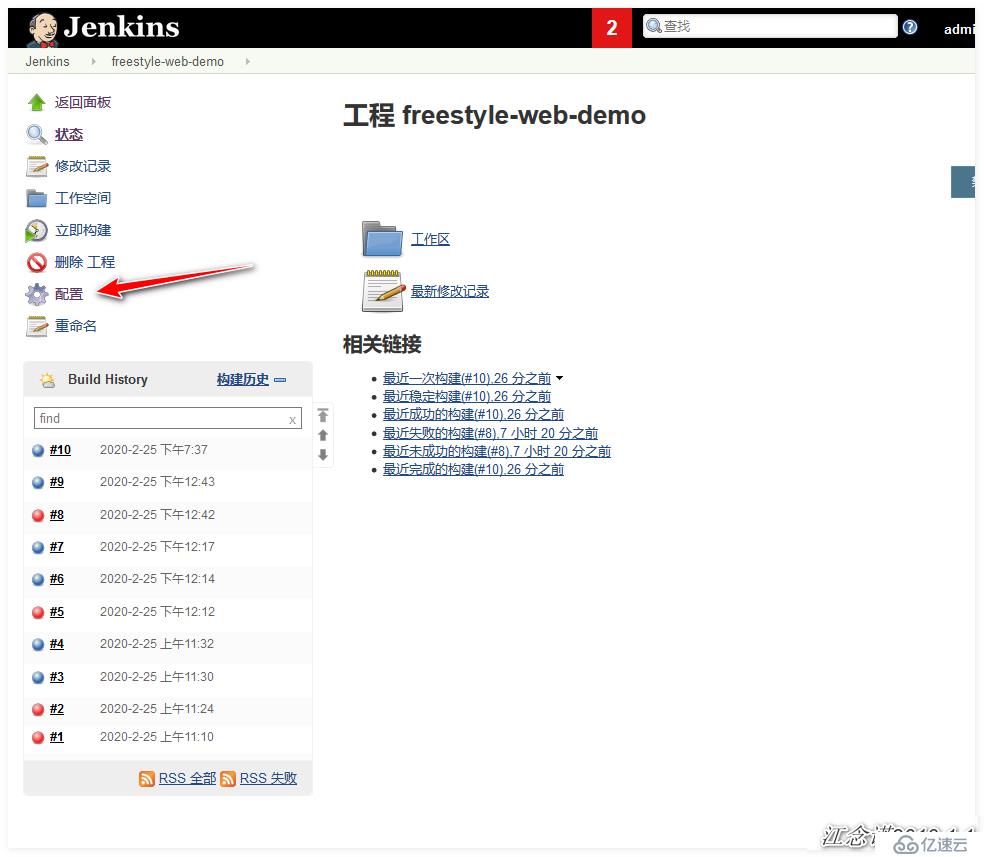
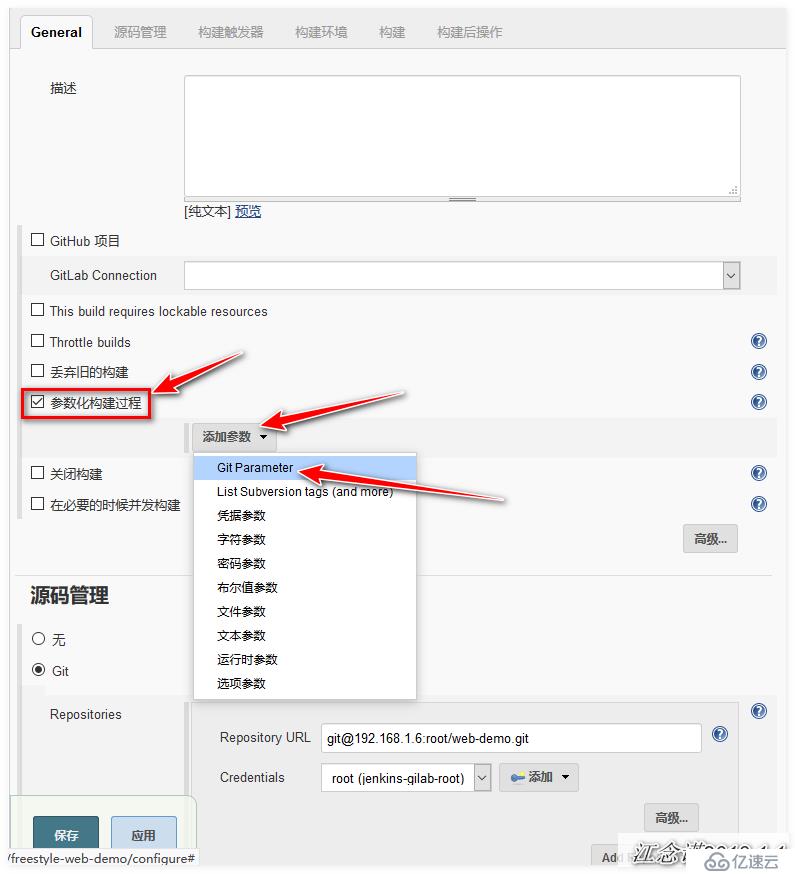
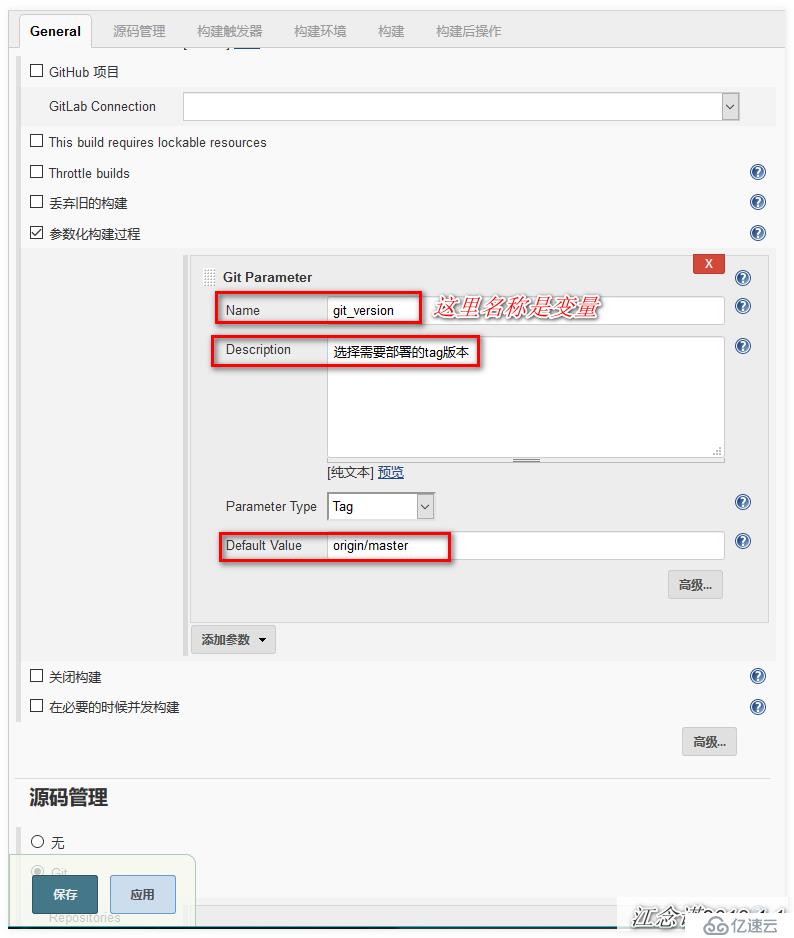
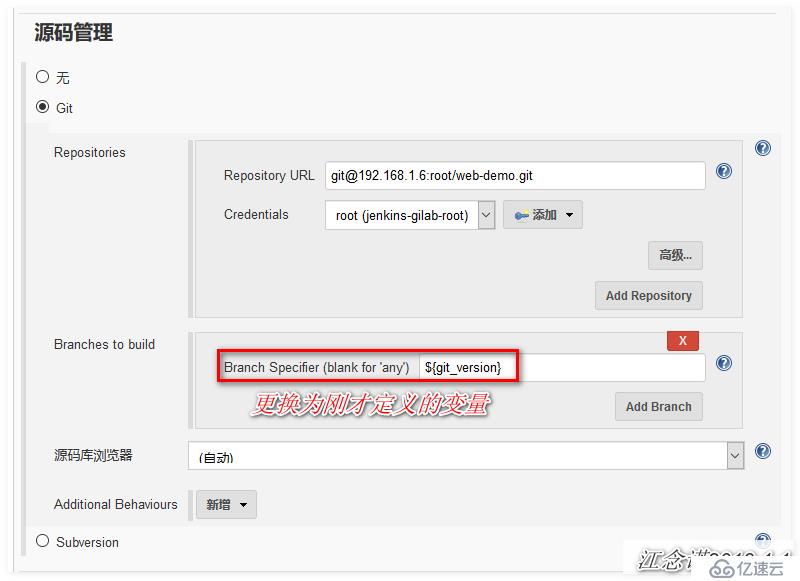
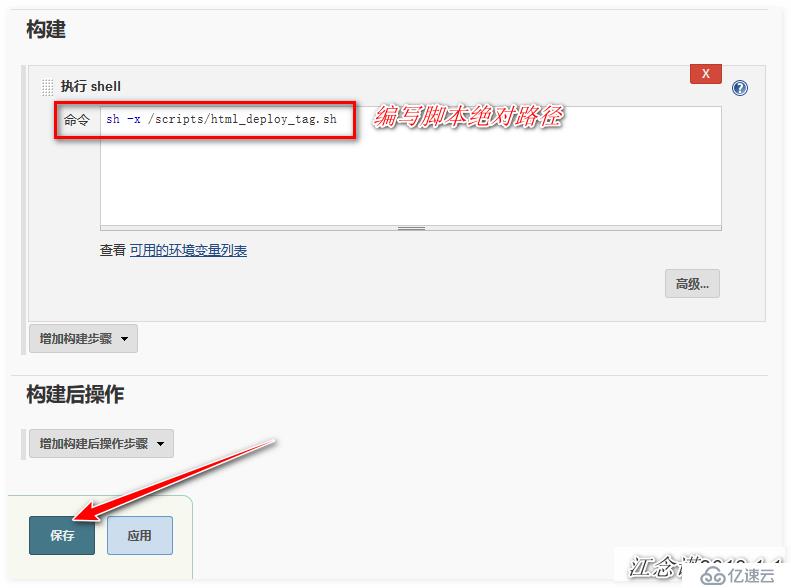
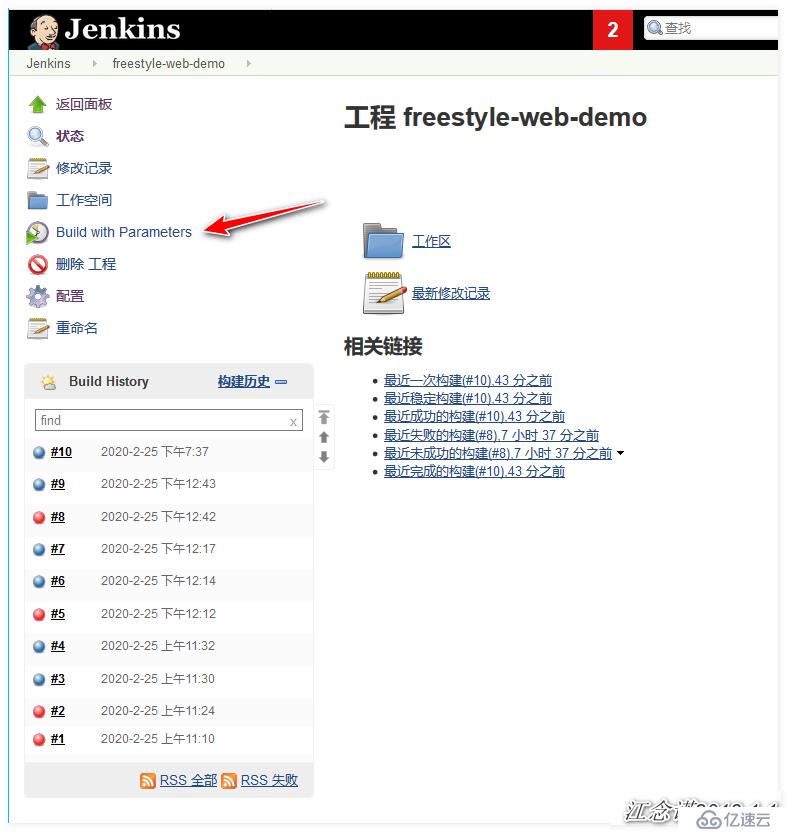
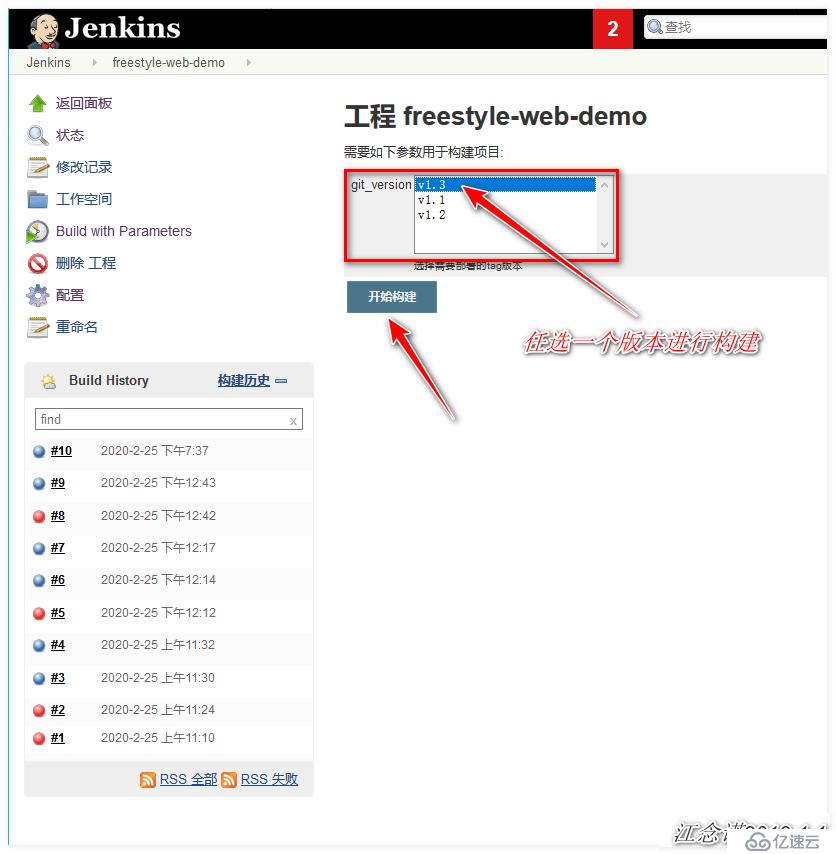
訪問nginx: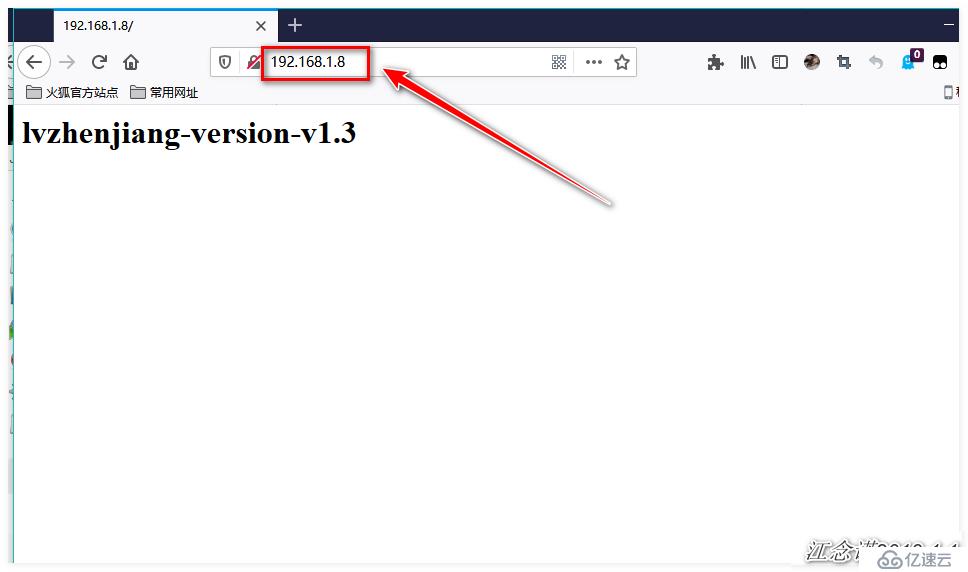
[root@nginx ~]# ll /code     #這樣就可以很清楚的查看構建的是哪個版本
總用量 0
lrwxrwxrwx 1 root root 34 2月  25 20:21 web -> /code/web-2020-02-25-20-21-18-v1.3
drwxr-xr-x 2 root root 39 2月  25 19:37 web-2020-02-25-19-37-13
drwxr-xr-x 2 root root 39 2月  25 20:21 web-2020-02-25-20-21-18-v1.3
部署到此。回退的問題仍沒有解決!比如:部署兩次v1.3版本就會產生兩個v1.3的目錄!
[root@jenkins scripts]# vim html_deploy_tag_rollback.sh     #優化腳本,支持回退
#!/bin/bash
DATE=$(date +%Y-%m-%d-%H-%M-%S)
web_server="192.168.1.8"
Sdir=/opt
Ddir=/code
Name=${DATE}-${git_version}                 #${git_version}是在jenkins界面定義的變量

#1)進入項目目錄,將內容進行打包
#${WORKSPACE}是Jenkins的內置變量,表示構建目錄的絕對路徑
get_code(){
        cd ${WORKSPACE} && \
        tar zcf ${Sdir}/web-${Name}.tar.gz ./*
}
#2)將內容通過scp復制到web網頁目錄
scp_web_server(){
for hosts in ${web_server}
do
        scp ${Sdir}/web-${Name}.tar.gz root@${hosts}:/opt
        ssh root@${hosts} "mkdir -p ${Ddir}/web-${Name} && \
                        tar zxf ${Sdir}/web-${Name}.tar.gz -C ${Ddir}/web-${Name}
                        rm -rf ${Ddir}/web && \
                        ln -s ${Ddir}/web-${Name} ${Ddir}/web"
done
}

rollback(){
back_file=$(ssh root@${web_server} "find /code/ -maxdepth 1 -type d -name "web-*-${git_version}"")
for hosts in ${web_server}
do
        ssh root@${hosts} "rm -rf ${Ddir}/web && \
           ln -s ${back_file} ${Ddir}/web"
done
}

deploy(){
        get_code
        scp_web_server
}
#判斷之前是否部署過該版本的commit,如果沒有部署則部署,如果有則提示已經部署過然后退出
#如果是回退,則不受限制
if [ ${deploy_env} == "deploy" ];then
        if [ ${GIT_COMMIT} == ${GIT_PREVIOUS_SUCCESSFUL_COMMIT} ];then
                echo "你已經部署過該${git_version}版本"
                exit 1
        else
                deploy
        fi

elif  [ ${deploy_env} == "rollback" ];then
        rollback
fi
[root@jenkins scripts]# chmod +x html_deploy_tag_rollback.sh
接下來配置: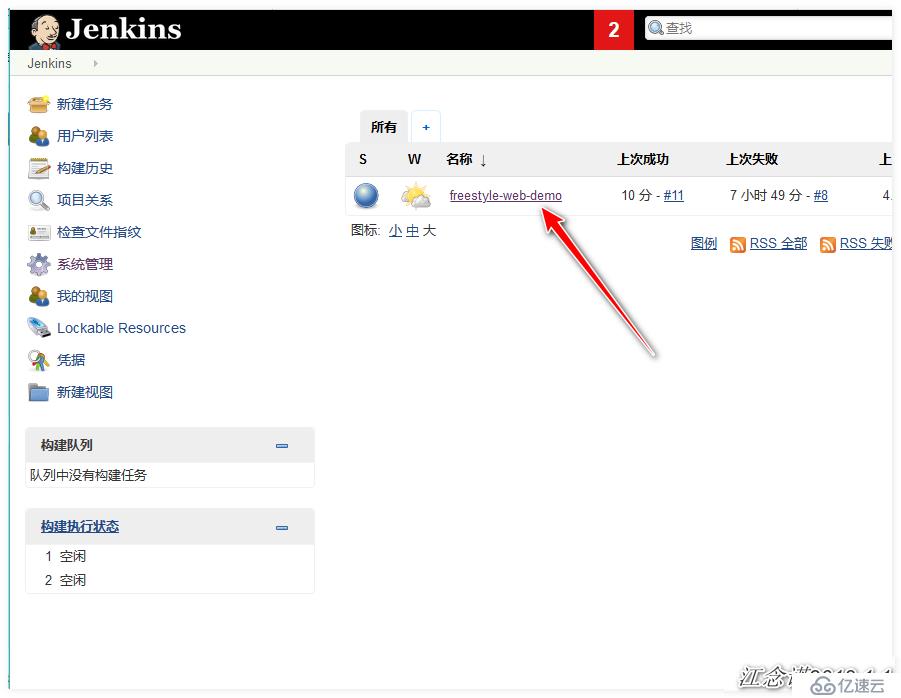
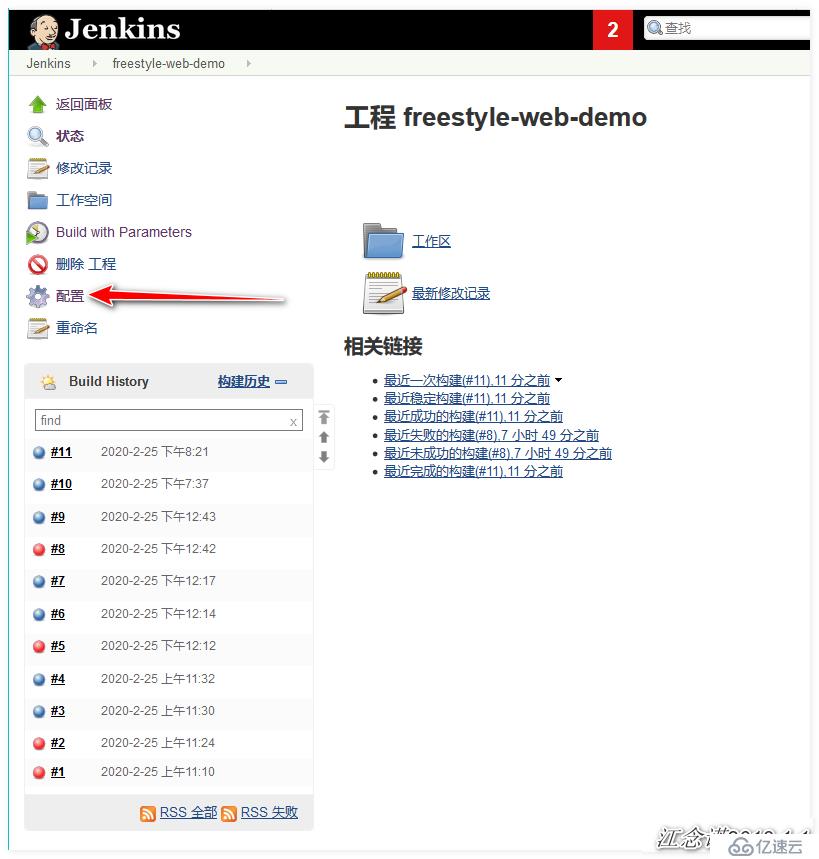
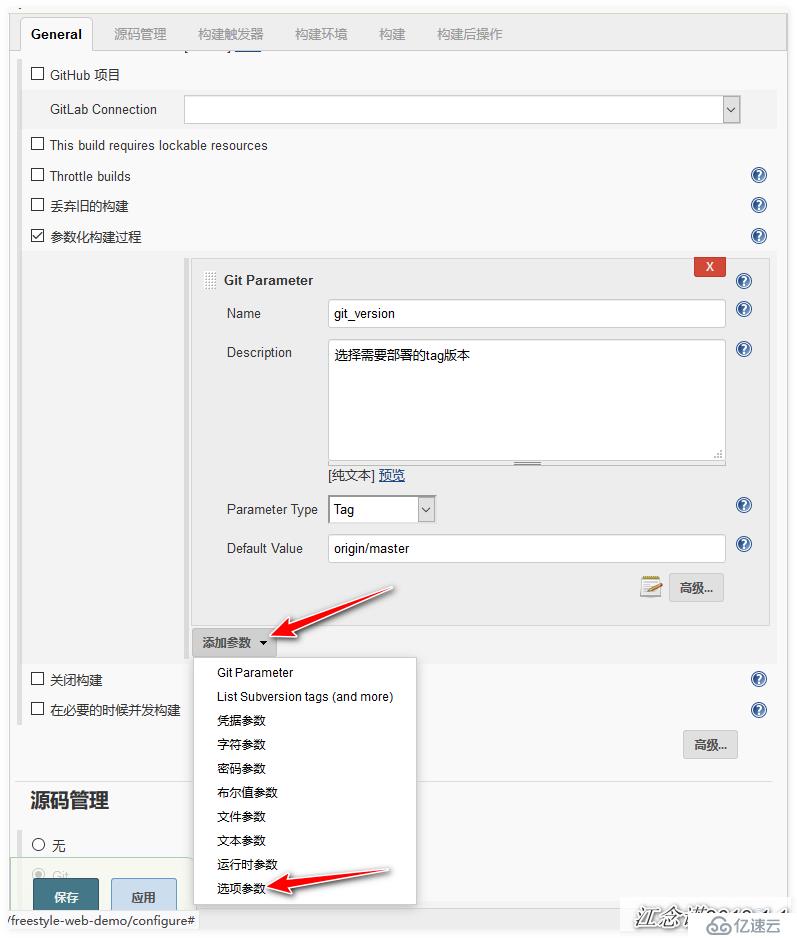
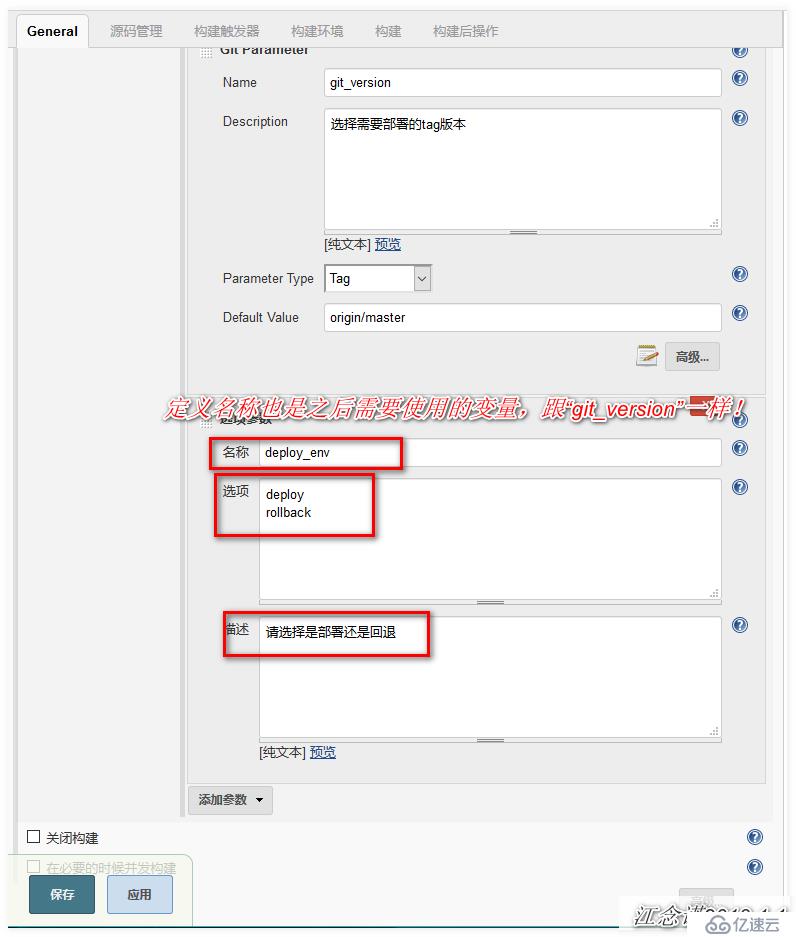
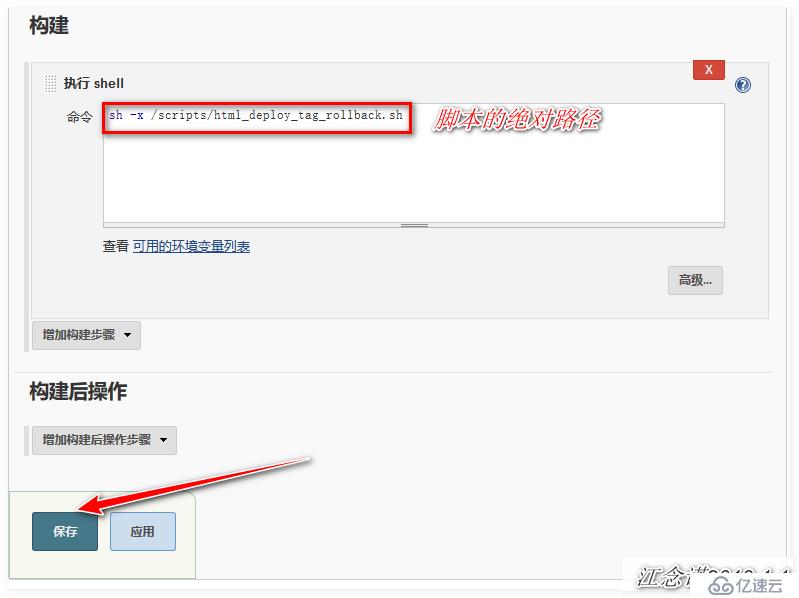
測試: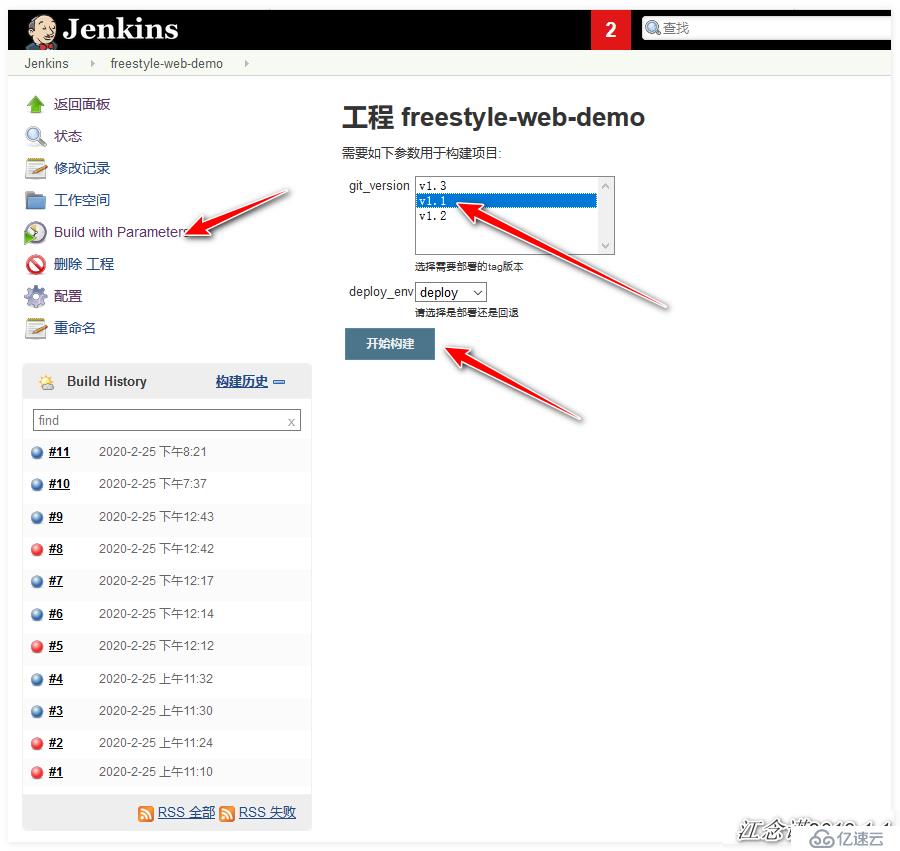
web頁面: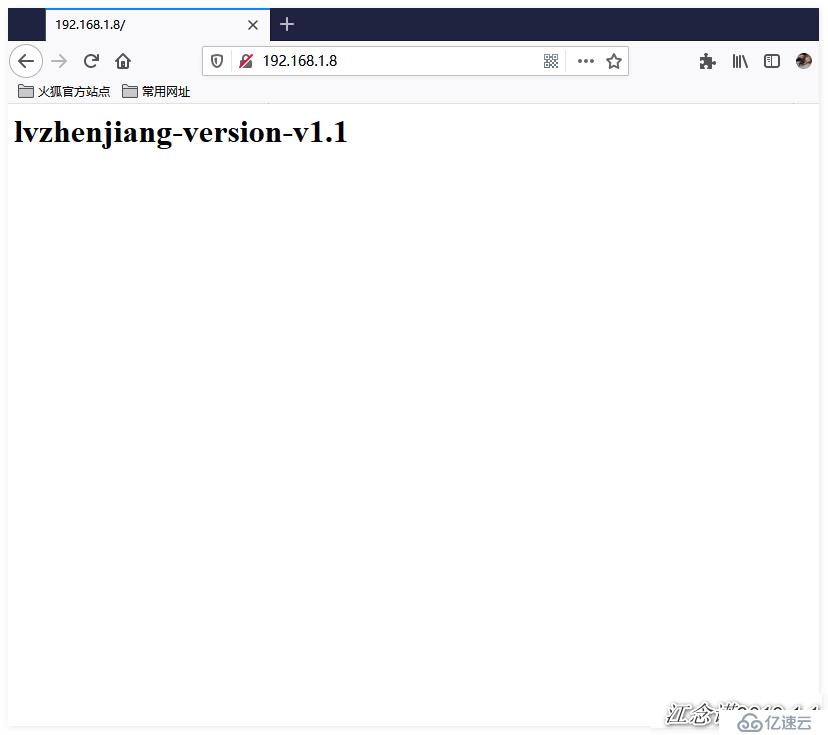
執行回退操作: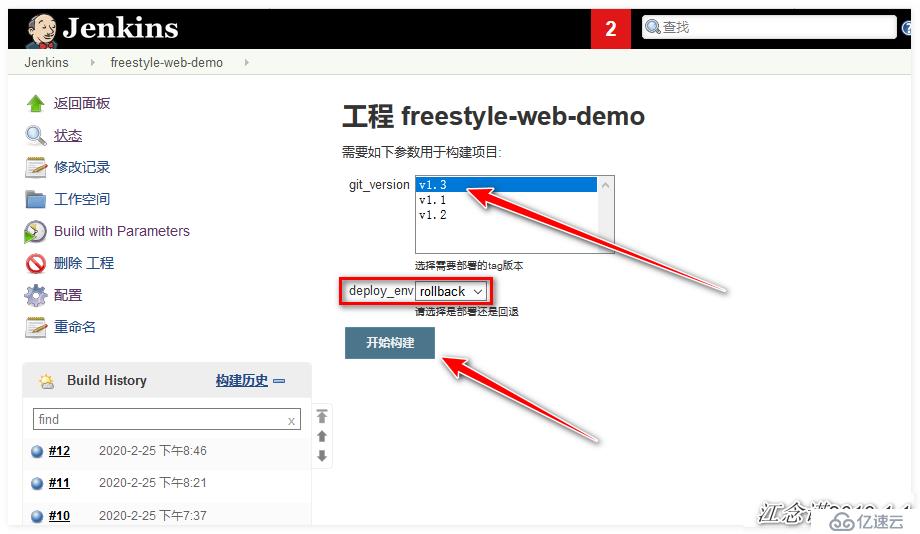
有興趣可以構建時的控制臺輸出!
web頁面:
[root@nginx ~]# ll /code            #可以看出只創建了一次v1.3的目錄
總用量 0
lrwxrwxrwx 1 root root 34 2月  25 20:46 web -> /code/web-2020-02-25-20-21-18-v1.3
drwxr-xr-x 2 root root 39 2月  25 19:37 web-2020-02-25-19-37-13
drwxr-xr-x 2 root root 39 2月  25 20:21 web-2020-02-25-20-21-18-v1.3
drwxr-xr-x 2 root root 39 2月  25 20:46 web-2020-02-25-20-46-15-v1.1
重復構建、回退問題解決!
免責聲明:本站發布的內容(圖片、視頻和文字)以原創、轉載和分享為主,文章觀點不代表本網站立場,如果涉及侵權請聯系站長郵箱:is@yisu.com進行舉報,并提供相關證據,一經查實,將立刻刪除涉嫌侵權內容。