溫馨提示×
您好,登錄后才能下訂單哦!
點擊 登錄注冊 即表示同意《億速云用戶服務條款》
您好,登錄后才能下訂單哦!
這篇文章主要介紹“springboot怎么集成easy-captcha實現圖像驗證碼顯示和登錄”的相關知識,小編通過實際案例向大家展示操作過程,操作方法簡單快捷,實用性強,希望這篇“springboot怎么集成easy-captcha實現圖像驗證碼顯示和登錄”文章能幫助大家解決問題。
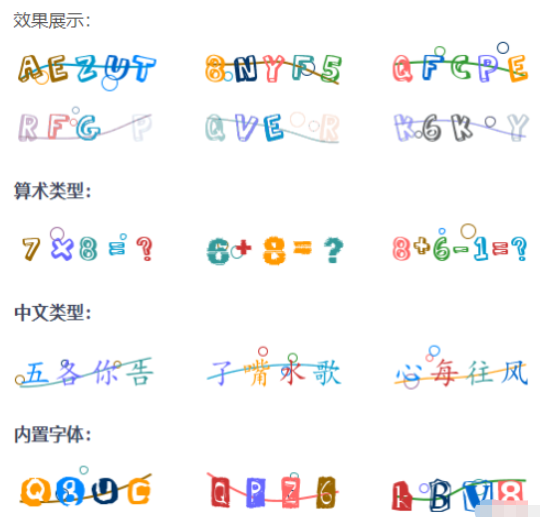
easy-captcha是生成圖形驗證碼的Java類庫,支持gif、中文、算術等類型,可用于Java Web、JavaSE等項目。

<guava.version>20.0</guava.version>
<captcha.version>1.6.2</captcha.version>

<dependency>
    <groupId>com.google.guava</groupId>
    <artifactId>guava</artifactId>
    <version>${guava.version}</version>
</dependency>

<dependency>
    <groupId>com.github.whvcse</groupId>
    <artifactId>easy-captcha</artifactId>
    <version>${captcha.version}</version>
</dependency>@Service
public class CaptchaServiceImpl implements CaptchaService {
/**
* Local Cache 5分鐘過期
*/
Cache<String, String> localCache = CacheBuilder.newBuilder().maximumSize(1000).expireAfterAccess(5, TimeUnit.MINUTES).build();
@Override
public void create(HttpServletResponse response, String uuid) throws IOException {
response.setContentType("image/gif");
response.setHeader("Pragma", "No-cache");
response.setHeader("Cache-Control", "no-cache");
response.setDateHeader("Expires", 0);
//生成驗證碼
SpecCaptcha captcha = new SpecCaptcha(150, 40);
captcha.setLen(5);
captcha.setCharType(Captcha.TYPE_DEFAULT);
captcha.out(response.getOutputStream());
//保存到緩存
setCache(uuid, captcha.text());
}
@Override
public boolean validate(String uuid, String code) {
//獲取驗證碼
String captcha = getCache(uuid);
//效驗成功
if(code.equalsIgnoreCase(captcha)){
return true;
}
return false;
}
private void setCache(String key, String value){
localCache.put(key, value);
}
private String getCache(String key){
String captcha = localCache.getIfPresent(key);
//刪除驗證碼
if(captcha != null){
localCache.invalidate(key);
}
return captcha;
}
}創建LoginController并提供生成驗證碼的方法
@Controller
@AllArgsConstructor
public class CaptchaController {
    private CaptchaService captchaService;

    @GetMapping("/captcha")
    public void captcha(HttpServletResponse response, String uuid)throws IOException {
        //uuid不能為空
        AssertUtils.isBlank(uuid, ErrorCode.IDENTIFIER_NOT_NULL);

        //生成驗證碼
        captchaService.create(response, uuid);
    }
}<Motion :delay="200"> <el-form-item prop="verifyCode"> <el-input clearable v-model="ruleForm.verifyCode" placeholder="驗證碼" :prefix-icon="useRenderIcon(Line)" > <template v-slot:append> <img style=" vertical-align: middle; height: 40px; width: 100px; cursor: pointer; " :src="captchaUrl" @click="onRefreshCode" alt="" /> </template> </el-input> </el-form-item> </Motion>
完整的登錄頁代碼如下
<script setup lang="ts">
import Motion from "./utils/motion";
import { useRouter } from "vue-router";
import { message } from "@/utils/message";
import { loginRules } from "./utils/rule";
import { useNav } from "@/layout/hooks/useNav";
import type { FormInstance } from "element-plus";
import { useLayout } from "@/layout/hooks/useLayout";
import { useUserStoreHook } from "@/store/modules/user";
import { bg, avatar, illustration } from "./utils/static";
import { useRenderIcon } from "@/components/ReIcon/src/hooks";
import { ref, reactive, toRaw, onMounted, onBeforeUnmount } from "vue";
import { useDataThemeChange } from "@/layout/hooks/useDataThemeChange";
import { initRouter } from "@/router/utils";
import { getUuid } from "@/utils/utils";
import dayIcon from "@/assets/svg/day.svg?component";
import darkIcon from "@/assets/svg/dark.svg?component";
import Lock from "@iconify-icons/ri/lock-fill";
import User from "@iconify-icons/ri/user-3-fill";
import Line from "@iconify-icons/ri/shield-keyhole-line";
import { getConfig } from "@/config";
defineOptions({
name: "Login"
});
const router = useRouter();
const loading = ref(false);
const ruleFormRef = ref<FormInstance>();
const captchaUrl = ref("");
const { Api } = getConfig();
const { initStorage } = useLayout();
initStorage();
const { dataTheme, dataThemeChange } = useDataThemeChange();
dataThemeChange();
const { title } = useNav();
const ruleForm = reactive({
username: "admin",
password: "admin123",
verifyCode: "",
uuid: ""
});
const onLogin = async (formEl: FormInstance | undefined) => {
loading.value = true;
if (!formEl) return;
await formEl.validate((valid, fields) => {
if (valid) {
useUserStoreHook()
.loginByUsername({ username: ruleForm.username, password: "admin123" })
.then(res => {
if (res.code == 200) {
// 獲取后端路由
initRouter().then(() => {
router.push("/");
message("登錄成功", { type: "success" });
});
}
});
} else {
loading.value = false;
return fields;
}
});
};
/** 使用公共函數,避免`removeEventListener`失效 */
function onkeypress({ code }: KeyboardEvent) {
if (code === "Enter") {
onLogin(ruleFormRef.value);
}
}
function getCaptchaUrl() {
ruleForm.uuid = getUuid();
captchaUrl.value = `${Api}/captcha?uuid=${ruleForm.uuid}`;
}
function onRefreshCode() {
getCaptchaUrl();
}
onMounted(() => {
window.document.addEventListener("keypress", onkeypress);
getCaptchaUrl();
});
onBeforeUnmount(() => {
window.document.removeEventListener("keypress", onkeypress);
});
</script>
<template>
<div class="select-none">
<img :src="bg" class="wave" />
<div class="flex-c absolute right-5 top-3">
<!-- 主題 -->
<el-switch
v-model="dataTheme"
inline-prompt
:active-icon="dayIcon"
:inactive-icon="darkIcon"
@change="dataThemeChange"
/>
</div>
<div class="login-container">
<div class="img">
<component :is="toRaw(illustration)" />
</div>
<div class="login-box">
<div class="login-form">
<avatar class="avatar" />
<Motion>
<h3 class="outline-none">{{ title }}</h3>
</Motion>
<el-form
ref="ruleFormRef"
:model="ruleForm"
:rules="loginRules"
size="large"
>
<Motion :delay="100">
<el-form-item
:rules="[
{
required: true,
message: '請輸入賬號',
trigger: 'blur'
}
]"
prop="username"
>
<el-input
clearable
v-model="ruleForm.username"
placeholder="賬號"
:prefix-icon="useRenderIcon(User)"
/>
</el-form-item>
</Motion>
<Motion :delay="150">
<el-form-item prop="password">
<el-input
clearable
show-password
v-model="ruleForm.password"
placeholder="密碼"
:prefix-icon="useRenderIcon(Lock)"
/>
</el-form-item>
</Motion>
<Motion :delay="200">
  <el-form-item prop="verifyCode">
    <el-input
      clearable
      v-model="ruleForm.verifyCode"
      placeholder="驗證碼"
      :prefix-icon="useRenderIcon(Line)"
    >
      <template v-slot:append>
        <img
          style="
            vertical-align: middle;
            height: 40px;
            width: 100px;
            cursor: pointer;
          "
          :src="captchaUrl"
          @click="onRefreshCode"
          alt=""
        />
      </template>
    </el-input>
  </el-form-item>
</Motion>
<Motion :delay="250">
<el-button
class="w-full mt-4"
size="default"
type="primary"
:loading="loading"
@click="onLogin(ruleFormRef)"
>
登錄
</el-button>
</Motion>
</el-form>
</div>
</div>
</div>
</div>
</template>
<style scoped>
@import url("@/style/login.css");
</style>
<style lang="scss" scoped>
:deep(.el-input-group__append, .el-input-group__prepend) {
padding: 0;
}
</style>編譯運行后端,同事運行點前端,可以看到登錄頁面。
關于“springboot怎么集成easy-captcha實現圖像驗證碼顯示和登錄”的內容就介紹到這里了,感謝大家的閱讀。如果想了解更多行業相關的知識,可以關注億速云行業資訊頻道,小編每天都會為大家更新不同的知識點。
免責聲明:本站發布的內容(圖片、視頻和文字)以原創、轉載和分享為主,文章觀點不代表本網站立場,如果涉及侵權請聯系站長郵箱:is@yisu.com進行舉報,并提供相關證據,一經查實,將立刻刪除涉嫌侵權內容。