您好,登錄后才能下訂單哦!
您好,登錄后才能下訂單哦!
這篇文章主要介紹了SpringBoot怎么整合Mybatis的相關知識,內容詳細易懂,操作簡單快捷,具有一定借鑒價值,相信大家閱讀完這篇SpringBoot怎么整合Mybatis文章都會有所收獲,下面我們一起來看看吧。
MyBatis 本是apache的一個開源項目iBatis, 2010年這個項目由apache software foundation 遷移到了google code,并且改名為MyBatis 。2013年11月遷移到Github。
iBATIS一詞來源于“internet”和“abatis”的組合,是一個基于Java的持久層框架。iBATIS提供的持久層框架包括SQL Maps和Data Access Objects(DAOs)
MyBatis 是一款優秀的持久層框架,它支持定制化 SQL、存儲過程以及高級映射。MyBatis 避免了幾乎所有的 JDBC 代碼和手動設置參數以及獲取結果集。MyBatis 可以使用簡單的 XML 或注解來配置和映射原生信息,將接口和 Java 的 POJOs(Plain Ordinary Java Object,普通的 Java對象)映射成數據庫中的記錄。
思想:ORM:Object Relational Mapping
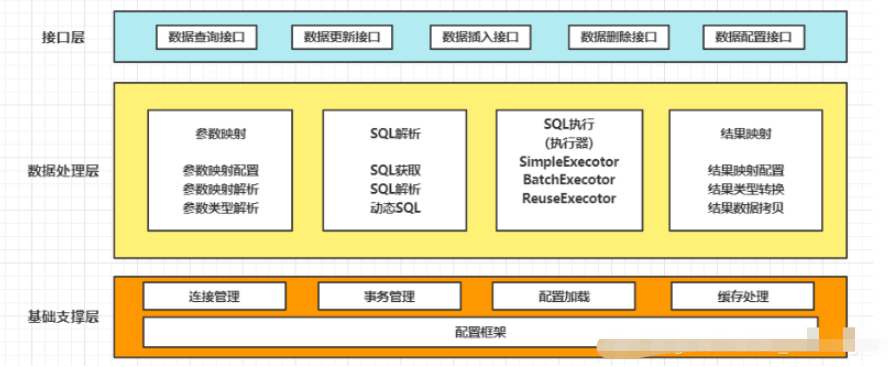
Mybatis基本框架:

新建Spring Boot項目,引入依賴
pom.xml
<!--mysql-->
<dependency>
    <groupId>mysql</groupId>
    <artifactId>mysql-connector-java</artifactId>
    <version>5.1.47</version>
</dependency>
<!--mybatis-->
<dependency>
    <groupId>org.mybatis.spring.boot</groupId>
    <artifactId>mybatis-spring-boot-starter</artifactId>
    <version>1.3.2</version>
</dependency>
<!--Druid數據源-->
<dependency>
    <groupId>com.alibaba</groupId>
    <artifactId>druid-spring-boot-starter</artifactId>
    <version>1.1.9</version>
</dependency>
<!--測試-->
<dependency>
    <groupId>org.springframework.boot</groupId>
    <artifactId>spring-boot-starter-test</artifactId>
    <scope>test</scope>
</dependency>
DB-sql
CREATE TABLE `student` (
  `id` int(11) NOT NULL AUTO_INCREMENT,
  `name` varchar(255) DEFAULT NULL,
  `age` int(11) DEFAULT NULL,
  PRIMARY KEY (`id`)
) ENGINE=InnoDB AUTO_INCREMENT=13 DEFAULT CHARSET=utf8;
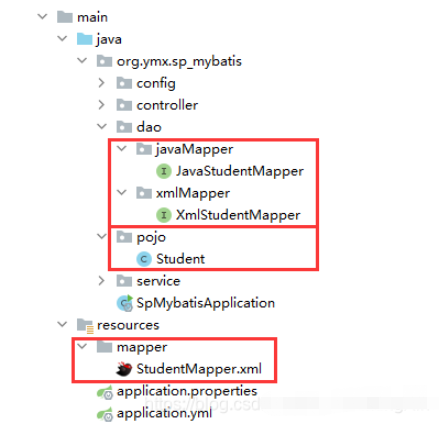
項目結構

server:
  port: 8081
spring:
  datasource: # 配置數據庫
    username: root
    password: 12345
    driver-class-name: com.mysql.jdbc.Driver
    url: jdbc:mysql://localhost:3306/test   #數據庫名
    type: com.alibaba.druid.pool.DruidDataSource
/**
 * 注解版
 */
@Mapper
@Repository
public interface JavaStudentMapper {

    /**
     * 添加一個學生
     *
     * @param student
     * @return
     */
    @Insert("insert into student(name, age) " +
            "values (#{name}, #{age})")
    public int saveStudent(Student student);

    /**
     * 根據ID查看一名學生
     *
     * @param id
     * @return
     */
    @Select("select *  " +
            "from student " +
            "where id = #{id}")
    public Student findStudentById(Integer id);

    /**
     * 查詢全部學生
     *
     * @return
     */
    @Select("select * " +
            "from student")
    @Results({
            @Result(property = "id", column = "id"),
            @Result(property = "name", column = "name"),
            @Result(property = "age", column = "age")
    })
    public List<Student> findAllStudent();

    /**
     * 根據ID刪除一個
     *
     * @param id
     * @return
     */
    @Delete("delete   " +
            "from student " +
            "where id = #{id}")
    public int removeStudentById(Integer id);

    /**
     * 根據ID修改
     *
     * @param student
     * @return
     */
    @Update("update set name=#{name},age=#{age}  " +
            "where id=#{id}")
    public int updateStudentById(Student student);

}@Autowired
private JavaStudentMapper studentMapper;
@Test
void testJavaMapperInsert() {
Student student = new Student("張三", 22);
System.out.println(studentMapper.saveStudent(student));
}
@Test
void testJavaMapperFind() {
System.out.println(studentMapper.findStudentById(2));
}
@Test
void testJavaMapperFindAll() {
System.out.println(studentMapper.findAllStudent());
}
@Test
void testJavaMapperUpdate() {
Student student = new Student(2, "張三", 22);
System.out.println(studentMapper.updateStudentById(student));
}
@Test
void testJavaMapperDelete() {
System.out.println(studentMapper.removeStudentById(2));
}server: port: 8081 spring: application: name: hospitalManager #項目名 datasource: # 配置數據庫 username: root password: 12345 driver-class-name: com.mysql.jdbc.Driver url: jdbc:mysql://localhost:3306/test #數據庫名 type: com.alibaba.druid.pool.DruidDataSource mybatis: mapper-locations: classpath:mapper/*Mapper.xml #掃描resources下的mapper文件夾下的xml文件 type-aliases-package: org.ymx.sp_mybatis.pojo #實體類所在包,定義別名
主啟動類:
@SpringBootApplication
@MapperScan("org.ymx.sp_mybatis.xmlMapper") //掃描的mapper
public class SpMybatisApplication {

    public static void main(String[] args) {
        SpringApplication.run(SpMybatisApplication.class, args);
    }

}/**
* xml版
*/
@Mapper
@Repository
public interface XmlStudentMapper {
/**
* 添加一個學生
*
* @param student
* @return
*/
public int saveStudent(Student student);
/**
* 根據ID查看一名學生
*
* @param id
* @return
*/
public Student findStudentById(Integer id);
/**
* 查詢全部學生
*
* @return
*/
public List<Student> findAllStudent();
/**
* 根據ID刪除一個
*
* @param id
* @return
*/
public int removeStudentById(Integer id);
/**
* 根據ID修改
*
* @param student
* @return
*/
public int updateStudentById(Student student);
}xml文件(StudentMapper.xml)
<?xml version="1.0" encoding="UTF-8" ?>
<!DOCTYPE mapper PUBLIC
        "-//mybatis.org//DTD Mapper 3.0//EN"
        "http://mybatis.org/dtd/mybatis-3-mapper.dtd">
<mapper namespace="org.ymx.sp_mybatis.dao.xmlMapper.XmlStudentMapper">
    <!-- 添加學生-->
    <insert id="saveStudent" parameterType="org.ymx.sp_mybatis.pojo.Student" useGeneratedKeys="true"
            keyProperty="id">
        insert into student(name, age)
        values (#{name}, #{age})
    </insert>
    <!--查看學生根據ID-->
    <select id="findStudentById" parameterType="integer"              resultType="org.ymx.sp_mybatis.pojo.Student">
        select *
        from student
        where id = #{id}
    </select>
    <!--查看全部學生-->
    <select id="findAllStudent" resultMap="studentResult">
        select *
        from student
    </select>
    <!--刪除學生根據ID-->
    <delete id="removeStudentById" parameterType="integer">
        delete
        from student
        where id = #{id}
    </delete>
    <!--修改學生根據ID-->
    <update id="updateStudentById" parameterType="org.ymx.sp_mybatis.pojo.Student">
        update student
        set name=#{name},
            age=#{age}
        where id = #{id}
    </update>
    <!--查詢結果集-->
    <resultMap id="studentResult" type="org.ymx.sp_mybatis.pojo.Student">
        <result column="id" javaType="INTEGER" jdbcType="INTEGER" property="id"/>
        <result column="name" javaType="STRING" jdbcType="VARCHAR" property="name"/>
        <result column="age" javaType="INTEGER" jdbcType="INTEGER" property="age"/>
    </resultMap>
</mapper>@Autowired
private XmlStudentMapper studentMapper;
@Test
void testJavaMapperInsert() {
Student student = new Student("張三", 22);
System.out.println(studentMapper.saveStudent(student));
}
@Test
void testJavaMapperFind() {
System.out.println(studentMapper.findStudentById(2));
}
@Test
void testJavaMapperFindAll() {
System.out.println(studentMapper.findAllStudent());
}
@Test
void testJavaMapperUpdate() {
Student student = new Student(2, "張三", 22);
System.out.println(studentMapper.updateStudentById(student));
}
@Test
void testJavaMapperDelete() {
System.out.println(studentMapper.removeStudentById(2));
}基本步驟:

注意事項:
(1)相比注解方式,更推薦使用xml方式,因為注解方式將SQL語句嵌套到Java代碼中,一旦需要修改則需要重新編譯項目,而xml方式則不需要重新編譯項目
(2)xml方式需要在主啟動函數或配置類中配置接口的掃描路徑
關于“SpringBoot怎么整合Mybatis”這篇文章的內容就介紹到這里,感謝各位的閱讀!相信大家對“SpringBoot怎么整合Mybatis”知識都有一定的了解,大家如果還想學習更多知識,歡迎關注億速云行業資訊頻道。
免責聲明:本站發布的內容(圖片、視頻和文字)以原創、轉載和分享為主,文章觀點不代表本網站立場,如果涉及侵權請聯系站長郵箱:is@yisu.com進行舉報,并提供相關證據,一經查實,將立刻刪除涉嫌侵權內容。