您好,登錄后才能下訂單哦!
您好,登錄后才能下訂單哦!
這篇文章主要介紹“Spring集成Mybatis怎么實現”,在日常操作中,相信很多人在Spring集成Mybatis怎么實現問題上存在疑惑,小編查閱了各式資料,整理出簡單好用的操作方法,希望對大家解答”Spring集成Mybatis怎么實現”的疑惑有所幫助!接下來,請跟著小編一起來學習吧!
雖然Spring中提供了JDBCTemplate模塊,已經很大程度了解決了JDBC代碼的復雜度,但它仍然是和Java代碼寫在一起的。反觀 Mybatis 將 Sql 語句寫在配置文件中,使得SQL語句和程序實現了松耦合。而且提供了些許標簽,使得SQL可以是動態的。在ORM基礎上想要更好的用Spring的DI、AOP、事務處理、Junit支持等實現成果,學會使用 Spring 框架集成 Mybatis 是大勢所趨。
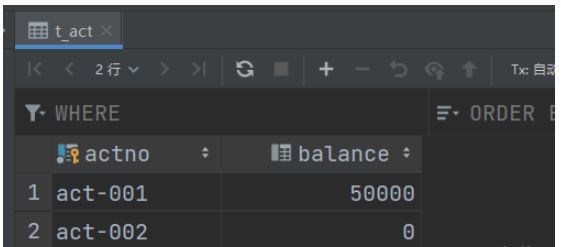
第一步:準備數據庫表

第二步:IDEA中創建一個模塊,并引入以下依賴
spring-context
spring-jdbc
mysql驅動
mybatis
mybatis-spring:mybatis提供的與spring框架集成的依賴
druid:德魯伊連接池
junit
    <dependencies>
        <dependency>
            <groupId>org.springframework</groupId>
            <artifactId>spring-context</artifactId>
            <version>6.0.5</version>
        </dependency>
        <dependency>
            <groupId>org.springframework</groupId>
            <artifactId>spring-jdbc</artifactId>
            <version>6.0.5</version>
        </dependency>
        <dependency>
            <groupId>mysql</groupId>
            <artifactId>mysql-connector-java</artifactId>
            <version>8.0.31</version>
        </dependency>
        <dependency>
            <groupId>org.mybatis</groupId>
            <artifactId>mybatis</artifactId>
            <version>3.5.11</version>
        </dependency>
        <dependency>
            <groupId>org.mybatis</groupId>
            <artifactId>mybatis-spring</artifactId>
            <version>3.0.1</version>
        </dependency>
        <dependency>
            <groupId>com.alibaba</groupId>
            <artifactId>druid</artifactId>
            <version>1.2.16</version>
        </dependency>
        <dependency>
            <groupId>junit</groupId>
            <artifactId>junit</artifactId>
            <version>4.13</version>
            <scope>test</scope>
        </dependency>
    </dependencies>
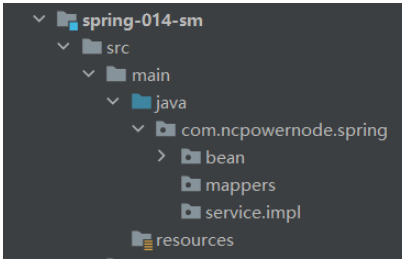
第三步:基于三層架構實現,所以提前創建好所有的包
XXXX.mapper
XXXX.service
XXXX.service.impl
XXXX.bean

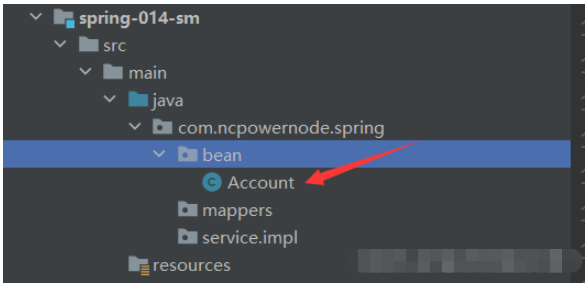
第四步:編寫bean
Account,按bean規范創建

第五步:編寫Mapper接口
AccountMapper接口,定義與數據庫交互的方法
package com.ncpowernode.spring.mappers;
import com.ncpowernode.spring.bean.Account;
import java.util.List;
public interface AccountMapper {
    List<Account> selectAll();
    Account selectByActno(String actno);
    int insert(Account account);
    int deleteByActno(String actno);
    int update(Account account);
}
第六步:編寫mapper配置文件
<?xml version="1.0" encoding="UTF-8" ?>
<!DOCTYPE mapper
        PUBLIC "-//mybatis.org//DTD Mapper 3.0//EN"
        "http://mybatis.org/dtd/mybatis-3-mapper.dtd">
<mapper namespace="com.ncpowernode.spring.mappers.AccountMapper">
    <select id="selectAll" resultType="account">
        select * from t_act;
    </select>
    <insert id="insert">
        insert into t_act values(#{actno},#{balance})
    </insert>
    <delete id="deleteByActno">
        delete from t_act where actno = #{actno};
    </delete>
    <select id="selectByActno" resultType="account">
        select * from t_act where actno = #{actno};
    </select>
    <update id="update">
        update t_act set balance = #{balance} where actno = #{actno};
    </update>
</mapper>
第七步:編寫service接口和service接口的實現類
service接口
package com.ncpowernode.spring.service;
import com.ncpowernode.spring.bean.Account;
import java.util.List;
public interface AccountService {
    int save(Account act);
    int deleteByActno(String actno);
    List<Account> getAll();
    void transfer(String fromActno,String toActno,double money);
}
service實現
package com.ncpowernode.spring.service.impl;
import com.ncpowernode.spring.bean.Account;
import com.ncpowernode.spring.mappers.AccountMapper;
import com.ncpowernode.spring.service.AccountService;
import org.springframework.beans.factory.annotation.Autowired;
import org.springframework.beans.factory.annotation.Qualifier;
import java.util.List;
@Service("accountService")
@Transactional
public class AccountServiceImpl implements AccountService {
    @Autowired
    @Qualifier("accountMapper")
    private AccountMapper accountMapper;
    @Override
    public int save(Account act) {
        return accountMapper.insert(act);
    }
    @Override
    public int deleteByActno(String actno) {
        return accountMapper.deleteByActno(actno);
    }
    @Override
    public List<Account> getAll() {
        return accountMapper.selectAll();
    }
    @Override
    public void transfer(String fromActno, String toActno, double money) {
        // 判斷余額
        Account fromAccount = accountMapper.selectByActno(fromActno);
        if (fromAccount.getBalance()<money) throw new RuntimeException("余額不足");
        // 更新數據庫
        Account toAccount = accountMapper.selectByActno(toActno);
        fromAccount.setBalance(fromAccount.getBalance()-money);
        toAccount.setBalance(toAccount.getBalance()+money);
        int cnt = accountMapper.update(fromAccount);
        cnt += accountMapper.update(toAccount);
        // 判斷業務是否實現成功
        if(cnt!=2) throw new RuntimeException("轉賬失敗");
    }
}
第八步:編寫jdbc.properties配置文件
數據庫連接池相關信息
jdbc.driver=com.mysql.cj.jdbc.Driver
jdbc.url=jdbc:mysql://localhost:3306/???
jdbc.username=???
jdbc.password=???
第九步:編寫mybatis-config.xml核心配置文件
<?xml version="1.0" encoding="UTF-8" ?>
<!DOCTYPE configuration
        PUBLIC "-//mybatis.org//DTD Config 3.0//EN"
        "http://mybatis.org/dtd/mybatis-3-config.dtd">
<configuration>
    <settings>
        <!--駝峰命名自動映射,默認false-->
        <setting name="mapUnderscoreToCamelCase" value="false"/>
        <!--設置懶加載-->
        <setting name="lazyLoadingEnabled" value="true"/>
        <!--配置日志,可以幫助我們查看sql執行信息-->
        <setting name="logImpl" value="STDOUT_LOGGING"/>
    </settings>
</configuration>
第十步:編寫spring.xml配置文件
組件掃描
引入外部的屬性文件
數據源
SqlSessionFactoryBean配置(注入mybatis核心配置文件路徑,指明別名包,注入數據源)
Mapper掃描配置器(指定掃描的包)
事務管理器(DataSourceTransactionManager,注入數據源)
啟動事務注解(注入事務管理器)
<?xml version="1.0" encoding="UTF-8"?>
<beans xmlns="http://www.springframework.org/schema/beans"
       xmlns:xsi="http://www.w3.org/2001/XMLSchema-instance"
       xmlns:context="http://www.springframework.org/schema/context"
       xmlns:tx="http://www.springframework.org/schema/tx"
       xsi:schemaLocation="http://www.springframework.org/schema/beans http://www.springframework.org/schema/beans/spring-beans.xsd
                            http://www.springframework.org/schema/context http://www.springframework.org/schema/context/spring-context.xsd
                            http://www.springframework.org/schema/tx http://www.springframework.org/schema/tx/spring-tx.xsd">
    <!--組件掃描-->
    <context:component-scan base-package="com.ncpowernode.spring.service"/>
    <!--引入外部的屬性文件-->
    <context:property-placeholder location="jdbc.properties"/>
    <!--數據源-->
    <bean id="dataSource" class="com.alibaba.druid.pool.DruidDataSource">
        <property name="driverClassName" value="${jdbc.driver}"/>
        <property name="url" value="${jdbc.url}"/>
        <property name="username" value="${jdbc.username}"/>
        <property name="password" value="${jdbc.password}"/>
    </bean>
    <!--配置SqlSessionFactoryBean-->
    <bean class="org.mybatis.spring.SqlSessionFactoryBean">
        <!--注入數據源-->
        <property name="dataSource" ref="dataSource"/>
        <!--指定別名包-->
        <property name="typeAliasesPackage" value="com.ncpowernode.spring.bean"/>
        <!--指定mybatis核心配置文件-->
        <property name="configLocation" value="mybatis-config.xml"/>
    </bean>
    <!--配置Mapper掃描配置器-->
    <!--主要掃描mapper接口,生成代理類-->
    <bean class="org.mybatis.spring.mapper.MapperScannerConfigurer">
        <property name="basePackage" value="com.ncpowernode.spring.mappers"/>
    </bean>
    <!--事務管理器-->
    <bean id="txManager" class="org.springframework.jdbc.datasource.DataSourceTransactionManager">
        <property name="dataSource" ref="dataSource"/>
    </bean>
    <!--啟動事務注解-->
    <tx:annotation-driven transaction-manager="txManager"/>
</beans>
第十一步:編寫測試程序,并添加事務,進行測試。
	@Test
    public void testSM(){
        ApplicationContext applicationContext = new ClassPathXmlApplicationContext("spring.xml");
        AccountService accountService = applicationContext.getBean("accountService", AccountServiceImpl.class);
        accountService.getAll().forEach(System.out::println);
        accountService.transfer("act-001","act-002",10000.0);
    }
測試結果


到此,關于“Spring集成Mybatis怎么實現”的學習就結束了,希望能夠解決大家的疑惑。理論與實踐的搭配能更好的幫助大家學習,快去試試吧!若想繼續學習更多相關知識,請繼續關注億速云網站,小編會繼續努力為大家帶來更多實用的文章!
免責聲明:本站發布的內容(圖片、視頻和文字)以原創、轉載和分享為主,文章觀點不代表本網站立場,如果涉及侵權請聯系站長郵箱:is@yisu.com進行舉報,并提供相關證據,一經查實,將立刻刪除涉嫌侵權內容。