您好,登錄后才能下訂單哦!
您好,登錄后才能下訂單哦!
這篇文章主要講解了“Android View與Compose互相調用的方法是什么”,文中的講解內容簡單清晰,易于學習與理解,下面請大家跟著小編的思路慢慢深入,一起來研究和學習“Android View與Compose互相調用的方法是什么”吧!
Compose 具有超強的兼容性,兼容現有的所有代碼,Compose 能夠與現有 View 體系并存,可實現漸進式替換。這就很有意義了,我們可以在現有項目中一小塊一小塊逐步地替換Compose,或者在舊項目中實現新的需求的時候,使用Compose。
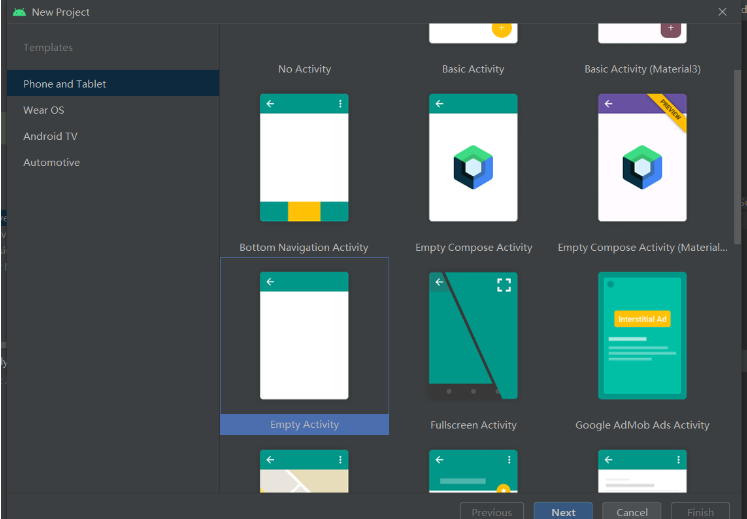
新建項目的時候選擇 Empty Activity

在app的build.config android代碼塊中添加
buildFeatures {
compose true
}
composeOptions {
kotlinCompilerExtensionVersion '1.1.1'
}
在app的build.config dependencies代碼塊中添加
dependencies {
//...省略...def compose_ui_version = '1.1.1'
implementation "androidx.compose.ui:ui:$compose_ui_version"
implementation "androidx.compose.ui:ui-tooling-preview:$compose_ui_version"
androidTestImplementation "androidx.compose.ui:ui-test-junit4:$compose_ui_version"
debugImplementation "androidx.compose.ui:ui-tooling:$compose_ui_version"
debugImplementation "androidx.compose.ui:ui-test-manifest:$compose_ui_version"implementation 'androidx.activity:activity-compose:1.3.1' //kotlin對應版本1.6.20
implementation 'androidx.compose.material:material:1.1.1'
}
在MainActivity.kt中定義Compose函數
@Composable
fun ComposeContent() {
    Box(
        modifier = Modifier.fillMaxSize(),
        contentAlignment = Alignment.Center
    ) {
        Text(text = "Hello world!")
    }
}在activity_main.xml中添加androidx.compose.ui.platform.ComposeView
<?xml version="1.0" encoding="utf-8"?>
<LinearLayout xmlns:android="http://schemas.android.com/apk/res/android"
    xmlns:app="http://schemas.android.com/apk/res-auto"
    xmlns:tools="http://schemas.android.com/tools"
    android:layout_width="match_parent"
    android:layout_height="match_parent"
    android:orientation="vertical"
    tools:context=".MainActivity">
    <androidx.compose.ui.platform.ComposeView
        android:id="@+id/compose_view"
        android:layout_width="match_parent"
        android:layout_height="match_parent" />
</LinearLayout>
在MainActivity.kt中,先通過findViewById找到ComposeView,然后通過composeView.setContent將Android 傳統View和Compose建立關聯。
override fun onCreate(savedInstanceState: Bundle?) {
    super.onCreate(savedInstanceState)
    setContentView(R.layout.activity_main)
    val composeView : ComposeView = findViewById(R.id.compose_view)
    composeView.setContent {
        ComposeContent()
    }
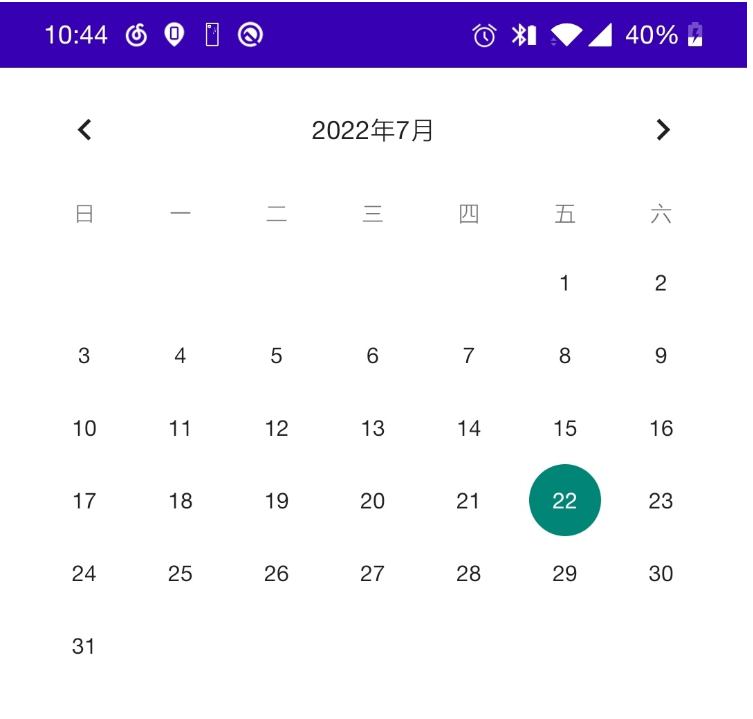
}在@Composable內使用: androidx.compose.ui.viewinterop.AndroidView,然后在factory里面返回原生View即可
@Composable
fun AndroidViewPage() {
    AndroidView(factory = {
        CalendarView(it)
    }, modifier = Modifier.fillMaxWidth(), update = {
        it.setOnDateChangeListener { view, year, month, day ->
            Toast.makeText(view.context, "${year}年${month}月${day}日", Toast.LENGTH_SHORT).show()
        }
    })
}
首先需要在AndroidManifest.xml中添加網絡權限
<uses-permission android:name="android.permission.INTERNET" />
@Composable
private fun rememberWebViewLifecycleObserver(webView: WebView): LifecycleEventObserver {
    return remember(webView) {
        LifecycleEventObserver { _, event ->
            run {
                when (event) {
                    Lifecycle.Event.ON_RESUME -> webView.onResume()
                    Lifecycle.Event.ON_PAUSE -> webView.onPause()
                    Lifecycle.Event.ON_DESTROY -> webView.destroy()
                    else -> Log.e("WebView", event.name)
                }
            }
        }
    }
}創建有狀態的WebView,并注冊生命周期
@Composable
fun rememberWebViewWIthLifecycle(): WebView {
    val context = LocalContext.current
    val webView = remember {
        WebView(context)
    }
    val lifecycleObserver = rememberWebViewLifecycleObserver(webView)
    val lifecycle = LocalLifecycleOwner.current.lifecycle
    DisposableEffect(lifecycle) {
        lifecycle.addObserver(lifecycleObserver)
        onDispose {
            lifecycle.removeObserver(lifecycleObserver)
        }
    }
    return webView
}@Composable
fun WebViewPage() {
//創建有狀態的WebView,并注冊生命周期
val webView = rememberWebViewWIthLifecycle()
AndroidView(factory = {
webView
}, modifier = Modifier
.fillMaxSize() //寬高占滿父布局
.background(Color.Red),
update = {webView ->
//設置支持JavaScript
val webSettings = webView.settings
webSettings.javaScriptEnabled = true
webView.loadUrl("https://www.baidu.com")
})
}獲取AndroidView中的原生View id
有時候,我們會遇到這種情況,就是在原生項目了,頁面中有部分使用了Compose,然后在Compose中又有部分組件使用了原生View,這種情況下,要如何取到AndroidView中的原生View id 呢 ?
<LinearLayout xmlns:android="http://schemas.android.com/apk/res/android"
    xmlns:app="http://schemas.android.com/apk/res-auto"
    xmlns:tools="http://schemas.android.com/tools"
    android:layout_width="match_parent"
    android:layout_height="match_parent"
    android:orientation="vertical"
    tools:context=".MainActivity">
    <androidx.compose.ui.platform.ComposeView
        android:id="@+id/compose_view"
        android:layout_width="match_parent"
        android:layout_height="match_parent" />
</LinearLayout>
在MainActivity.kt中,先通過findViewById找到ComposeView,然后通過composeView.setContent將Android 傳統View和Compose建立關聯。
override fun onCreate(savedInstanceState: Bundle?) {
    super.onCreate(savedInstanceState)
    setContentView(R.layout.activity_main)
    val composeView : ComposeView = findViewById(R.id.compose_view)
    composeView.setContent {
        ComposeContent()
    }
}
@Composable
fun ComposeContent() {
	//....
}在resources/values目錄下創建ids.xml
<?xml version="1.0" encoding="utf-8"?>
<resources>
    <item type="id" name="my_calendar_view" />
</resources>
@Composable
fun ComposeContent() {
    AndroidView(factory = {
        //這里也可以通過 layoutInflater.inflate(R.layout.xxxxxx) 的方式返回原生View
        val calendarView = CalendarView(it)
        val keyboard = R.id.my_calendar_view
        Log.i(TAG,"my_calendar_view id:$keyboard")
        calendarView.id = keyboard
        calendarView
    }, modifier = Modifier.fillMaxWidth(), update = {
        it.setOnDateChangeListener { view, year, month, day ->
            Toast.makeText(view.context, "${year}年${month}月${day}日", Toast.LENGTH_SHORT).show()
        }
    })
}在原生代碼的地方,通過composeView.findViewById查找id為my_calendar_view的原生View
window?.decorView?.post {
    val calendarViewId = R.id.my_calendar_view
    Log.i(TAG,"my_calendar_view id ===>:$calendarViewId")
    val calendarView = composeView.findViewById<CalendarView>(calendarViewId)
    Log.i(TAG,"calendarView:$calendarView")
    calendarView.setOnDateChangeListener { view, year, month, day ->
        Toast.makeText(view.context, "!!!! ${year}年${month}月${day}日", Toast.LENGTH_SHORT).show()
    }
}注意這里的window?.decorView?.post : 必須在頁面加載完成后,才能查找到my_calendar_view對應的原生View,如果直接在onCreate里面去查找,會發現composeView.findViewById<CalendarView>(calendarViewId)返回的是null
選擇任意一個日期,可以發現彈出的toast是!!!! year年month月day日,即原生的setOnDateChangeListener覆蓋了Compose中的setOnDateChangeListener監聽,這樣說明我們也在原生代碼處,取到了Compose內部的原生View了。
感謝各位的閱讀,以上就是“Android View與Compose互相調用的方法是什么”的內容了,經過本文的學習后,相信大家對Android View與Compose互相調用的方法是什么這一問題有了更深刻的體會,具體使用情況還需要大家實踐驗證。這里是億速云,小編將為大家推送更多相關知識點的文章,歡迎關注!
免責聲明:本站發布的內容(圖片、視頻和文字)以原創、轉載和分享為主,文章觀點不代表本網站立場,如果涉及侵權請聯系站長郵箱:is@yisu.com進行舉報,并提供相關證據,一經查實,將立刻刪除涉嫌侵權內容。