您好,登錄后才能下訂單哦!
您好,登錄后才能下訂單哦!
這篇“Ubuntu常見錯誤問題如何解決”文章的知識點大部分人都不太理解,所以小編給大家總結了以下內容,內容詳細,步驟清晰,具有一定的借鑒價值,希望大家閱讀完這篇文章能有所收獲,下面我們一起來看看這篇“Ubuntu常見錯誤問題如何解決”文章吧。
一、下載libcap-1.8.1.tar.gz, 解壓縮之后
錯誤1: ./configure
checking for getifaddrs... yes
checking ifaddrs.h usability... yes
checking ifaddrs.h presence... yes
checking for ifaddrs.h... yes
checking for socklen_t... yes
checking for getaddrinfo... yes
checking whether to build optimizer debugging code... no
checking whether to build parser debugging code... no
checking whether we have dag api headers... no
checking whether we have septel api headers... no
checking whether we have myricom sniffer api... no
checking whether turbocap is supported... no
checking for flex... no
checking for lex... no
configure: error: neither flex nor lex was found.
核心錯誤信息為:
error: neither flex nor lex was found.
解決辦法: sudo apt-get install flex bison
reading package lists... done
building dependency tree
reading state information... done
the following package was automatically installed and is no longer required:
 linux-image-extra-4.4.0-34-generic
use 'sudo apt autoremove' to remove it.
the following additional packages will be installed:
 libbison-dev libfl-dev
suggested packages:
 bison-doc
the following new packages will be installed:
 bison flex libbison-dev libfl-dev
0 upgraded, 4 newly installed, 0 to remove and 7 not upgraded.
need to get 900 kb of archives.
after this operation, 2,692 kb of additional disk space will be used.
do you want to continue? [y/n] y
get:1 http://mirrors.aliyun.com/ubuntu xenial/main amd64 libfl-dev amd64 2.6.0-11 [12.5 kb]
get:2 http://mirrors.aliyun.com/ubuntu xenial/main amd64 flex amd64 2.6.0-11 [290 kb]
get:3 http://mirrors.aliyun.com/ubuntu xenial/main amd64 libbison-dev amd64 2:3.0.4.dfsg-1 [338 kb]
get:4 http://mirrors.aliyun.com/ubuntu xenial/main amd64 bison amd64 2:3.0.4.dfsg-1 [259 kb]
fetched 900 kb in 1s (518 kb/s)
selecting previously unselected package libfl-dev:amd64.
然后輸入==> sudo make install , 進行安裝
錯誤2:
checking for gcc... gcc
checking whether the c compiler works... yes
checking for c compiler default output file name... a.out
checking for suffix of executables...
checking whether we are cross compiling... no
checking for suffix of object files... o
checking whether we are using the gnu c compiler... yes
checking whether gcc accepts -g... yes
checking for gcc option to accept iso c89... none needed
checking for pcap_open_live in -lpcap... no
error: pcap library not found!
問題解決:
sudo apt-get install libsqlite3-dev libpcap-dev
然后重新嘗試新的命令,即可解決上述錯誤
二、中文模式下切換回英文模式?
修改/etc/default/locale文件的語言值。
將lang zh_cn.utf-8修改為en_us.utf-8 , language zh_cn:zh修改為en_us:en
三、英文模式下開機自動啟動ibus中文輸入法。
英文模式下,ibus不能自動啟動。每次輸入中文都得手動啟動。這個讓人不能接受。google一下,兩種方法。
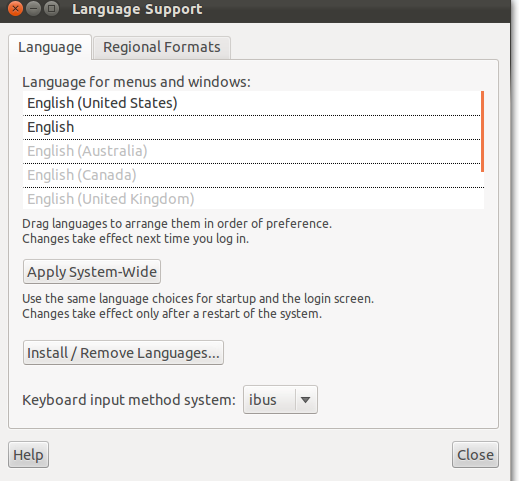
方法1:system settings->languange-support->keyboard input method system ->ibus

這種方法我沒試驗成功。如圖所示,選擇了沒有保存按鈕。我以為是默認保存的。但是關了在打開發現還是沒有選擇上。有可能語言包沒有按完整的語言,每次進入語言設置,都會提示語言包沒有安裝完整。
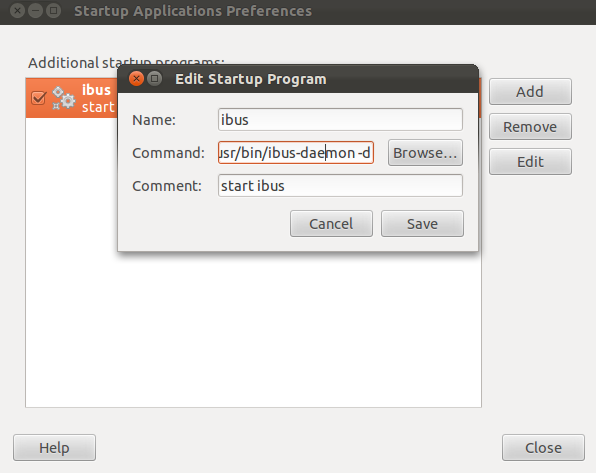
方法2:添加ibus設置為開機啟動的應用
system->preferences->startup application

-d 的意思是讓ibus在后臺運行
以上就是關于“Ubuntu常見錯誤問題如何解決”這篇文章的內容,相信大家都有了一定的了解,希望小編分享的內容對大家有幫助,若想了解更多相關的知識內容,請關注億速云行業資訊頻道。
免責聲明:本站發布的內容(圖片、視頻和文字)以原創、轉載和分享為主,文章觀點不代表本網站立場,如果涉及侵權請聯系站長郵箱:is@yisu.com進行舉報,并提供相關證據,一經查實,將立刻刪除涉嫌侵權內容。