您好,登錄后才能下訂單哦!
您好,登錄后才能下訂單哦!
這篇“Python opencv怎么實現高動態范圍成像”文章的知識點大部分人都不太理解,所以小編給大家總結了以下內容,內容詳細,步驟清晰,具有一定的借鑒價值,希望大家閱讀完這篇文章能有所收獲,下面我們一起來看看這篇“Python opencv怎么實現高動態范圍成像”文章吧。
如今,大多數數字圖像和成像設備每通道使用 8 位整數表示灰度,因此將設備的動態范圍限制在兩個數量級(實際上是 256 級),而人眼可以適應變化十個數量級的照明條件。當我們拍攝真實世界場景的照片時,明亮區域可能曝光過度,而黑暗區域可能曝光不足,因此我們無法使用單次曝光捕捉所有細節。 HDR 成像適用于每通道使用超過 8 位(通常為 32 位浮點值)的圖像,允許更寬的動態范圍。獲取 HDR 圖像的方法有很多種,但最常見的一種是使用以不同曝光值拍攝的場景照片。要結合這些曝光,了解相機的響應函數以及估計它的算法很有用。混合 HDR 圖像后,必須將其轉換回 8 位才能在普通顯示器上查看。這個過程稱為色調映射。當場景或相機的對象在鏡頭之間移動時,會出現額外的復雜性,因為應該配準和對齊具有不同曝光的圖像。在本教程中,我們將展示如何從曝光序列中生成和顯示 HDR 圖像。在我們的例子中,圖像已經對齊并且沒有移動對象。我們還展示了一種稱為曝光融合的替代方法,它可以產生低動態范圍的圖像。

from __future__ import print_function
from __future__ import division
import cv2 as cv
import numpy as np
import argparse
import os
def cv_show(name, img):
    cv.imshow(name, img)
    cv.waitKey(0)
    cv.destroyAllWindows()
def compare(imgs):
  #  for i in range(len(imgs)):
 #       imgs[i][:,-3:-1,:] = [255,255,255]
    res = np.hstack(imgs)
    cv_show('Compare', res)
def loadExposureSeq(path): images = [] times = [] with open(os.path.join(path, 'list.txt')) as f: content = f.readlines() for line in content: tokens = line.split() images.append(cv.imread(os.path.join(path, tokens[0]))) # 便于之后的逆CRF操作 times.append(1 / float(tokens[1])) return images, np.asarray(times, dtype=np.float32)
# jupyter 難以手動輸入參數,故使用絕對路徑
#parser = argparse.ArgumentParser(description='Code for High Dynamic Range Imaging tutorial.')
# parser.add_argument('--input', type=str, help='Path to the directory that contains images and exposure times.')
# args = parser.parse_args()
# if not args.input:
#     parser.print_help()
#     exit(0)
# images, times = loadExposureSeq(args.input)
images, times = loadExposureSeq('exposures/')
calibrate = cv.createCalibrateDebevec()
response = calibrate.process(images, times)
merge_debevec = cv.createMergeDebevec()
hdr = merge_debevec.process(images, times, response)
tonemap = cv.createTonemap(2.2)
ldr = tonemap.process(hdr)
merge_mertens = cv.createMergeMertens()
fusion = merge_mertens.process(images)
cv.imwrite('fusion.png', fusion * 255)
cv.imwrite('ldr.png', ldr * 255)
cv.imwrite('hdr.hdr', hdr)True
images, times = loadExposureSeq('exposures/')# 查看數據集中曝光圖像個數 len(images)
16
首先我們從用戶自定義文件夾中(此處我采用了教程提供的數據集并將其放置到了同目錄下便于載入)載入輸入圖像以及其曝光時間。文件夾中需要包含圖像和list.txt文本文件,其中包含了文件名稱和反曝光時間
提供的圖像數據集的列表如下:
memorial00.png 0.03125
memorial01.png 0.0625
...
memorial15.png 1024
calibrate = cv.createCalibrateDebevec()
response = calibrate.process(images, times)
用法如下:
cv.createCalibrateDebevec( [, samples[, lambda_[, random]]] ) -> retval
參數含義:
samples :number of pixel locations to use
lambda :smoothness term weight. Greater values produce smoother results, but can alter the response.
random :if true sample pixel locations are chosen at random, otherwise they form a rectangular grid.
很多 HDR 構建算法都需要了解相機響應函數(CRF)。 我們使用一種校準算法來估計所有 256 個像素值的逆 CRF
merge_debevec = cv.createMergeDebevec()
# 利用逆CRF形成HDR圖像
hdr = merge_debevec.process(images, times, response)
用法如下:
cv.createMergeMertens( [, contrast_weight[, saturation_weight[, exposure_weight]]] ) -> retval
參數含義:
contrast_weight :contrast measure weight. See MergeMertens.
saturation_weight: saturation measure weight
exposure_weight :well-exposedness measure weight
我們使用 Debevec 的加權方案,使用上一項中計算的響應來構建 HDR 圖像。
tonemap = cv.createTonemap(2.2)
ldr = tonemap.process(hdr)
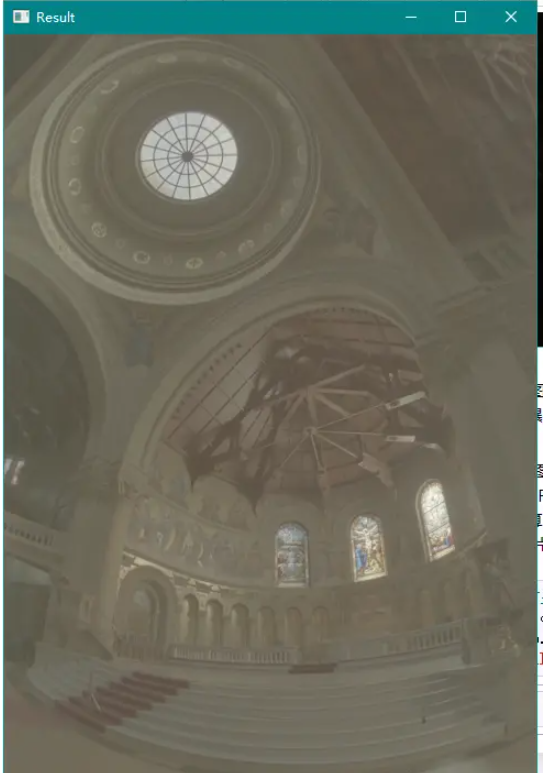
cv_show('Result', ldr)
用法如下: cv.createTonemap( [, gamma] ) -> retval
參數含義:
gamma :positive value for gamma correction. Gamma value of 1.0 implies no correction, gamma equal to 2.2f is suitable for most displays. Generally gamma > 1 brightens the image and gamma < 1 darkens it.
由于我們想在普通 LDR 顯示器上看到我們的結果,我們必須將 HDR 圖像映射到 8 位范圍,保留大部分細節。 這是色調映射方法的主要目標。 我們使用帶有雙邊濾波的色調映射器,并將 2.2 設置為 gamma 校正的值。
merge_mertens = cv.createMergeMertens()
fusion = merge_mertens.process(images)
如果我們不需要 HDR 圖像,還有另一種方法可以合并我們的曝光。 這個過程稱為曝光融合,并產生不需要伽馬校正的 LDR 圖像。 它也不使用照片的曝光值。
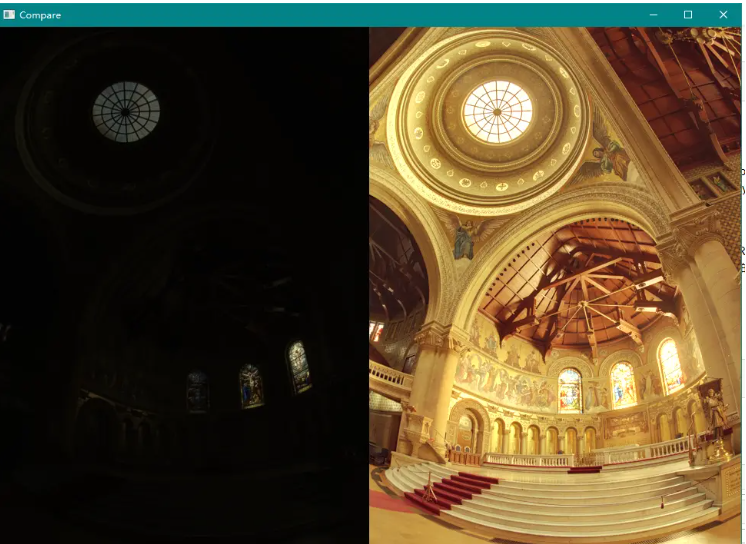
compare([ldr,fusion])

左邊是對HDR圖像直接進行色調映射的結果,只會保留大部分細節,右邊圖像是使用所有輸入圖像序列進行圖像曝光融合的結果
請注意,HDR 圖像不能以一種常見的圖像格式存儲,因此我們將其保存為 Radiance 圖像 (.hdr)。 此外,所有 HDR 成像函數都返回 [0, 1] 范圍內的結果,因此我們應該將結果乘以 255。您可以嘗試其他色調映射算法:cv::TonemapDrago、cv::TonemapMantiuk 和 cv::TonemapReinhard 您還可以調整 您自己的照片的 HDR 校準和色調映射方法參數。
# 修改gamma使整幅圖像變亮
tonemap = cv.createTonemap(10)
ldr = tonemap.process(hdr)
cv_show('Result', ldr)
以上就是關于“Python opencv怎么實現高動態范圍成像”這篇文章的內容,相信大家都有了一定的了解,希望小編分享的內容對大家有幫助,若想了解更多相關的知識內容,請關注億速云行業資訊頻道。
免責聲明:本站發布的內容(圖片、視頻和文字)以原創、轉載和分享為主,文章觀點不代表本網站立場,如果涉及侵權請聯系站長郵箱:is@yisu.com進行舉報,并提供相關證據,一經查實,將立刻刪除涉嫌侵權內容。