您好,登錄后才能下訂單哦!
您好,登錄后才能下訂單哦!
這篇文章主要介紹了Vue中的slot如何使用的相關知識,內容詳細易懂,操作簡單快捷,具有一定借鑒價值,相信大家閱讀完這篇Vue中的slot如何使用文章都會有所收獲,下面我們一起來看看吧。
在Vue中,我們使用組件來組織頁面和組織代碼,類似于搭積木,每一個組件都是一個積木,使用一些相同或者不同組件就能搭建出我們想要的頁面。
slot(插槽)是組件功能的重要組成部分,插槽必須用于組件才有意義。
它為組件提供了對外的接口,允許從組件外部傳遞內容,并將這部分內容放置到指定的位置。
當一個組件可能被使用至少兩次并且兩次使用內容(這里指組件視圖的組成)不同時,插槽才有存在的必要。注意: 本文的代碼都是基于Vue3編寫。
Link.vue
<template>
  <a :href="href" rel="external nofollow"  class="link">
    <!-- 留個插槽,外界傳入內容放置在這里 -->
    <slot></slot>
  </a>
</template>
<script>
export default {
  props: {
    href: {
      required: true,
      type: String,
    },
  },
};

</script>
<style lang="less" scoped>
.link {
display: inline-block;
line-height: 1;
white-space: nowrap;
cursor: pointer;
background: #fff;
border: 1px solid #dcdfe6;
color: #606266;
-webkit-appearance: none;
text-align: center;
box-sizing: border-box;
outline: none;
margin: 0;
transition: 0.1s;
font-weight: 500;
padding: 12px 20px;
font-size: 14px;
border-radius: 4px;
}
</style>App.vue
<template>
  <div class="app">
    <Link href="https://baidu.com" rel="external nofollow" > 百度</Link>
    <br />
    <Link href="https://google.com" rel="external nofollow"  >
      <!-- 這里允許放置任意的內容,包括字符串和標簽 -->
      <span>Icon</span>谷歌</Link
    >
  </div>
</template>
<script>
import Link from "./Link.vue";

export default {
  components: {
    Link,
  },
};
</script>
視覺效果:

以上實現了兩個組件Link.vue和App.vue,Link.vue是一個鏈接組件,在組件內部已經定義好了樣式,然后鏈接的內容交由外界使用時填充。
在App.vue組件內則使用了Link.vue組件兩次,并且兩次傳入的內容不同。
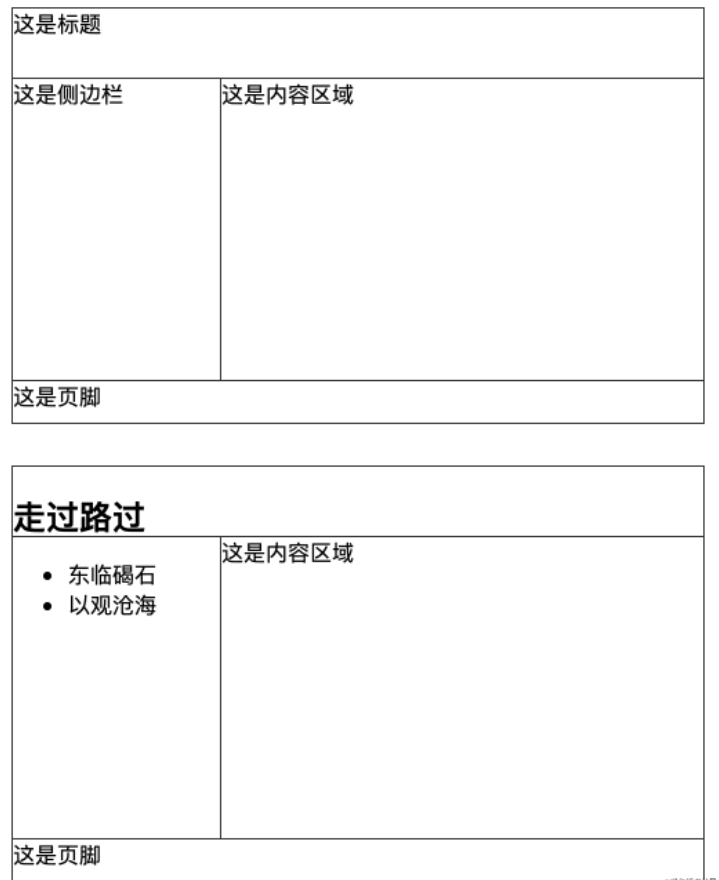
上面的Link.vue只要求填充一份內容,那么當我們需要在組件的好幾個位置都填充不同的內容應該怎么辦?這時候可以使用具名插槽,就是給組件的每個填充區域都取個名字,這樣在使用的時候就可以往對應名字的那個區域填充內容。
Page.vue
<template>
  <div class="page">
    <header class="page-header">
      <slot name="header"></slot>
    </header>
    <div class="page-center">
      <aside class="page-aside">
        <slot name="aside"></slot>
      </aside>
      <div class="page-content">
        <slot name="content"></slot>
      </div>
    </div>
    <footer class="page-footer">
      <slot name="footer"></slot>
    </footer>
  </div>
</template>
<script>
export default {
  setup() {
    return {};
  },
};
</script>
<style lang="less">
body {
margin: 0;
}
.page {
border: 1px solid #333;
width: 100vw;
height: 100vh;
display: flex;
flex-direction: column;
&-header {
height: 50px;
border-bottom: 1px solid #333333;
}
&-center {
flex: 1;
display: flex;
}
&-aside {
width: 150px;
border-right: 1px solid #333333;
}
&-content {
flex: 1;
}
&-footer {
border-top: 1px solid #333;
height: 30px;
}
}
</style>App.vue
<template>
  <Page >
    <template v-slot:header>這是標題</template>
    <template v-slot:aside>這是側邊欄</template>
    <template v-slot:content>這是內容區域</template>
    <template v-slot:footer>這是頁腳</template>
  </Page>

  <Page >
    <template v-slot:header>
      <h3>走過路過</h3>
    </template>
    <template v-slot:aside>
      <ul>
        <li>東臨碣石</li>
        <li>以觀滄海</li>
      </ul>
    </template>
    <template v-slot:content>這是內容區域</template>
    <template v-slot:footer>這是頁腳</template>
  </Page>
</template>
<script>
import Page from "./Page.vue";

export default {
  components: {
    Page,
  },
};
</script>
效果圖:

為啥叫作用域插槽?首先要搞清楚作用域這個概念。在JS中,作用域表示的是當前的執行上下文,只有在當前作用域中變量才可以被使用。作用域有層次之分,分為父作用域和子作用域,子作用域可以訪問父作用域中的變量,這一層層的往上則形成了作用域鏈。JS中只有全局作用域和函數作用域,ES6新增了塊級作用域。關于作用域,這里不再贅言,有需要的同學可以去MDN作用域查看。
Vue本質上還是js,模板最終會被編譯成render函數,每個組件都有一個render函數。下面先看個例子:
Count.vue
<template>
  <div>
    <p>當前數字:{{ count }}</p>
    <button @click="onAdd">+</button>
    <button @click="onMinus">-</button>
    <slot></slot>
  </div>
</template>
<script>
export default {
data() {
return {
count: 0,
};
},
methods: {
onAdd() {
this.count++;
},
onMinus() {
this.count--;
},
},
};
</script>App.vue
<template>
  <div>
    <Count >
      <p>這就是填充Count組件的插槽</p>
      <p>appCount:{{ appCount }}</p>
      <p>Count組件中的count變量:{{ count }}</p>
    </Count>
    <br />
    <button @click="onClick">app add</button>
  </div>
</template>
<script>
import Count from "./Count.vue";
export default {
components: {
Count,
},
data() {
return {
appCount: 0,
};
},
methods: {
onClick() {
this.appCount++;
},
},
};
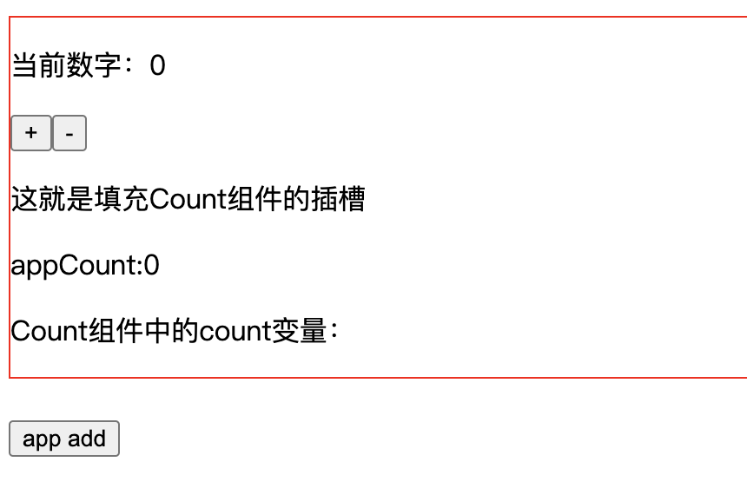
</script>效果圖:

從上面的效果圖中可以看到,在App.vue組件中使用Count.vue組件時,在Count.vue組件的插槽中,能夠訪問appCount變量,但是不能訪問Count.vue組件的Count變量,這是為什么呢?理論上,插槽傳入的內容最終會插入到Count.vue組件中,那么也應該可以訪問Count.vue組件的變量才對啊?
父級模板里的所有內容都是在父級作用域中編譯的;子模板里的所有內容都是在子作用域中編譯的。
上面的一段引用摘自Vue文檔,這段文字表明了,在App.vue中的一切,包括Count.vue組件的插槽內容都是在App.vue組件下編譯的,也就是Count.vue組件的插槽模板可以訪問App.vue組件的所有變量,但不能訪問Count.vue的任意變量。如果我一定要在插槽中訪問Count.vue的count變量呢?這個時候作用域插槽就派上用場了。
作用域插槽允許在組件中對插槽所在的上下文暴露某一些變量,改寫以上的Count.vue組件,
Count.vue
<template>
  <div>
    <p>當前數字:{{ count }}</p>
    <button @click="onAdd">+</button>
    <button @click="onMinus">-</button>
    <!-- 把count變量暴露到插槽作用域 -->
    <slot :count="count"></slot>
  </div>
</template>
<script>
export default {
data() {
return {
count: 0,
};
},
methods: {
onAdd() {
this.count++;
},
onMinus() {
this.count--;
},
},
};
</script>App.vue
<template>
  <div>
    <Count >
     <!--Count組件插槽暴露的所有變量都放在 slotProps對象中 -->
      <template v-slot="slotProps">
        <p>這就是填充Count組件的插槽</p>
        <p>appCount:{{ appCount }}</p>
        <p>Count組件中的count變量:{{ slotProps.count }}</p>
      </template>
    </Count>
    <br />
    <button @click="onClick">app add</button>
  </div>
</template>
<script>
import Count from "./Count.vue";
export default {
components: {
Count,
},
data() {
return {
appCount: 0,
};
},
methods: {
onClick() {
this.appCount++;
},
},
};
</script>這就是作用域插槽,本質上了是允許在父組件作用域訪問到子組件作用域,它為插槽模板區域提供了一個數據來源于子組件的上下文。
作用域插槽的用處還是挺廣的,總的來說當你需要它時自然會用到它,如果想提前學習,可以看一下elementUI的table組件。
上面就插槽的使用說了一大堆,關于插槽的實現還是沒有涉及,下文講解在Vue中插槽是如何實現的?
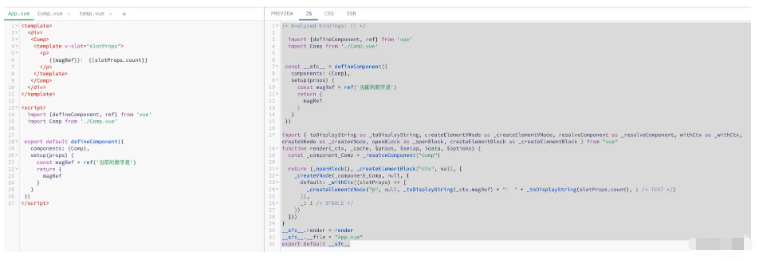
首先,我們都知道,無論是使用jsx還是模板,最終都會編譯成render函數,并且render函數在執行之后會輸出 Virtual Dom ,下面先看一個組件在編譯完成之后是什么樣子?
Comp.vue
<template>
  <div>
   	<p>count: {{count}}</p>
    <button @click="onClick">
      ADD
    </button>
    <slot :count="count"></slot>
  </div>
</template>
<script>
import {defineComponent, ref} from 'vue'
export default defineComponent((props) => {
const count = ref(0);
const onClick = () => {
count.value++
}
return {
count,
onClick
}
})
</script>App.vue
<template>
  <div>
   <Comp>
   	<template v-slot="slotProps">
      <p>
         {{magRef}}: {{slotProps.count}}
      </p>
    </template>
   </Comp>
  </div>
</template>
<script>
import {defineComponent, ref} from 'vue'
import Comp from './Comp.vue'
export default defineComponent({
components: {Comp},
setup(props) {
const magRef = ref('當前的數字是')
return {
magRef
}
}
})
</script>Comp.vue編譯之后:
/* Analyzed bindings: {} */
import {
  defineComponent,
  ref
} from 'vue'

const __sfc__ = defineComponent((props) => {
  const count = ref(0);
  const onClick = () => {
    count.value++
  }
  return {
    count,
    onClick
  }
})

import {
  toDisplayString as _toDisplayString,
  createElementVNode as _createElementVNode,
  renderSlot as _renderSlot,
  openBlock as _openBlock,
  createElementBlock as _createElementBlock
} from "vue"

function render(_ctx, _cache, $props, $setup, $data, $options) {
  return (_openBlock(), _createElementBlock("div", null, [
    _createElementVNode("p", null, "count: " + _toDisplayString(_ctx.count), 1 /* TEXT */ ),
    _createElementVNode("button", {
      onClick: _cache[0] || (_cache[0] = (...args) => (_ctx.onClick && _ctx.onClick(...args)))
    }, " ADD "),
    _renderSlot(_ctx.$slots, "default", {
      count: _ctx.count
    })
  ]))
}
__sfc__.render = render
__sfc__.__file = "Comp.vue"
export default __sfc__
App.vue編譯之后:
/* Analyzed bindings: {} */
import {
  defineComponent,
  ref
} from 'vue'
import Comp from './Comp.vue'


const __sfc__ = defineComponent({
  components: {
    Comp
  },
  setup(props) {
    const magRef = ref('當前的數字是')
    return {
      magRef
    }
  }
})

import {
  toDisplayString as _toDisplayString,
  createElementVNode as _createElementVNode,
  resolveComponent as _resolveComponent,
  withCtx as _withCtx,
  createVNode as _createVNode,
  openBlock as _openBlock,
  createElementBlock as _createElementBlock
} from "vue"

function render(_ctx, _cache, $props, $setup, $data, $options) {
  const _component_Comp = _resolveComponent("Comp")

  return (_openBlock(), _createElementBlock("div", null, [
    _createVNode(_component_Comp, null, {
      default: _withCtx((slotProps) => [
        _createElementVNode("p", null, _toDisplayString(_ctx.magRef) + ": " + _toDisplayString(slotProps.count), 1 /* TEXT */ )
      ]),
      _: 1 /* STABLE */
    })
  ]))
}
__sfc__.render = render
__sfc__.__file = "App.vue"
export default __sfc__
這個編譯是在加載.vue文件的時候就執行了,runtime階段是不存在模板字符串了(使用UMD的時候會存在),在瀏覽器中執行的都是編譯之后的js。下面具體分析一下以上Comp.vue和App.vue編譯之后的js代碼。
首先在Comp.vue中,<slot :count="count"></slot>會被編譯成_renderSlot(_ctx.$slots, "default", {count: _ctx.count}),下面看看_renderSlot中干了什么?
export type Slot = (...args: any[]) => VNode[]

export type InternalSlots = {
  [name: string]: Slot | undefined
}
export function renderSlot(
  slots: Slots,
  name: string,
  props: Data = {},
  // this is not a user-facing function, so the fallback is always generated by
  // the compiler and guaranteed to be a function returning an array
  fallback?: () => VNodeArrayChildren,
  noSlotted?: boolean
): VNode {
  let slot = slots[name]

  openBlock()
  const validSlotContent = slot && ensureValidVNode(slot(props))
  const rendered = createBlock(
    Fragment,
    { key: props.key || `_${name}` },
    validSlotContent || (fallback ? fallback() : []),
    validSlotContent && (slots as RawSlots)._ === SlotFlags.STABLE
      ? PatchFlags.STABLE_FRAGMENT
      : PatchFlags.BAIL
  )
  return rendered
}
_renderSlot(_ctx.$slots, "default", {count: _ctx.count})這一句顯然是執行_ctx.$slots.default({count: _ctx.count}),這說明在父組件中,每個插槽模板最終會被編譯成一個函數,并且這個函數會被傳遞到子組件,在子組件里面會以props(這里是{count: _ctx.count})作為參數執行插槽函數,最終_ctx.$slots.default({count: _ctx.count})會返回virtual dom對象。
下面再看一下App.vue組件:
<Comp>
    <template v-slot="slotProps">
        <p>
            {{magRef}}: {{slotProps.count}}
        </p>
    </template>
</Comp>
被編譯成了:
_createVNode(_component_Comp, null, {
    default: _withCtx((slotProps) => [
    _createElementVNode("p", null, _toDisplayString(_ctx.magRef) + ": " + _toDisplayString(slotProps.count), 1 /* TEXT */ )
    ]),
    _: 1 /* STABLE */
})
請忽略_withCtx,顯然模板會編譯成一個函數,并傳遞到子組件,進而在子組件中構建出完整的virtual dom, 上面中_ctx是當前組件的上下文,slotProps則是作用域插槽暴露的參數。
由此可以做一個總結,vue slot的實現原理:
所有的模板會被編譯成創建vnode的函數。
父組件中傳遞給子組件的插槽(每個插槽都是一個函數,即名字不同的插槽為不同的函數)內容模板也會被編譯成函數并且傳遞給子組件,模板中如果使用了父組件的變量,那么會通過閉包的形式在插槽函數中被使用。
子組件在接收到父組件傳遞的插槽內容函數,會以在slot暴露的變量(只有作用域插槽有這些變量)為參數執行這個函數,返回vnode,這個vnode會作為子組件vnode的一部分。
關于“Vue中的slot如何使用”這篇文章的內容就介紹到這里,感謝各位的閱讀!相信大家對“Vue中的slot如何使用”知識都有一定的了解,大家如果還想學習更多知識,歡迎關注億速云行業資訊頻道。
免責聲明:本站發布的內容(圖片、視頻和文字)以原創、轉載和分享為主,文章觀點不代表本網站立場,如果涉及侵權請聯系站長郵箱:is@yisu.com進行舉報,并提供相關證據,一經查實,將立刻刪除涉嫌侵權內容。