您好,登錄后才能下訂單哦!
您好,登錄后才能下訂單哦!
這篇文章主要介紹了Android單選多選按鈕怎么使用的相關知識,內容詳細易懂,操作簡單快捷,具有一定借鑒價值,相信大家閱讀完這篇Android單選多選按鈕怎么使用文章都會有所收獲,下面我們一起來看看吧。
單選按鈕類:RadioButton
android:checked="true"設置默認選中
單選按鈕控件通常與RadioGroup搭配使用。
RadioGroup是LinearLayout的子類,用于將多個單選按鈕組合為一組。
同一按鈕組內的單選按鈕只能有一個被選中。
用法基本與Button相同
CheckBox對象.isChecked()方法可以用來判斷復選按鈕是否選中
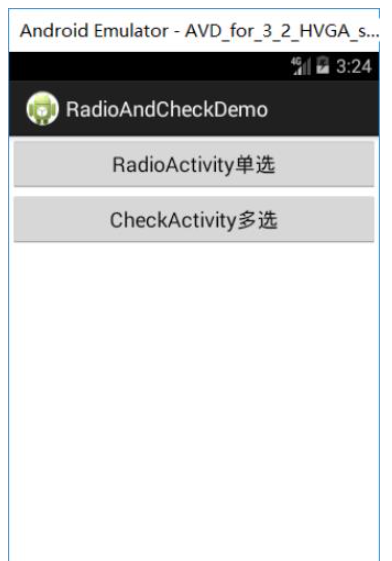
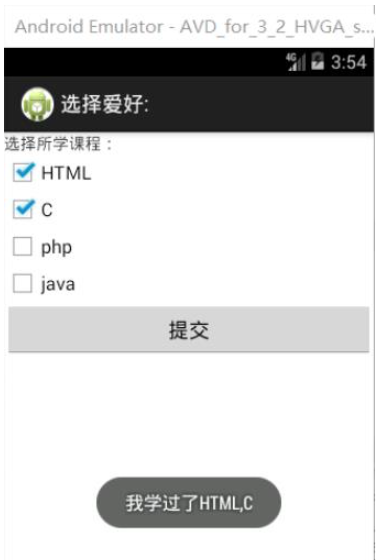
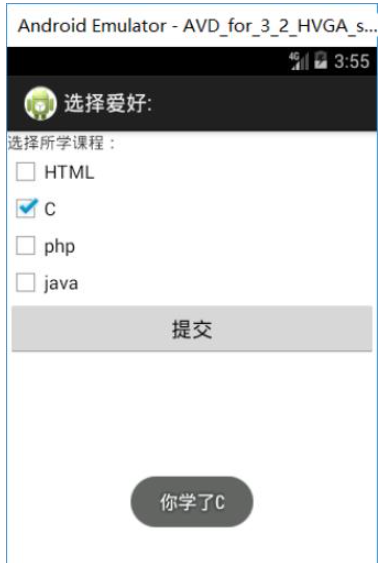
效果圖(單選多選寫在一個項目里邊,用了一個頁面跳轉):
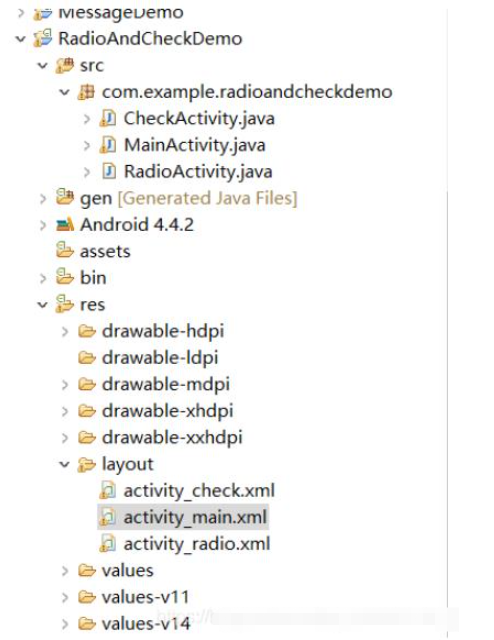
項目目錄:


多選按鈕,兩種形式


activity_main.xml
<LinearLayout xmlns:android="http://schemas.android.com/apk/res/android"
    xmlns:tools="http://schemas.android.com/tools"
    android:id="@+id/LinearLayout1"
    android:layout_width="match_parent"
    android:layout_height="match_parent"
    android:orientation="vertical"
    tools:context="${relativePackage}.${activityClass}" >

    <Button
        android:id="@+id/button1"
        android:layout_width="match_parent"
        android:layout_height="wrap_content"
        android:text="RadioActivity單選" />

    <Button
        android:id="@+id/button2"
        android:layout_width="match_parent"
        android:layout_height="wrap_content"
        android:text="CheckActivity多選" />

</LinearLayout>
MainActivity.java
package com.example.radioandcheckdemo;

import android.app.Activity;
import android.content.Intent;
import android.os.Bundle;
import android.view.Menu;
import android.view.MenuItem;
import android.view.View;
import android.view.View.OnClickListener;
import android.widget.Button;

public class MainActivity extends Activity implements OnClickListener{

    private Button button1;
    private Button button2;

    @Override
    protected void onCreate(Bundle savedInstanceState) {
        super.onCreate(savedInstanceState);
        setContentView(R.layout.activity_main);

        button1 = (Button) findViewById(R.id.button1);
        button2 = (Button) findViewById(R.id.button2);
        button1.setOnClickListener(this);
        button2.setOnClickListener(this);

    }

    @Override
    public void onClick(View v) {
        Intent intent = new Intent();
        switch (v.getId()) {
        case R.id.button1:
            //跳轉頁面
            intent.setClass(MainActivity.this, RadioActivity.class);
            startActivity(intent);
            break;
        case R.id.button2:
            //跳轉頁面
            intent.setClass(MainActivity.this, CheckActivity.class);
            startActivity(intent);
        default:
            break;
        }
    }
}
activity_radio.xml
<LinearLayout xmlns:android="http://schemas.android.com/apk/res/android"
    xmlns:tools="http://schemas.android.com/tools"
    android:id="@+id/LinearLayout1"
    android:layout_width="match_parent"
    android:layout_height="match_parent"
    android:orientation="vertical"
    android:layout_margin="20sp"
    tools:context="${relativePackage}.${activityClass}" >

    <TextView
        android:layout_width="wrap_content"
        android:layout_height="wrap_content"
        android:text="@string/hello_world" />

    <!--
        單選
        android:checked="true"設置默認選中
     -->
    <RadioGroup
        android:id="@+id/group1"
        android:orientation="horizontal"
        android:layout_width="match_parent"
        android:layout_height="wrap_content" >

        <RadioButton
            android:id="@+id/radio1"
            android:layout_width="wrap_content"
            android:layout_height="wrap_content"
            android:checked="true"
            android:text="男"/>
         <RadioButton
             android:id="@+id/radio2"
            android:layout_width="wrap_content"
            android:layout_height="wrap_content"
            android:text="女"/>

    </RadioGroup>

    <!-- 分界線 -->
    <View
        android:layout_width="match_parent"
        android:layout_height="2sp"
        android:background="@android:color/holo_blue_dark"
        android:layout_marginTop="10sp"
        android:layout_marginBottom="10sp" />

    <TextView
        android:id="@+id/text1"
        android:layout_width="match_parent"
        android:layout_height="wrap_content"
        android:textSize="18sp"
        android:text="你吃飯了嗎?"/>

    <RadioGroup
        android:id="@+id/group2"
        android:layout_width="match_parent"
        android:layout_height="wrap_content" >

        <RadioButton
            android:id="@+id/radio3"
            android:layout_width="wrap_content"
            android:layout_height="wrap_content"
            android:text="吃了"/>
         <RadioButton
            android:id="@+id/radio4"
            android:layout_width="wrap_content"
            android:layout_height="wrap_content"
            android:text="沒吃"/>

    </RadioGroup>

</LinearLayout>
RadioActivity.java
package com.example.radioandcheckdemo;

import android.app.Activity;
import android.os.Bundle;
import android.widget.RadioButton;
import android.widget.RadioGroup;
import android.widget.RadioGroup.OnCheckedChangeListener;
import android.widget.Toast;

public class RadioActivity extends Activity implements OnCheckedChangeListener {
    private RadioGroup group1;
    private RadioGroup group2;
    @Override
    protected void onCreate(Bundle savedInstanceState) {
        super.onCreate(savedInstanceState);
        setContentView(R.layout.activity_radio);

        group1 = (RadioGroup) findViewById(R.id.group1);
        group2 = (RadioGroup) findViewById(R.id.group2);
        group1.setOnCheckedChangeListener(this);
        group2.setOnCheckedChangeListener(this);
    }

    @Override
    public void onCheckedChanged(RadioGroup group, int checkedId) {
        //顯示值的幾種方法

        //checkedId選中RadioButton的id
        /*switch (checkedId) {
        case R.id.radio1:
            Toast.makeText(this, "男", Toast.LENGTH_LONG).show();
            break;
        case R.id.radio2:
            Toast.makeText(this, "女", Toast.LENGTH_LONG).show();
            break;
        case R.id.radio3:
            Toast.makeText(this, "吃了", Toast.LENGTH_LONG).show();
            break;
        case R.id.radio4:
            Toast.makeText(this, "沒吃", Toast.LENGTH_LONG).show();
            break;
        default:
            break;
        }*/

        //找到點擊的RadioButton
        //RadioButton radio = (RadioButton) findViewById(checkedId);
        //取出RadioButton中的值
        //String str = radio.getText().toString();
        //彈框顯示選中的值
        //Toast.makeText(this, str, Toast.LENGTH_LONG).show();

        //兩組數據同時顯示
        //根據RadioGroup取出數據,沒有選中返回-1
        String str = "";
        int buttonId = group1.getCheckedRadioButtonId();
        if(buttonId != -1){
            RadioButton radio = (RadioButton) findViewById(buttonId);
            str = "你的性別是" + radio.getText().toString();
        }else{
            str = "你沒有選擇性別";
        }
        buttonId = group2.getCheckedRadioButtonId();
        if(buttonId != -1){
            RadioButton radio = (RadioButton) findViewById(buttonId);
            str += ",   你吃飯了嗎?"+radio.getText().toString();
        }
        Toast.makeText(this, str, Toast.LENGTH_LONG).show();
    }
}
activity_check.xml
<LinearLayout xmlns:android="http://schemas.android.com/apk/res/android"
    xmlns:tools="http://schemas.android.com/tools"
    android:id="@+id/LinearLayout1"
    android:layout_width="match_parent"
    android:layout_height="match_parent"
    android:orientation="vertical"
    tools:context="${relativePackage}.${activityClass}" >

    <TextView
        android:layout_width="wrap_content"
        android:layout_height="wrap_content"
        android:text="選擇所學課程:" />

    <CheckBox
        android:id="@+id/check1"
        android:layout_width="wrap_content"
        android:layout_height="wrap_content"
        android:text="HTML" />
    <CheckBox
        android:id="@+id/check2"
        android:layout_width="wrap_content"
        android:layout_height="wrap_content"
        android:text="C" />
    <CheckBox
        android:id="@+id/check3"
        android:layout_width="wrap_content"
        android:layout_height="wrap_content"
        android:text="php" />

    <CheckBox
        android:id="@+id/check4"
        android:layout_width="wrap_content"
        android:layout_height="wrap_content"
        android:text="java" />

    <Button
        android:id="@+id/button1"
        android:layout_width="match_parent"
        android:layout_height="wrap_content"
        android:text="提交" />

</LinearLayout>
CheckActivity.java
package com.example.radioandcheckdemo;

import android.app.Activity;
import android.os.Bundle;
import android.view.Menu;
import android.view.MenuItem;
import android.view.View;
import android.view.View.OnClickListener;
import android.widget.Button;
import android.widget.CheckBox;
import android.widget.CompoundButton;
import android.widget.CompoundButton.OnCheckedChangeListener;
import android.widget.Toast;

public class CheckActivity extends Activity {

    private CheckBox check1;
    private CheckBox check2;
    private CheckBox check3;
    private CheckBox check4;
    private Button button1;

    private OnCheckedChangeListener listenter = new OnCheckedChangeListener() {

        @Override
        public void onCheckedChanged(CompoundButton buttonView, boolean isChecked) {
            //選中多選框
            CheckBox check = (CheckBox)buttonView;
            //取出當前勾選值
            String str = check.getText().toString();
            //判斷是否勾選狀態
            if(isChecked){
                str = "你學了"+str;
            }else{
                str = "你沒學"+str;
            }
            Toast.makeText(CheckActivity.this, str, Toast.LENGTH_LONG).show();
        }
    };

    @Override
    protected void onCreate(Bundle savedInstanceState) {
        super.onCreate(savedInstanceState);
        setContentView(R.layout.activity_check);

        check1 = (CheckBox) findViewById(R.id.check1);
        check2 = (CheckBox) findViewById(R.id.check2);
        check3 = (CheckBox) findViewById(R.id.check3);
        check4 = (CheckBox) findViewById(R.id.check4);
        button1 = (Button) findViewById(R.id.button1);

        //多選框點擊事件
        /*check1.setOnCheckedChangeListener(listenter);
        check2.setOnCheckedChangeListener(listenter);
        check3.setOnCheckedChangeListener(listenter);
        check4.setOnCheckedChangeListener(listenter);*/

        //提交按鈕點擊事件
        button1.setOnClickListener(new OnClickListener() {

            @Override
            public void onClick(View v) {
                String str = "我學過了";
                boolean f = false;
                if(check1.isChecked()){
                    str += check1.getText()+",";
                    f = true;
                }
                if(check2.isChecked()){
                    str += check2.getText()+",";
                    f = true;
                }
                if(check3.isChecked()){
                    str += check3.getText()+",";
                    f = true;
                }
                if(check4.isChecked()){
                    str += check4.getText()+",";
                    f = true;
                }
                if(f){
                    str = str.substring(0, str.length()-1);
                }
                Toast.makeText(CheckActivity.this, str, Toast.LENGTH_LONG).show();
            }
        });
    }
}
關于“Android單選多選按鈕怎么使用”這篇文章的內容就介紹到這里,感謝各位的閱讀!相信大家對“Android單選多選按鈕怎么使用”知識都有一定的了解,大家如果還想學習更多知識,歡迎關注億速云行業資訊頻道。
免責聲明:本站發布的內容(圖片、視頻和文字)以原創、轉載和分享為主,文章觀點不代表本網站立場,如果涉及侵權請聯系站長郵箱:is@yisu.com進行舉報,并提供相關證據,一經查實,將立刻刪除涉嫌侵權內容。