您好,登錄后才能下訂單哦!
您好,登錄后才能下訂單哦!
這篇文章主要介紹“nlp自然語言處理CBOW模型類怎么實現”的相關知識,小編通過實際案例向大家展示操作過程,操作方法簡單快捷,實用性強,希望這篇“nlp自然語言處理CBOW模型類怎么實現”文章能幫助大家解決問題。

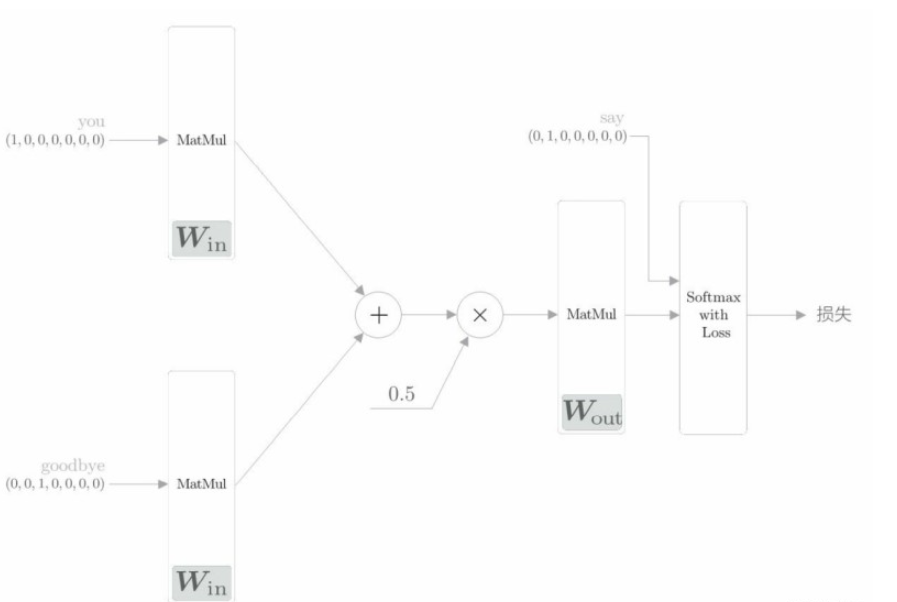
初始化:初始化方法的參數包括詞匯個數 vocab_size 和中間層的神經元個數 hidden_size。首先生成兩個權重(W_in 和 W_out),并用一些小的隨機值初始化這兩個權重。設置astype(‘f’),初始化將使用 32 位的浮點數。
生成層:生成兩個輸入側的 MatMul 層、一個輸出側的 MatMul 層,以及一個 Softmax with Loss 層。
保存權重和梯度:將該神經網絡中使用的權重參數和梯度分別保存在列表類型的成員變量 params 和 grads 中。
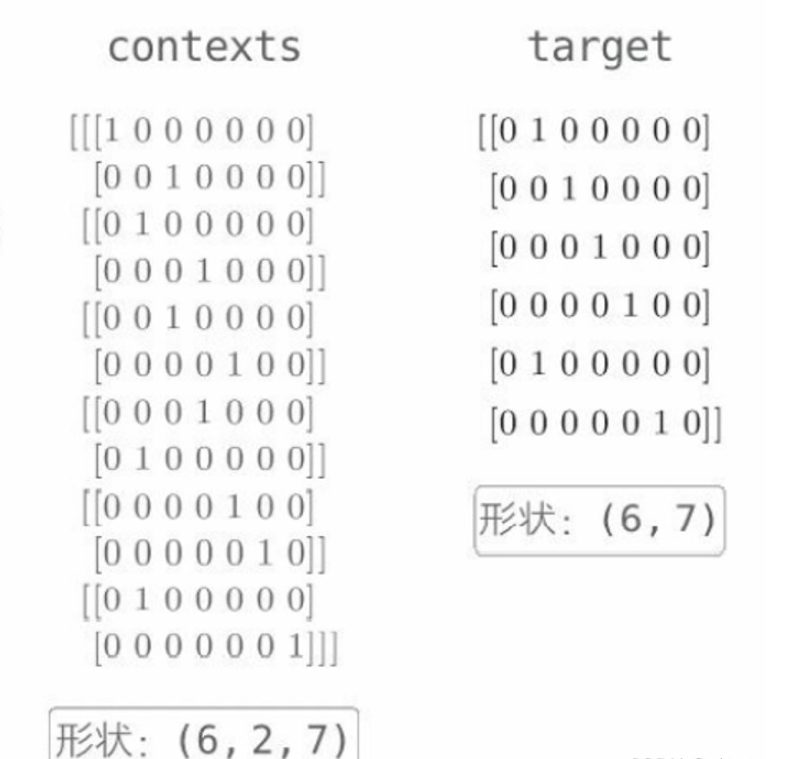
正向傳播 forward() 函數:該函數接收參數 contexts 和 target,并返回損失(loss)。這兩個參數結構如下。

contexts 是一個三維 NumPy 數組,第 0 維的元素個數是 mini-batch 的數量,第 1 維的元素個數是上下文的窗口大小,第 2 維表示 one-hot 向量。下面這個代碼取出來的是什么?
 h0 = self.in_layer0.forward(contexts[:, 0])
 h2 = self.in_layer1.forward(contexts[:, 1])
jym做了一個測試:
import sys
sys.path.append('..')
from common.util import preprocess #, create_co_matrix, most_similar
from common.util import create_contexts_target, convert_one_hot
text = 'You say goodbye and I say hello.'
corpus, word_to_id, id_to_word = preprocess(text)
contexts, target = create_contexts_target(corpus, window_size=1)
#print(contexts)
#print(target)
vocab_size = len(word_to_id)
target = convert_one_hot(target, vocab_size)
contexts = convert_one_hot(contexts, vocab_size)
print(contexts[:, 0])
輸出:然后從輸出就知道了,取的是不同target的左邊的單詞。
[[1 0 0 0 0 0 0]
[0 1 0 0 0 0 0]
[0 0 1 0 0 0 0]
[0 0 0 1 0 0 0]
[0 0 0 0 1 0 0]
[0 1 0 0 0 0 0]]
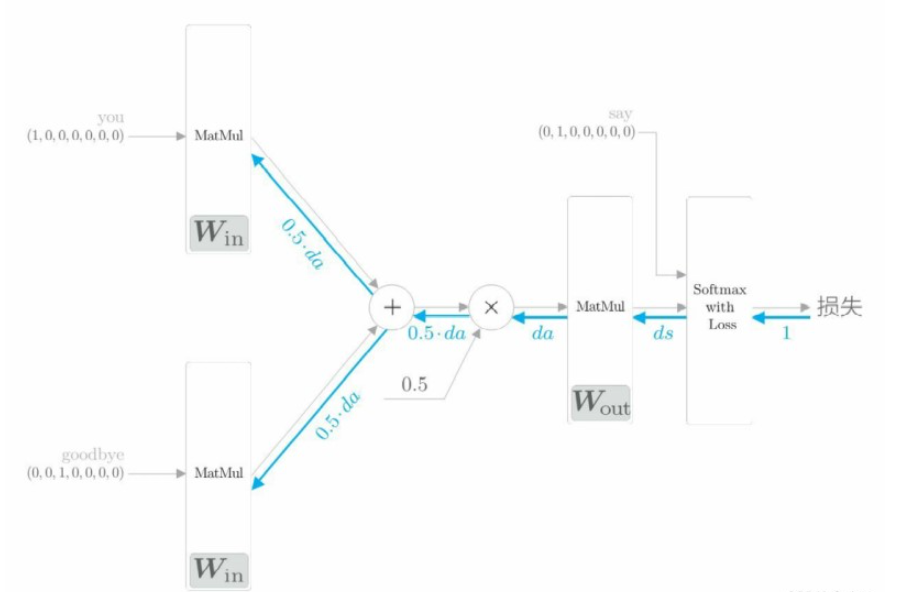
反向傳播 backward():神經網絡的反向傳播在與正向傳播相反的方向上傳播梯度。這個反向傳播從 1 出發,并將其傳向 Softmax with Loss 層。然后,將 Softmax with Loss 層的反向傳播的輸出 ds 傳到輸出側的 MatMul 層。“×”的反向傳播將正向傳播時的輸入值“交換”后乘以梯度。“+”的反向傳播將梯度“原樣”傳播。

這個backward函數里面調用的是之前寫好的層的反向傳播函數,比如loss_layer.backward(dout),因此backward函數用完之后,各個權重參數的梯度就保存在了成員變量 grads 中(這是之前寫的層里面的反向傳播函數來實現的)。先調用 forward() 函數,再調用 backward() 函數,grads 列表中的梯度被更新。
import sys
sys.path.append('..')
import numpy as np
from common.layers import MatMul, SoftmaxWithLoss
class SimpleCBOW:
    def __init__(self, vocab_size, hidden_size):
        V, H = vocab_size, hidden_size
        # 初始化權重
        W_in = 0.01 * np.random.randn(V, H).astype('f')
        W_out = 0.01 * np.random.randn(H, V).astype('f')
        # 生成層
        self.in_layer0 = MatMul(W_in)
        self.in_layer1 = MatMul(W_in)
        self.out_layer = MatMul(W_out)
        self.loss_layer = SoftmaxWithLoss()
        # 將所有的權重和梯度整理到列表中
        layers = [self.in_layer0, self.in_layer1, self.out_layer]
        self.params, self.grads = [], []
        for layer in layers:
            self.params += layer.params
            self.grads += layer.grads
        # 將單詞的分布式表示設置為成員變量
        self.word_vecs = W_in
    def forward(self, contexts, target):
        h0 = self.in_layer0.forward(contexts[:, 0])
        h2 = self.in_layer1.forward(contexts[:, 1])
        h = (h0 + h2) * 0.5
        score = self.out_layer.forward(h)
        loss = self.loss_layer.forward(score, target)
        return loss
    def backward(self, dout=1):
        ds = self.loss_layer.backward(dout)
        da = self.out_layer.backward(ds)
        da *= 0.5
        self.in_layer1.backward(da)
        self.in_layer0.backward(da)
return NoneCBOW 模型的學習的實現:給神經網絡準備好學習數據。然后求梯度,并逐步更新權重參數。
Trainer類:學習的類。
初始化:類的初始化程序接收神經網絡(模型)和優化器(SGD、Momentum、AdaGrad、Adam)
學習:調用 fit() 方法開始學習。參數:x,輸入數據;t,監督標簽;max_epoch,進行學習的 epoch 數;batch_size,mini-batch 的大小;eval_interval,輸出結果(平均損失等)的間隔。 例如設置 eval_interval=20,則每 20 次迭代計算 1 次平均損失, 并將結果輸出到界面上;max_grad,梯度的最大范數。 當梯度的范數超過這個值時,縮小梯度。
def fit(self, x, t, max_epoch=10, batch_size=32, max_grad=None, eval_interval=20):
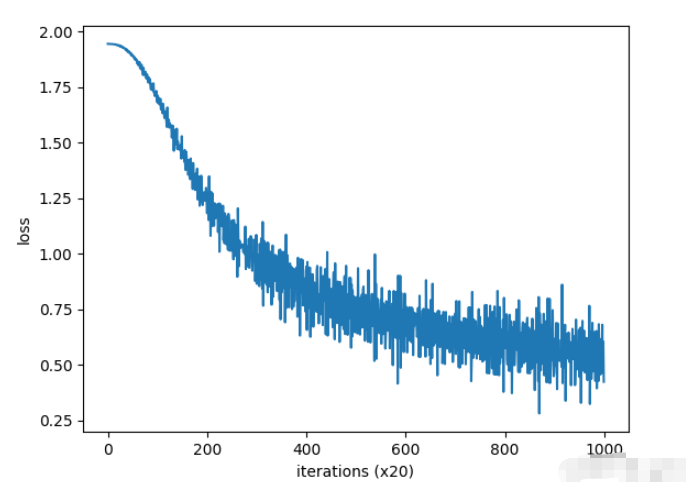
plot方法:畫出 fit() 方法記錄的損失(按照 eval_interval 評價的平均損失)。
class Trainer:
    def __init__(self, model, optimizer):
        self.model = model
        self.optimizer = optimizer
        self.loss_list = []
        self.eval_interval = None
        self.current_epoch = 0
    def fit(self, x, t, max_epoch=10, batch_size=32, max_grad=None, eval_interval=20):
        data_size = len(x)
        max_iters = data_size // batch_size
        self.eval_interval = eval_interval
        model, optimizer = self.model, self.optimizer
        total_loss = 0
        loss_count = 0
        start_time = time.time()
        for epoch in range(max_epoch):
            # 打亂
            idx = numpy.random.permutation(numpy.arange(data_size))
            x = x[idx]
            t = t[idx]
            for iters in range(max_iters):
                batch_x = x[iters*batch_size:(iters+1)*batch_size]
                batch_t = t[iters*batch_size:(iters+1)*batch_size]

                # 計算梯度,更新參數
                loss = model.forward(batch_x, batch_t)
                model.backward()
                params, grads = remove_duplicate(model.params, model.grads)  # 將共享的權重整合為1個
                if max_grad is not None:
                    clip_grads(grads, max_grad)
                optimizer.update(params, grads)
                total_loss += loss
                loss_count += 1
                # 評價
                if (eval_interval is not None) and (iters % eval_interval) == 0:
                    avg_loss = total_loss / loss_count
                    elapsed_time = time.time() - start_time
                    print('| epoch %d |  iter %d / %d | time %d[s] | loss %.2f'
                          % (self.current_epoch + 1, iters + 1, max_iters, elapsed_time, avg_loss))
                    self.loss_list.append(float(avg_loss))
                    total_loss, loss_count = 0, 0
            self.current_epoch += 1
    def plot(self, ylim=None):
        x = numpy.arange(len(self.loss_list))
        if ylim is not None:
            plt.ylim(*ylim)
        plt.plot(x, self.loss_list, label='train')
        plt.xlabel('iterations (x' + str(self.eval_interval) + ')')
        plt.ylabel('loss')
        plt.show()
這里面使用Trainer 類來執行CBOW 模型的學習。
這個model其實存的就是SimpleCBOW的成員變量。
model = SimpleCBOW(vocab_size, hidden_size)
下面是調用Trainer 類:
trainer = Trainer(model, optimizer)
trainer.fit(contexts, target, max_epoch, batch_size)
trainer.plot()
# coding: utf-8
import sys
sys.path.append('..')  # 為了引入父目錄的文件而進行的設定
from common.trainer import Trainer
from common.optimizer import Adam
from simple_cbow import SimpleCBOW
from common.util import preprocess, create_contexts_target, convert_one_hot
window_size = 1
hidden_size = 5
batch_size = 3
max_epoch = 1000
text = 'You say goodbye and I say hello.'
corpus, word_to_id, id_to_word = preprocess(text)
vocab_size = len(word_to_id)
contexts, target = create_contexts_target(corpus, window_size)
target = convert_one_hot(target, vocab_size)
contexts = convert_one_hot(contexts, vocab_size)
model = SimpleCBOW(vocab_size, hidden_size)
optimizer = Adam()
trainer = Trainer(model, optimizer)
trainer.fit(contexts, target, max_epoch, batch_size)
trainer.plot()
word_vecs = model.word_vecs
for word_id, word in id_to_word.items():
    print(word, word_vecs[word_id])
結果:

SimpleCBOW類里面成員變量有下面這個:權重矩陣W_in就是單詞的分布式表示。
# 將單詞的分布式表示設置為成員變量
self.word_vecs = W_in
那就可以看看單詞的分布式表示。
word_vecs = model.word_vecs
for word_id, word in id_to_word.items():
    print(word, word_vecs[word_id])
結果如下:可見,單詞表示為了密集向量
you [-0.9987413 1.0136298 -1.4921554 0.97300434 1.0181936 ]
say [ 1.161595 -1.1513934 -0.25779223 -1.1773298 -1.1531342 ]
goodbye [-0.88470864 0.9155085 -0.30859873 0.9318609 0.9092796 ]
and [ 0.7929211 -0.8148116 -1.8787507 -0.7845257 -0.8028278]
i [-0.8925459 0.95505357 -0.29667985 0.90895575 0.90703803]
hello [-1.0259517 0.97562104 -1.5057516 0.96239203 1.0297285 ]
. [ 1.2134467 -1.1766206 1.6439314 -1.1993438 -1.1676227]
這里面為啥是5個數,其實還是在于權重矩陣W。在SimpleCBOW類里面W_in大小是跟單詞數目和hidden_size有關的。
V, H = vocab_size, hidden_size
 # 初始化權重
W_in = 0.01 * np.random.randn(V, H).astype('f')
在使用Trainer 類來執行CBOW 模型的學習時,設置的hidden_size = 5,所以最后單詞就表示成包含五個數的向量了。
CBOW模型的學習:調整權重,以使預測準確。也就是說,上下文是 you 和 goodbye,正確解標簽應該是 say,那么如果網絡具有良好的權重,對應正確解的神經元(say)的得分應該更高。
對神經網絡進行學習,其實是用了Softmax 函數和交叉熵誤差。使用 Softmax 函數將得分轉化為概率,再求這些概率和監督標簽之間的交叉熵誤差,并將其作為損失進行學習。推理的 CBOW 模型加上 Softmax 層和 Cross Entropy Error 層,就可以得到損失。
輸入側和輸出側的權重都可以被視為單詞的分布式表示,這里面只使用輸入側的權重作為單詞的分布式表示。
最后把之前寫的CBOW模型類放上來:
class SimpleCBOW:
    def __init__(self, vocab_size, hidden_size):
        V, H = vocab_size, hidden_size
        # 初始化權重
        W_in = 0.01 * np.random.randn(V, H).astype('f')
        W_out = 0.01 * np.random.randn(H, V).astype('f')
        # 生成層
        self.in_layer0 = MatMul(W_in)
        self.in_layer1 = MatMul(W_in)
        self.out_layer = MatMul(W_out)
        self.loss_layer = SoftmaxWithLoss()
        # 將所有的權重和梯度整理到列表中
        layers = [self.in_layer0, self.in_layer1, self.out_layer]
        self.params, self.grads = [], []
        for layer in layers:
            self.params += layer.params
            self.grads += layer.grads
        # 將單詞的分布式表示設置為成員變量
        self.word_vecs = W_in
    def forward(self, contexts, target):
        h0 = self.in_layer0.forward(contexts[:, 0])
        h2 = self.in_layer1.forward(contexts[:, 1])
        h = (h0 + h2) * 0.5
        score = self.out_layer.forward(h)
        loss = self.loss_layer.forward(score, target)
        return loss
    def backward(self, dout=1):
        ds = self.loss_layer.backward(dout)
        da = self.out_layer.backward(ds)
        da *= 0.5
        self.in_layer1.backward(da)
        self.in_layer0.backward(da)
        return None
關于“nlp自然語言處理CBOW模型類怎么實現”的內容就介紹到這里了,感謝大家的閱讀。如果想了解更多行業相關的知識,可以關注億速云行業資訊頻道,小編每天都會為大家更新不同的知識點。
免責聲明:本站發布的內容(圖片、視頻和文字)以原創、轉載和分享為主,文章觀點不代表本網站立場,如果涉及侵權請聯系站長郵箱:is@yisu.com進行舉報,并提供相關證據,一經查實,將立刻刪除涉嫌侵權內容。