您好,登錄后才能下訂單哦!
您好,登錄后才能下訂單哦!
本篇內容介紹了“Android的AdapterView組件怎么使用”的有關知識,在實際案例的操作過程中,不少人都會遇到這樣的困境,接下來就讓小編帶領大家學習一下如何處理這些情況吧!希望大家仔細閱讀,能夠學有所成!
在Android應用開發中,AdapterView是一類常用且非常重要的組件。我們常見的以列表的形式顯示信息的組件就是AdapterView的子類,稱為Listview;我們經常以網格方式瀏覽圖片縮略圖的組件也是AdapterView的子類,被稱為GridView;以下拉列表形式顯示可選項的組件也是AdapterView的子類,稱為Spinner;還有等等它們都是AdapterView的子類。
用Android的ListView組件以列表顯示Android系統中已經安裝的所有程序信息。ListView,顧名思義,就是通過列表的形式向用戶展示信息。就像你手機設置里面的列表,它包含了你所有應用程序的圖標, 應用程序名稱(類似下圖)和入口Activity的類名。當顯示的內容超出物理屏幕可用區域時,它還可以進行滾動,就跟上期我們說的ScrollView的效果一樣。
如下圖:黃色大框的部分是一個ListView,深藍色小框框住的部分是一個列表中的一個列表項,因此在程序中要使用ListView顯示信息,必須要做一下的工作。
(1)在界面布局中包含一個ListView組件
(2)對在列表中顯示的列表項進行布局
(3)設計一個實現了Adapter接口的類,用于為ListView組件提供需要顯示的數據。
剛剛提到的列表組件(ListView),網格組件(GridView)和下拉列表組件(Spinner),它們都是Adapter的子類,這些組件只負責顯示數據,而對于這些要顯示的數據則必須通過稱為Adapter的接口來進行管理。以使用ListView顯示數據為例,AdapterView和Adapter接口的關系如下圖:
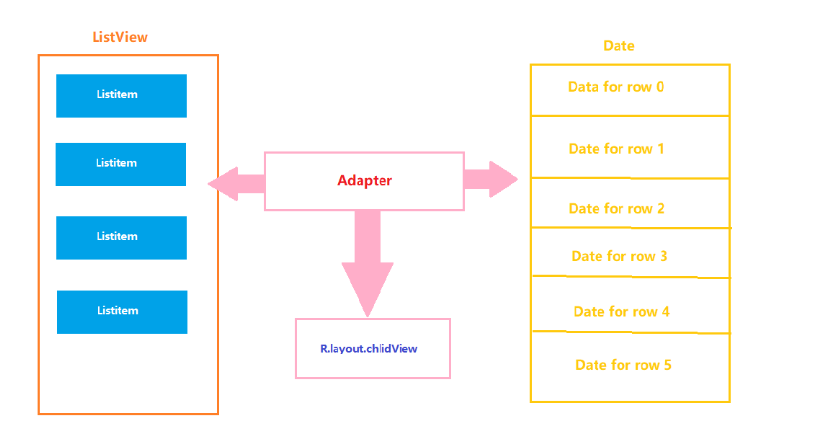
Adapter常用方法及其含義:
| 方法名字 | 含義 |
|---|---|
| int getCount() | 返回要顯示的數據集中的數據總數 |
| Object getItem(int position) | 返回數據集中指定位置的數據對象 |
| long getItemId(int position) | 返回數據集中指定位置的數據的ID |
View getView(int position, View convertView, ViewGroup parent) | 將指定位置的數據構建成一個可以顯示在AdapterView中的組件,并返回AdapterView進行顯示 |
activity_main.xml
<?xml version="1.0" encoding="utf-8"?>
<RelativeLayout xmlns:android="http://schemas.android.com/apk/res/android"
    xmlns:app="http://schemas.android.com/apk/res-auto"
    xmlns:tools="http://schemas.android.com/tools"
    android:layout_width="match_parent"
    android:layout_height="match_parent"
    tools:context=".MainActivity"
    android:stretchColumns="2"
    >

    <ListView
        android:id="@+id/lv1"
        android:layout_width="match_parent"
        android:layout_height="match_parent" />

</RelativeLayout>
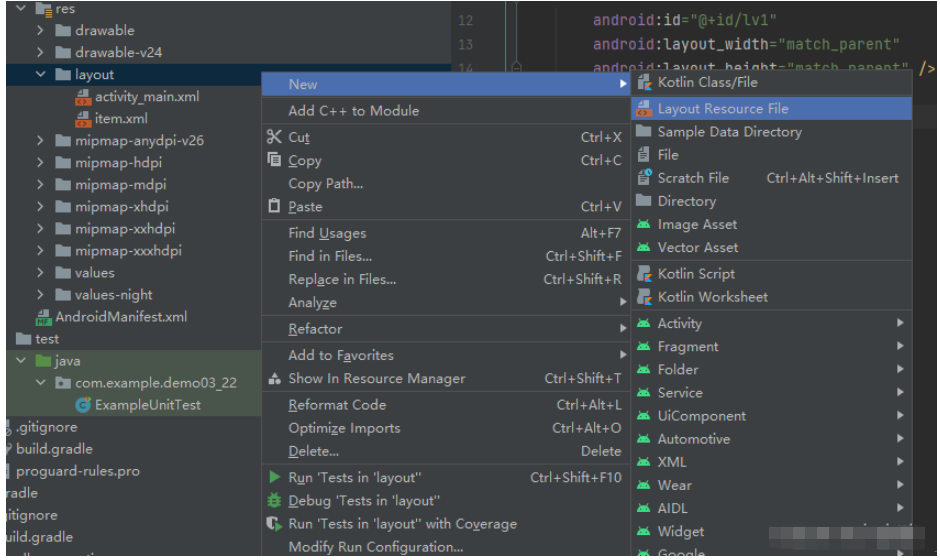
選擇New→Layout resoure file 創建
item.xml
<?xml version="1.0" encoding="utf-8"?>
<RelativeLayout xmlns:android="http://schemas.android.com/apk/res/android"
    xmlns:app="http://schemas.android.com/apk/res-auto"
    xmlns:tools="http://schemas.android.com/tools"
    android:layout_width="match_parent"
    android:layout_height="match_parent"
    tools:context=".MainActivity"
    android:stretchColumns="2"
    >

    <ListView
        android:id="@+id/lv1"
        android:layout_width="match_parent"
        android:layout_height="match_parent" />

</RelativeLayout>
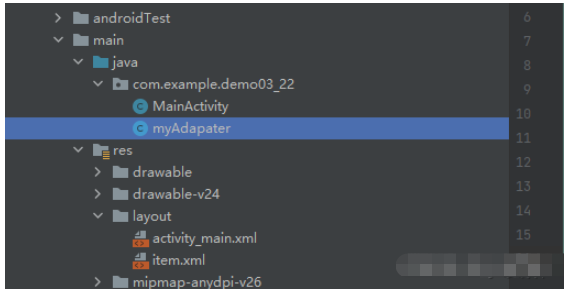
package com.example.demo03_22;

import android.content.Context;
import android.view.LayoutInflater;
import android.view.View;
import android.view.ViewGroup;
import android.widget.BaseAdapter;
import android.widget.TextView;


public class myAdapater extends BaseAdapter {
    private String[] books={"Java程序設計","Android應用開發","oracle數據庫管理指南","JavaWeb程序設計","軟件工程之系統工程師之路"};
    LayoutInflater inflater;
    int id_item;
    public myAdapater(Context context,int id_item){
        this.id_item=id_item;
        inflater=(LayoutInflater)context.getSystemService(Context.LAYOUT_INFLATER_SERVICE);
    }
    @Override
    public int getCount() {
        return books.length;
    }

    @Override
    public Object getItem(int i) {
        return books[i];
    }

    @Override
    public long getItemId(int i) {
        return i;
    }

    @Override
    public View getView(int i, View view, ViewGroup viewGroup) {
        TextView tv;
        tv=(TextView) inflater.inflate(id_item,viewGroup,false);
        tv.setText(books[i]);
        return tv;
    }
}package com.example.demo03_22;
import androidx.appcompat.app.AppCompatActivity;
import android.os.Bundle;
import android.widget.ListView;
public class MainActivity extends AppCompatActivity {
@Override
protected void onCreate(Bundle savedInstanceState) {
super.onCreate(savedInstanceState);
setContentView(R.layout.activity_main);
ListView lv=(ListView) this.findViewById(R.id.lv1);
myAdapater myAdapater=new myAdapater(this, R.layout.item);
lv.setAdapter(myAdapater);
}
}測試結果:
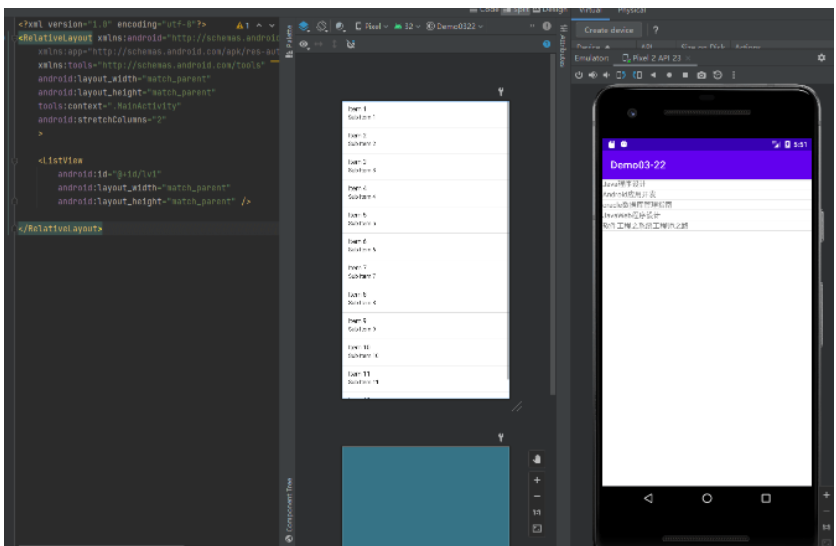
改進:添加圖片
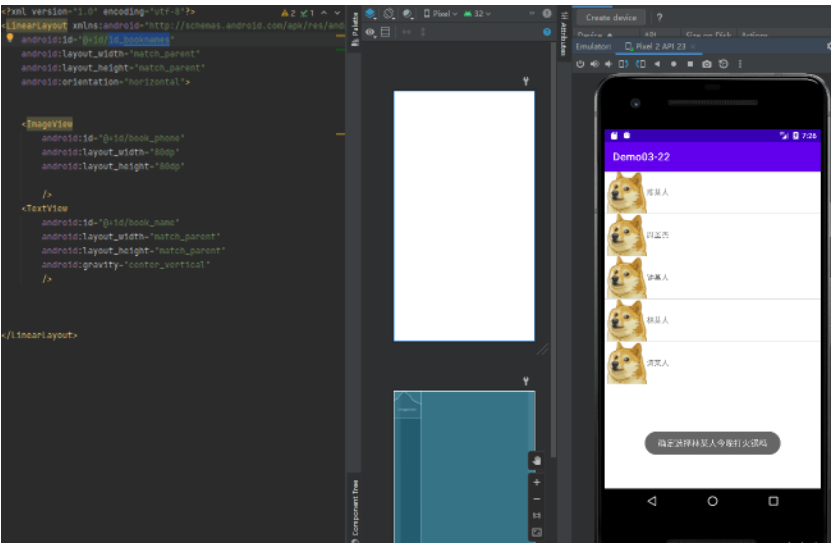
<?xml version="1.0" encoding="utf-8"?>
<RelativeLayout xmlns:android="http://schemas.android.com/apk/res/android"
    xmlns:app="http://schemas.android.com/apk/res-auto"
    xmlns:tools="http://schemas.android.com/tools"
    android:layout_width="match_parent"
    android:layout_height="match_parent"
    tools:context=".MainActivity"
    android:stretchColumns="2"
    >

    <ListView
        android:id="@+id/lv1"
        android:layout_width="fill_parent"
        android:layout_height="wrap_content" />

</RelativeLayout>
item.xml
<?xml version="1.0" encoding="utf-8"?>
<LinearLayout xmlns:android="http://schemas.android.com/apk/res/android"
    android:id="@+id/id_booknames"
    android:layout_width="match_parent"
    android:layout_height="match_parent"
    android:orientation="horizontal">


    <ImageView
        android:id="@+id/book_phone"
        android:layout_width="80dp"
        android:layout_height="80dp"

        />
    <TextView
        android:id="@+id/book_name"
        android:layout_width="match_parent"
        android:layout_height="match_parent"
        android:gravity="center_vertical"
        />


</LinearLayout>
package com.example.demo03_22;

import android.annotation.SuppressLint;
import android.content.Context;
import android.view.LayoutInflater;
import android.view.View;
import android.view.ViewGroup;
import android.widget.BaseAdapter;
import android.widget.ImageView;
import android.widget.LinearLayout;
import android.widget.TextView;


public class myAdapater extends BaseAdapter {
    private BookItem[] books={new BookItem("陳某人",R.drawable.dog),
            new BookItem("周某人",R.drawable.dog),
            new BookItem("鐘某人", R.drawable.dog),
            new BookItem("林某人",R.drawable.dog),
            new BookItem("濤某人",R.drawable.dog)};

    LayoutInflater inflater;
    int id_item;
    public myAdapater(Context context,int id_item){
        this.id_item=id_item;
        inflater=(LayoutInflater)context.getSystemService(Context.LAYOUT_INFLATER_SERVICE);
    }
    @Override
    public int getCount() {
        return books.length;
    }

    @Override
    public Object getItem(int position) {
        return books[position];
    }

    @Override
    public long getItemId(int position) {
        return position;
    }

    @SuppressLint("ViewHolder")@Override
    public View getView(int position, View view, ViewGroup parent) {
        LinearLayout LL=(LinearLayout)inflater.inflate(id_item,parent,false)
                ;
        ImageView iv=(ImageView)LL.findViewById(R.id.book_phone);
        iv.setImageResource(books[position].photo);

        TextView tv;
        tv=(TextView)LL.findViewById(R.id.book_name);
        tv.setText(books[position].name);

        return LL;
    }
/**
 *  定義一個圖片類
  */
    private class BookItem{
        String name;
        int photo;

        public BookItem(String name,int photo){
            this.name=name;
            this.photo=photo;
        }
    }
}package com.example.demo03_22;
import androidx.appcompat.app.AppCompatActivity;
import android.os.Bundle;
import android.view.View;
import android.widget.AdapterView;
import android.widget.ListView;
import android.widget.TextView;
import android.widget.Toast;
public class MainActivity extends AppCompatActivity implements AdapterView.OnItemClickListener {
@Override
protected void onCreate(Bundle savedInstanceState) {
super.onCreate(savedInstanceState);
setContentView(R.layout.activity_main);
ListView lv=(ListView) this.findViewById(R.id.lv1);
myAdapater myAdapater=new myAdapater(this, R.layout.item);
lv.setAdapter(myAdapater);
lv.setOnItemClickListener(this);
}
@Override
public void onItemClick(AdapterView<?> parent, View view, int position, long id) {
TextView textView=(TextView)view.findViewById(R.id.book_name);
String name=(String)textView.getText();
String text="確定選擇"+name+"今晚打火鍋嗎";
Toast.makeText(this,text,Toast.LENGTH_LONG).show();
}
}“Android的AdapterView組件怎么使用”的內容就介紹到這里了,感謝大家的閱讀。如果想了解更多行業相關的知識可以關注億速云網站,小編將為大家輸出更多高質量的實用文章!
免責聲明:本站發布的內容(圖片、視頻和文字)以原創、轉載和分享為主,文章觀點不代表本網站立場,如果涉及侵權請聯系站長郵箱:is@yisu.com進行舉報,并提供相關證據,一經查實,將立刻刪除涉嫌侵權內容。