您好,登錄后才能下訂單哦!
您好,登錄后才能下訂單哦!
小編給大家分享一下spring注解中@PropertySource如何配置數據源,希望大家閱讀完這篇文章之后都有所收獲,下面讓我們一起去探討吧!
一般在配置數據源是都會使用xml的方式注入,key-value在properties中管理;spring4.X已有著比較完善的注解來替換xml的配置方式。
通常我們使用xml配置數據源,使用SpEL獲取properties中的配置。
applicationContext.xml 中配置 dataSource 及 PreferencesPlaceholderConfigurer,使用 PropertyPlaceholderConfigurer進行Bean屬性替換
<bean id="configProperties" class="org.springframework.beans.factory.config.PropertiesFactoryBean">
        <property name="locations">
            <list>
                <value>classpath:/jdbc.properties</value>
            </list>
        </property>
        <property name="fileEncoding" value="utf-8"/>
    </bean>
<bean id="propertyConfigurer" class="org.springframework.beans.factory.config.PreferencesPlaceholderConfigurer">
    <property name="properties" ref="configProperties" />
</bean>
<!-- 使用proxool連接池的數據源, -->
<bean id="dataSource" class="org.logicalcobwebs.proxool.ProxoolDataSource">
    <!-- 數據源的別名 -->
    <property name="alias" value="${proxool.alias}" />
    <!-- 驅動 -->
    <property name="driver" value="${proxool.driver}" />
    <!-- 鏈接URL  -->
    <property name="driverUrl" value="${proxool.driverUrl}" />
    <!-- 用戶名-->
    <property name="user" value="${proxool.user}" />
    <!-- 密碼 -->
    <property name="password" value="${proxool.password}" />
    <!-- 最大鏈接數-->
    <property name="maximumConnectionCount" value="${proxool.maximumConnectionCount}" />
    <!-- 最小鏈接數 -->
    <property name="minimumConnectionCount" value="${proxool.minimumConnectionCount}" />
    <!-- ...(略) -->
</bean>
jdbc.properties
proxool.alias=mySql
proxool.driver=com.mysql.jdbc.Driver
proxool.driverUrl=jdbc:mysql://localhost:3306/test?characterEncoding=utf8
proxool.user=root
proxool.password=root
proxool.maximumActiveTime=1200
proxool.maximumConnectionCount=50
#...
DataSourceConfiguration類是數據源的javaBean配置方式,@Configuratio注解當前類,
spring啟動時會掃描被@Configuratio注解的類,注入當前類中配置的方法bean;
當然別忘了啟用注解掃描:
<context:annotation-config/>
<context:component-scan base-package="com.XXX.test.dateSource"></context:component-scan>
@value中可以直接使用SpEL,獲取properties配置,成員變量也不需要getter、setter,不過還是有一個前提,需要配置xml:
<bean id="configProperties" class="org.springframework.beans.factory.config.PropertiesFactoryBean">
        <property name="locations">
            <list>
                <value>classpath:/jdbc.properties</value>
            </list>
        </property>
        <property name="fileEncoding" value="utf-8"/>
    </bean>
<bean id="propertyConfigurer" class="org.springframework.beans.factory.config.PreferencesPlaceholderConfigurer">
    <property name="properties" ref="configProperties" />
</bean>
@Bean注解:spring掃面當前類時,注入每個有@Bean注解的方法的返回值Bean, name屬性默認為返回值類類名首字母小寫,這里自己設置name。
package com.XXX.test.dateSource;
import org.logicalcobwebs.proxool.ProxoolDataSource;
import org.springframework.beans.factory.annotation.Autowired;
import org.springframework.beans.factory.annotation.Value;
import org.springframework.context.annotation.Bean;
import org.springframework.context.annotation.Configuration;
@Configuratio
public class DataSourceConfiguration{
    @Value("${proxool.alias}")
    private String alias;
    @Value("${proxool.driver}")
    private String driver;
    @Value("${proxool.driverUrl}")
    private String driverUrl;
    @Value("${proxool.user}")
    private String user;
    @Value("${proxool.password}")
    private String password;
    //...
    @Bean(name="dataSource")
    public ProxoolDataSource dataSource(){
         ProxoolDataSource proxoolDataSource = new ProxoolDataSource();
         proxoolDataSource.setDriver(driver);
         proxoolDataSource.setDriverUrl(driverUrl);
         proxoolDataSource.setUser(user);
         proxoolDataSource.setPassword(password);
         //...
         return proxoolDataSource;
     }
 }
這時dataSource已被注入,使用時可注解注入,如下:
    @Autowired
    private ProxoolDataSource dataSource;
@PropertySource注解當前類,參數為對應的配置文件路徑,這種方式加載配置文件,可不用在xml中配置PropertiesFactoryBean引入jdbc.properties,使用時方便得多,DataSourceConfiguration不再需要成員變量,取而代之的是需要注入一個Environment環境配置,使用env.getProperty(key)獲取數據:
package com.XXX.test.dateSource;
import org.logicalcobwebs.proxool.ProxoolDataSource;
import org.springframework.beans.factory.annotation.Autowired;
import org.springframework.beans.factory.annotation.Value;
import org.springframework.context.annotation.Bean;
import org.springframework.context.annotation.Configuration;
import org.springframework.context.annotation.PropertySource;
import org.springframework.core.env.Environment;
@Configuratio
@PropertySource("classpath:/jdbc.properties")
public class DataSourceConfiguration{
    @Autowired
    private Environment env;
    @Bean(name="dataSource")
    public ProxoolDataSource dataSource(){
         ProxoolDataSource proxoolDataSource = new ProxoolDataSource();
         proxoolDataSource.setDriver(env.getProperty("proxool.alias"));
         proxoolDataSource.setDriverUrl(env.getProperty("proxool.driver"));
         proxoolDataSource.setUser(env.getProperty("proxool.user"));
         proxoolDataSource.setPassword(env.getProperty("proxool.password"));
         //...
         return proxoolDataSource;
     }
 }
這里主要是說明注解的用法,所以沒有具體體現數據源全部參數的配置。對于有強迫癥的來說若項目中所有bean都使用注解,幾乎不太希望僅dataSource用xml類配置,換成類的方式類配置強迫感就消失了!
前一段時間研究了一下spring多數據源的配置和使用,為了后期從多個數據源拉取數據定時進行數據分析和報表統計做準備。由于之前做過的項目都是單數據源的,沒有遇到這種場景,所以也一直沒有去了解過如何配置多數據源。
后來發現其實基于spring來配置和使用多數據源還是比較簡單的,因為spring框架已經預留了這樣的接口可以方便數據源的切換。

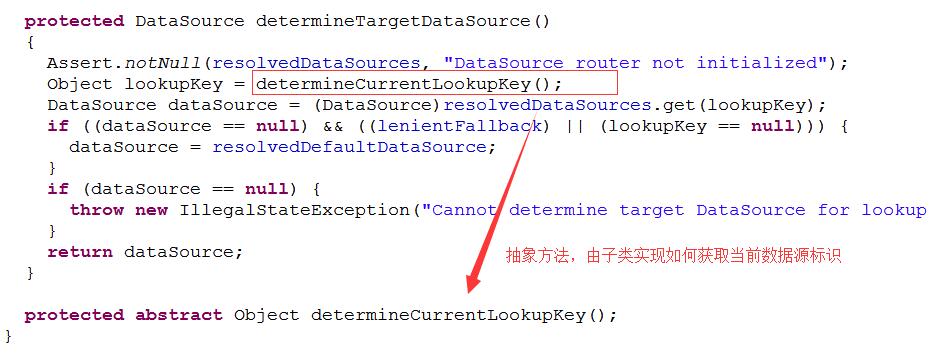
可以看到AbstractRoutingDataSource獲取數據源之前會先調用determineCurrentLookupKey方法查找當前的lookupKey,這個lookupKey就是數據源標識。
因此通過重寫這個查找數據源標識的方法就可以讓spring切換到指定的數據源了。
繼承AbstractRoutingDataSource并重寫determineCurrentLookupKey方法,代碼如下:
public class DynamicDataSource extends AbstractRoutingDataSource {
    @Override
    protected Object determineCurrentLookupKey() {
        // 從自定義的位置獲取數據源標識
        return DynamicDataSourceHolder.getDataSource();
    }
}用于持有當前線程中使用的數據源標識,代碼如下:
public class DynamicDataSourceHolder {
    /**
     * 注意:數據源標識保存在線程變量中,避免多線程操作數據源時互相干擾
     */
    private static final ThreadLocal<String> THREAD_DATA_SOURCE = new ThreadLocal<String>();
    public static String getDataSource() {
        return THREAD_DATA_SOURCE.get();
    }
    public static void setDataSource(String dataSource) {
        THREAD_DATA_SOURCE.set(dataSource);
    }
    public static void clearDataSource() {
        THREAD_DATA_SOURCE.remove();
    }
}和第一步里創建的DynamicDataSource的bean,簡化的配置如下:
<!--創建數據源1,連接數據庫db1 -->
<bean id="dataSource1" class="org.apache.commons.dbcp.BasicDataSource" destroy-method="close">
    <property name="driverClassName" value="${db1.driver}" />
    <property name="url" value="${db1.url}" />
    <property name="username" value="${db1.username}" />
    <property name="password" value="${db1.password}" />
</bean>
<!--創建數據源2,連接數據庫db2 -->
<bean id="dataSource2" class="org.apache.commons.dbcp.BasicDataSource" destroy-method="close">
    <property name="driverClassName" value="${db2.driver}" />
    <property name="url" value="${db2.url}" />
    <property name="username" value="${db2.username}" />
    <property name="password" value="${db2.password}" />
</bean>
<!--創建數據源3,連接數據庫db3 -->
<bean id="dataSource3" class="org.apache.commons.dbcp.BasicDataSource" destroy-method="close">
    <property name="driverClassName" value="${db3.driver}" />
    <property name="url" value="${db3.url}" />
    <property name="username" value="${db3.username}" />
    <property name="password" value="${db3.password}" />
</bean>
<bean id="dynamicDataSource" class="com.test.context.datasource.DynamicDataSource">
    <property name="targetDataSources">
        <map key-type="java.lang.String">
            <!-- 指定lookupKey和與之對應的數據源 -->
            <entry key="dataSource1" value-ref="dataSource1"></entry>
            <entry key="dataSource2" value-ref="dataSource2"></entry>
            <entry key="dataSource3 " value-ref="dataSource3"></entry>
        </map>
    </property>
    <!-- 這里可以指定默認的數據源 -->
    <property name="defaultTargetDataSource" ref="dataSource1" />
</bean>
到這里已經可以使用多數據源了,在操作數據庫之前只要DynamicDataSourceHolder.setDataSource("dataSource2")即可切換到數據源2并對數據庫db2進行操作了。
示例代碼如下:
@Service
public class DataServiceImpl implements DataService {
    @Autowired
    private DataMapper dataMapper;
    @Override
    public List<Map<String, Object>> getList1() {
        // 沒有指定,則默認使用數據源1
        return dataMapper.getList1();
    }
    @Override
    public List<Map<String, Object>> getList2() {
        // 指定切換到數據源2
        DynamicDataSourceHolder.setDataSource("dataSource2");
        return dataMapper.getList2();
    }
    @Override
    public List<Map<String, Object>> getList3() {
        // 指定切換到數據源3
        DynamicDataSourceHolder.setDataSource("dataSource3");
        return dataMapper.getList3();
    }
}
----------------------------華麗的分割線----------------------------
但是問題來了,如果每次切換數據源時都調用DynamicDataSourceHolder.setDataSource("xxx")就顯得十分繁瑣了,而且代碼量大了很容易會遺漏,后期維護起來也比較麻煩。能不能直接通過注解的方式指定需要訪問的數據源呢,比如在dao層使用@DataSource("xxx")就指定訪問數據源xxx?當然可以!前提是,再加一點額外的配置^_^。
首先,我們得定義一個名為DataSource的注解,代碼如下:
@Target({ TYPE, METHOD })
@Retention(RUNTIME)
public @interface DataSource {
    String value();
}
然后,定義AOP切面以便攔截所有帶有注解@DataSource的方法,取出注解的值作為數據源標識放到DynamicDataSourceHolder的線程變量中:
public class DataSourceAspect {
    /**
     * 攔截目標方法,獲取由@DataSource指定的數據源標識,設置到線程存儲中以便切換數據源
     *
     * @param point
     * @throws Exception
     */
    public void intercept(JoinPoint point) throws Exception {
        Class<?> target = point.getTarget().getClass();
        MethodSignature signature = (MethodSignature) point.getSignature();
        // 默認使用目標類型的注解,如果沒有則使用其實現接口的注解
        for (Class<?> clazz : target.getInterfaces()) {
            resolveDataSource(clazz, signature.getMethod());
        }
        resolveDataSource(target, signature.getMethod());
    }
    /**
     * 提取目標對象方法注解和類型注解中的數據源標識
     *
     * @param clazz
     * @param method
     */
    private void resolveDataSource(Class<?> clazz, Method method) {
        try {
            Class<?>[] types = method.getParameterTypes();
            // 默認使用類型注解
            if (clazz.isAnnotationPresent(DataSource.class)) {
                DataSource source = clazz.getAnnotation(DataSource.class);
                DynamicDataSourceHolder.setDataSource(source.value());
            }
            // 方法注解可以覆蓋類型注解
            Method m = clazz.getMethod(method.getName(), types);
            if (m != null && m.isAnnotationPresent(DataSource.class)) {
                DataSource source = m.getAnnotation(DataSource.class);
                DynamicDataSourceHolder.setDataSource(source.value());
            }
        } catch (Exception e) {
            System.out.println(clazz + ":" + e.getMessage());
        }
    }
}
最后在spring配置文件中配置攔截規則就可以了,比如攔截service層或者dao層的所有方法:
<bean id="dataSourceAspect" class="com.test.context.datasource.DataSourceAspect" />
    <aop:config>
        <aop:aspect ref="dataSourceAspect">
            <!-- 攔截所有service方法 -->
            <aop:pointcut id="dataSourcePointcut" expression="execution(* com.test.*.dao.*.*(..))"/>
            <aop:before pointcut-ref="dataSourcePointcut" method="intercept" />
        </aop:aspect>
    </aop:config>
</bean>
OK,這樣就可以直接在類或者方法上使用注解@DataSource來指定數據源,不需要每次都手動設置了。
示例代碼如下:
@Service
// 默認DataServiceImpl下的所有方法均訪問數據源1
@DataSource("dataSource1")
public class DataServiceImpl implements DataService {
    @Autowired
    private DataMapper dataMapper;
    @Override
    public List<Map<String, Object>> getList1() {
        // 不指定,則默認使用數據源1
        return dataMapper.getList1();
    }
    @Override
    // 覆蓋類上指定的,使用數據源2
    @DataSource("dataSource2")
    public List<Map<String, Object>> getList2() {
        return dataMapper.getList2();
    }
    @Override
    // 覆蓋類上指定的,使用數據源3
    @DataSource("dataSource3")
    public List<Map<String, Object>> getList3() {
        return dataMapper.getList3();
    }
}提示:注解@DataSource既可以加在方法上,也可以加在接口或者接口的實現類上,優先級別:方法>實現類>接口。也就是說如果接口、接口實現類以及方法上分別加了@DataSource注解來指定數據源,則優先以方法上指定的為準。
看完了這篇文章,相信你對“spring注解中@PropertySource如何配置數據源”有了一定的了解,如果想了解更多相關知識,歡迎關注億速云行業資訊頻道,感謝各位的閱讀!
免責聲明:本站發布的內容(圖片、視頻和文字)以原創、轉載和分享為主,文章觀點不代表本網站立場,如果涉及侵權請聯系站長郵箱:is@yisu.com進行舉報,并提供相關證據,一經查實,將立刻刪除涉嫌侵權內容。