您好,登錄后才能下訂單哦!
您好,登錄后才能下訂單哦!
小編給大家分享一下如何使用Entity Framework Core對Web項目生成數據庫表,希望大家閱讀完這篇文章之后都有所收獲,下面讓我們一起去探討吧!
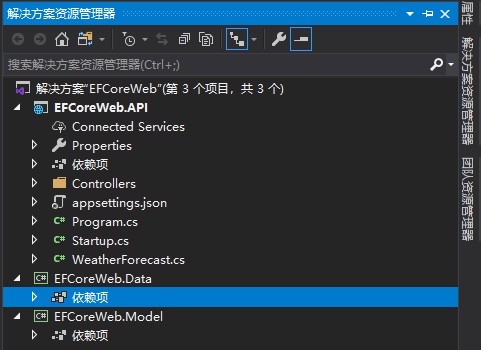
這篇文章中我們講解如何在Web項目中使用EntityFrameworkCore,并生成數據庫表,這里以ASP.NET Core WebApi為例講解。還是采用分層的結構。創建后的項目整體結構如下圖所示:

項目結構:
EFCoreWeb.API:ASP.NET Core WebApi項目,用來提供Web功能,在項目中會引用EFCoreWeb.Data。
EFCoreWeb.Data:類庫項目,基于.NET Core的類庫。存放的是與EFCore相關的操作。
EFCoreWeb.Model:類庫項目,基于.NET Core的類庫。存放的是實體類。
我們在EFCoreWeb.Model類庫項目里面添加Student實體類:
namespace EFCoreWeb.Model
{
    public class Student
    {
        public int Id { get; set; }

        public string Name { get; set; }

        public int Age { get; set; }

        public int Gender { get; set; }
    }
}因為要使用Student實體類,首先要在EFCoreWeb.Data項目里面添加對EFCoreWeb.Model的引用。
然后在EFCoreWeb.Data類庫項目里面添加Mircosoft.EntityFrameworkCore包,直接在NuGet里面安裝:

由于我們使用的是SQLServer數據庫,所以我們還要安裝Microsoft.EntityFrameworkCore.sqlServer包,同樣也是直接在NuGet里面安裝:

安裝完上面的兩個包以后,在EFCoreWeb.Data類庫項目里面添加Mapping文件夾,用來存放Fluent API的配置文件,Student類的配置伙伴類代碼如下:
using EFCoreWeb.Model;
using Microsoft.EntityFrameworkCore;
using Microsoft.EntityFrameworkCore.Metadata.Builders;

namespace EFCoreWeb.Data.Mapping
{
    /// <summary>
    /// Student配置伙伴類,繼承自IEntityTypeConfiguration<T>泛型接口
    /// </summary>
    public class StudentMap : IEntityTypeConfiguration<Student>
    {
        /// <summary>
        /// 實現接口里面的Configure方法,用來配置生成數據庫表結構
        /// </summary>
        /// <param name="builder"></param>
        public void Configure(EntityTypeBuilder<Student> builder)
        {
            // 設置主鍵
            builder.HasKey(p => p.Id);
            // 設置生成的表名
            builder.ToTable("T_Student");
            // 設置Name列的最大長度
            builder.Property("Name").HasMaxLength(64);
            // 設置Name列是必須的
            builder.Property("Name").IsRequired();
        }
    }
}
添加一個Context文件夾,然后添加數據上下文類,繼承自DbContext:
using EFCoreWeb.Model;
using Microsoft.EntityFrameworkCore;
using Microsoft.EntityFrameworkCore.Metadata.Builders;

namespace EFCoreWeb.Data.Mapping
{
    /// <summary>
    /// Student配置伙伴類,繼承自IEntityTypeConfiguration<T>泛型接口
    /// </summary>
    public class StudentMap : IEntityTypeConfiguration<Student>
    {
        /// <summary>
        /// 實現接口里面的Configure方法,用來配置生成數據庫表結構
        /// </summary>
        /// <param name="builder"></param>
        public void Configure(EntityTypeBuilder<Student> builder)
        {
            // 設置主鍵
            builder.HasKey(p => p.Id);
            // 設置生成的表名
            builder.ToTable("T_Student");
            // 設置Name列的最大長度
            builder.Property("Name").HasMaxLength(64);
            // 設置Name列是必須的
            builder.Property("Name").IsRequired();
        }
    }
}這里我們使用程序包管理器控制臺遷移的方式來生成數據庫表。需要在EFCoreWeb.Data項目里面安裝Microsoft.EntityFrameworkCore.Tools包。在EFCoreWeb.API項目里面安裝Microsoft.EntityFrameworkCore.Tools、Microsoft.EntityFrameworkCore兩個包。EFCoreWeb.API項目添加對EFCoreWeb.Data項目的引用。
首先在EFCoreWeb.API項目的appsettings.json文件里面添加數據庫連接字符串:
{
  "Logging": {
    "LogLevel": {
      "Default": "Information",
      "Microsoft": "Warning",
      "Microsoft.Hosting.Lifetime": "Information"
    }
  },
  "AllowedHosts": "*",
  "ConnectionString": {
    "DbConnection": "Data Source=.;Initial Catalog=EFTestDb;User ID=sa;Password=123456;"
  }
}
在Startup類的ConfigureServices方法里面添加數據庫連接:
using EFCoreWeb.Data.Context;
using Microsoft.AspNetCore.Builder;
using Microsoft.AspNetCore.Hosting;
using Microsoft.EntityFrameworkCore;
using Microsoft.Extensions.Configuration;
using Microsoft.Extensions.DependencyInjection;
using Microsoft.Extensions.Hosting;

namespace EFCoreWeb.API
{
    public class Startup
    {
        public Startup(IConfiguration configuration)
        {
            Configuration = configuration;
        }

        public IConfiguration Configuration { get; }

        // This method gets called by the runtime. Use this method to add services to the container.
        public void ConfigureServices(IServiceCollection services)
        {
            #region 數據庫連接
            services.AddDbContext<EFCoreDbContext>(options => {
                // options.UseSqlServer(Configuration.GetConnectionString("DbConnection"));
                options.UseSqlServer(Configuration.GetSection("ConnectionString").GetSection("DbConnection").Value);
            });
            #endregion
            services.AddControllers();
        }

        // This method gets called by the runtime. Use this method to configure the HTTP request pipeline.
        public void Configure(IApplicationBuilder app, IWebHostEnvironment env)
        {
            if (env.IsDevelopment())
            {
                app.UseDeveloperExceptionPage();
            }

            app.UseRouting();

            app.UseAuthorization();

            app.UseEndpoints(endpoints =>
            {
                endpoints.MapControllers();
            });
        }
    }
}
上面步驟配置完成以后,在程序包管理器控制臺里面開始遷移,使用下面的命令添加遷移:
Add-Migration Init
如下圖所示:

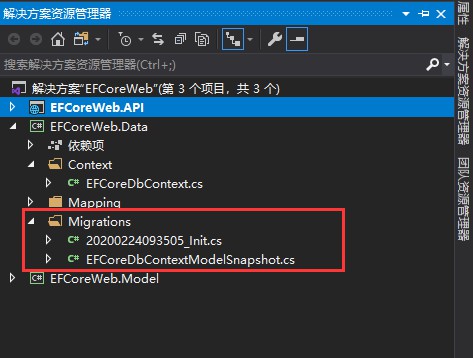
執行完命令以后就會生成遷移文件:

添加遷移之后,執行下面的命令更新數據庫:
Update-Database
如下圖所示:

執行完以后去查看數據庫:

可以看到,表里面Name列的長度是根據代碼里面設置的長度生成的,而且不為null,種子數據也插入進去了。
看完了這篇文章,相信你對“如何使用Entity Framework Core對Web項目生成數據庫表”有了一定的了解,如果想了解更多相關知識,歡迎關注億速云行業資訊頻道,感謝各位的閱讀!
免責聲明:本站發布的內容(圖片、視頻和文字)以原創、轉載和分享為主,文章觀點不代表本網站立場,如果涉及侵權請聯系站長郵箱:is@yisu.com進行舉報,并提供相關證據,一經查實,將立刻刪除涉嫌侵權內容。