溫馨提示×
您好,登錄后才能下訂單哦!
點擊 登錄注冊 即表示同意《億速云用戶服務條款》
您好,登錄后才能下訂單哦!
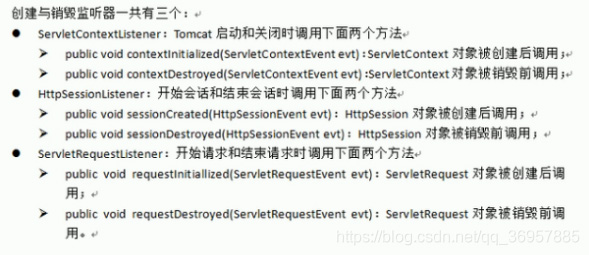
這篇“如何使用HttpSessionListener監聽器”文章的知識點大部分人都不太理解,所以小編給大家總結了以下內容,內容詳細,步驟清晰,具有一定的借鑒價值,希望大家閱讀完這篇文章能有所收獲,下面我們一起來看看這篇“如何使用HttpSessionListener監聽器”文章吧。
package lee;
import javax.servlet.*;
import javax.servlet.annotation.*;
import javax.servlet.http.*;import java.util.*;
@WebListener
public class OnlineListener
    implements HttpSessionListener
{
    // 當用戶與服務器之間開始session時觸發該方法
    public void sessionCreated(HttpSessionEvent se)
    {
        HttpSession session = se.getSession();
        ServletContext application = session.getServletContext();
        // 獲取session ID
        String sessionId = session.getId();
        // 如果是一次新的會話
        if (session.isNew())
        {
            String user = (String)session.getAttribute("user");
            // 未登錄用戶當游客處理
            user = (user == null) ? "游客" : user;
            Map<String , String> online = (Map<String , String>)
                application.getAttribute("online");
            if (online == null)
            {
                online = new Hashtable<String , String>();
            }
            // 將用戶在線信息放入Map中
            online.put(sessionId , user);
            application.setAttribute("online" , online);
        }
    }
    // 當用戶與服務器之間session斷開時觸發該方法
    public void sessionDestroyed(HttpSessionEvent se)
    {
        HttpSession session = se.getSession();
        ServletContext application = session.getServletContext();
        String sessionId = session.getId();
        Map<String , String> online = (Map<String , String>)
            application.getAttribute("online");
        if (online != null)
        {
            // 刪除該用戶的在線信息
            online.remove(sessionId);
        }
        application.setAttribute("online" , online);
    }
}<%@ page contentType="text/html; charset=GBK" language="java" errorPage="" %>
<%@ page import="java.util.*" %>
<!DOCTYPE html PUBLIC "-//W3C//DTD XHTML 1.0 Transitional//EN"
"http://www.w3.org/TR/xhtml1/DTD/xhtml1-transitional.dtd">
<html xmlns="http://www.w3.org/1999/xhtml">
<head>
<title> 用戶在線信息 </title>
<meta name="website" content="http://www.crazyit.org" />
</head>
<body>
在線用戶:
<table width="400" border="1">
<%
Map<String , String> online = (Map<String , String>)application
.getAttribute("online");
for (String sessionId : online.keySet())
{%>
<tr>
<td><%=sessionId%>
<td><%=online.get(sessionId)%>
</tr>
<%}%>
</body>
</html>

應用場景:用來統計當前在線人數
import javax.servlet.ServletContext;
import javax.servlet.http.HttpSession;
import javax.servlet.http.HttpSessionEvent;
import javax.servlet.http.HttpSessionListener;
public class MyHttpSessionListener implements HttpSessionListener {
    @Override
    public void sessionCreated(HttpSessionEvent httpSessionEvent) {
        System.out.println("httpsession被創建");
    }
    @Override
    public void sessionDestroyed(HttpSessionEvent httpSessionEvent) {
        System.out.println("httpsession被銷毀");
    }
}<%@ page contentType="text/html;charset=UTF-8" language="java" %> <html> <head> <title>$Title$</title> </head> <body> <% <%-- 創建HttpSessionListenter--%> request.getSession(); %> </body> </html>
<%@ page contentType="text/html;charset=UTF-8" language="java" %>
<html>
  <head>
    <title>$Title$</title>
  </head>
  <body>
  <%
<%--    銷毀HttpSessionListener--%>
    request.getSession().invalidate();
  %>
<h2>已退出</h2>
  </body>
</html>
web.xml中配置監聽
<?xml version="1.0" encoding="UTF-8"?>
<web-app xmlns="http://xmlns.jcp.org/xml/ns/javaee"
         xmlns:xsi="http://www.w3.org/2001/XMLSchema-instance"
         xsi:schemaLocation="http://xmlns.jcp.org/xml/ns/javaee http://xmlns.jcp.org/xml/ns/javaee/web-app_4_0.xsd"
         version="4.0">
    <listener>
        <listener-class>MyHttpSessionListener</listener-class>
    </listener>
    <listener>
        <listener-class>myServletContextListener</listener-class>
    </listener>
</web-app>
因為HttpSessionListener監聽器只在當前會話中有效
(1)創建ServletContextListener監聽器并設置初始值為0
import javax.servlet.ServletContext;
import javax.servlet.ServletContextEvent;
import javax.servlet.ServletContextListener;
public class myServletContextListener implements ServletContextListener {
    @Override
    public void contextInitialized(ServletContextEvent servletContextEvent) {
        ServletContext sc = servletContextEvent.getServletContext();
        sc.setAttribute("count", 0);
    }
    @Override
    public void contextDestroyed(ServletContextEvent servletContextEvent) {
    }
}
2)變更在線人數
import javax.servlet.ServletContext;
import javax.servlet.http.HttpSession;
import javax.servlet.http.HttpSessionEvent;
import javax.servlet.http.HttpSessionListener;
public class MyHttpSessionListener implements HttpSessionListener {
    @Override
    public void sessionCreated(HttpSessionEvent httpSessionEvent) {
        System.out.println("httpsession被創建");
        countPersion( httpSessionEvent.getSession().getServletContext(), true);
    }

    @Override
    public void sessionDestroyed(HttpSessionEvent httpSessionEvent) {
        System.out.println("httpsession被銷毀");
        countPersion(httpSessionEvent.getSession().getServletContext(), false);
    }
    /*
    * 變更在線的人數
    * */
    public void countPersion(ServletContext sc, boolean isAdd) {
        // 為了防止多線程并發問題加鎖
        synchronized (sc) {
            // 獲得當前的在線人數
            Integer count = (Integer) sc.getAttribute("count");
            if(isAdd) {
                sc.setAttribute("count", ++count);
            } else  {
                sc.setAttribute("count", --count);
            }
        }
    }
}
(3)前端頁面上去獲取顯示
<%@ page contentType="text/html;charset=UTF-8" language="java" %>
<html>
  <head>
    <title>$Title$</title>
  </head>
  <body>
  <%
<%--    創建HttpSessionListenter--%>
    request.getSession();
  %>
  <h2>歡迎登陸</h2>
  <hr>
  當前的在線人數 ${count}
  <a href="logout.jsp" rel="external nofollow" >退出</a>
  </body>
</html>
以上就是關于“如何使用HttpSessionListener監聽器”這篇文章的內容,相信大家都有了一定的了解,希望小編分享的內容對大家有幫助,若想了解更多相關的知識內容,請關注億速云行業資訊頻道。
免責聲明:本站發布的內容(圖片、視頻和文字)以原創、轉載和分享為主,文章觀點不代表本網站立場,如果涉及侵權請聯系站長郵箱:is@yisu.com進行舉報,并提供相關證據,一經查實,將立刻刪除涉嫌侵權內容。