您好,登錄后才能下訂單哦!
您好,登錄后才能下訂單哦!
這篇文章將為大家詳細講解有關stp怎么生成樹協議,小編覺得挺實用的,因此分享給大家做個參考,希望大家閱讀完這篇文章后可以有所收獲。

1、確定交換機的角色
根交換機:整個交換網絡中,有且只有一個;
非根交換機:剩余的其他交換機,都稱之為非根交換機
    注意:
        每一個非根交換機都會計算出一條去往根交換機的最短的、
        無環、2層數據轉發路徑,并且最終該路徑是“轉發”狀態;

        選舉原則:
              比較每個交換機的 BID (bridge ID):優先級+MAC地址
              優先級:默認值為 32768 ; 2個字節;
              MAC地址:使用的是交換機的主板MAC;6個字節;
                 比較原則 -
                       首先比較優先級,越小越好;
                       其次比較MAC地址,越小越好;

2、確定端口的角色
        根端口:在每一個非根交換機上,有且只有一個;
                距離根交換機最近的端口;

        指定端口:在每一個"網段/segment"中,有且只有一個;
                距離根交換機最近的端口;

        非指定端口:其他所有端口,都叫做“非指定端口”

3、確定端口的狀態
        down       -關閉(指的是當前端口沒有啟動STP)

        listening  -偵聽,此時偵聽的是網絡中的所有的BPDU
                          目的是為了確定交換機和端口的角色;
                          端口在該狀態停留15s;

        learning   -學習,該階段主要是學習端口上收到的數據幀
                           的源MAC地址,從而形成 MAC地址表;
                           端口在該狀態停留15s;

        forwarding -轉發(最終狀態),該狀態實現數據包的發送和接收

        blocking   -阻塞(最終狀態),該狀態不能發送和接收數據包;
                                    只能接收 BPDU。
實驗步驟及思路:
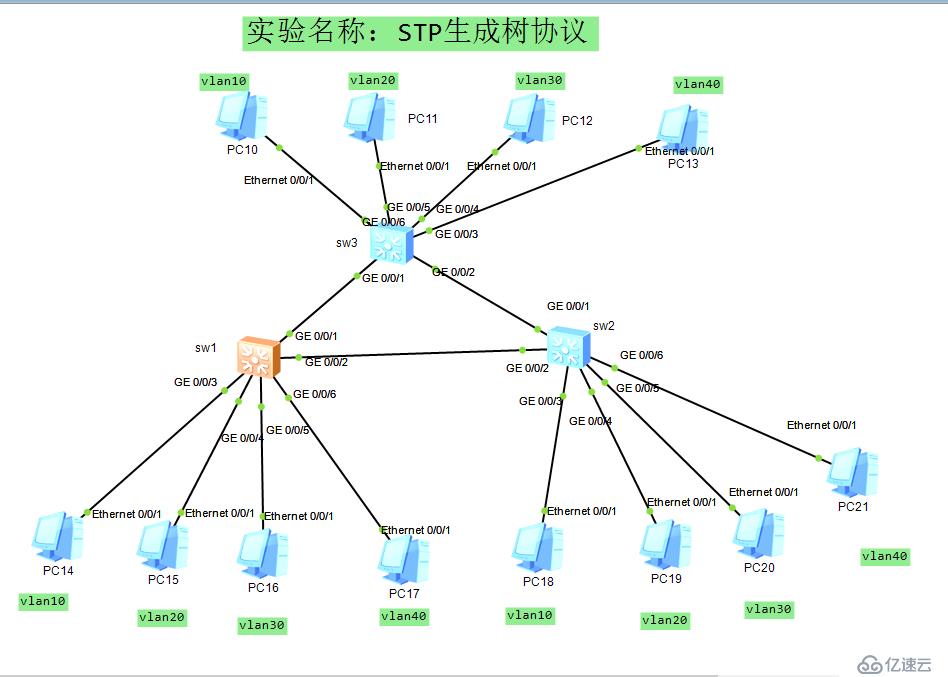
一.配置pc機的ip
pc14:
ip: 192.168.1.1
子網掩碼:255.255.255.0
網關:192.168.1.254
pc15:
ip: 192.168.2.1
子網掩碼:255.255.255.0
網關:192.168.2.254
pc16:
ip: 192.168.3.1
子網掩碼:255.255.255.0
網關:192.168.3.254
pc17:
ip: 192.168.4.1
子網掩碼:255.255.255.0
網關:192.168.4.254
pc18:
ip: 192.168.1.2
子網掩碼:255.255.255.0
網關:192.168.1.254
pc19:
ip: 192.168.2.2
子網掩碼:255.255.255.0
網關:192.168.2.254
pc20:
ip: 192.168.3.2
子網掩碼:255.255.255.0
網關:192.168.3.254
pc21:
ip: 192.168.4.2
子網掩碼:255.255.255.0
網關:192.168.4.254
pc10:
ip: 192.168.1.3
子網掩碼:255.255.255.0
網關:192.168.1.254
pc11:
ip: 192.168.2.3
子網掩碼:255.255.255.0
網關:192.168.2.254
pc12:
ip: 192.168.3.3
子網掩碼:255.255.255.0
網關:192.168.3.254
pc13:
ip: 192.168.4.3
子網掩碼:255.255.255.0
網關:192.168.4.254
二.創建vlan并將端口加入并設置trunk
1.在sw1上創建vlan并將端口加入:
vlan batch 10 20 30 40
interface g0/0/3
port link type-access
port default vlan 10
interface g0/0/4
port link type-access
port default vlan 20
interface g0/0/5
port link type-access
port default vlan 30
interface g0/0/6
port link type-access
port default vlan 40
設置trunk:
interface ge0/0/1
port link-type trunk
port trunk allow-pass vlan all
interface ge0/0/2
port link-type trunk
port trunk allow-pass vlan all
2.在sw2上創建vlan并將端口加入:
vlan batch 10 20 30 40
interface g0/0/3
port link type-access
port default vlan 10
interface g0/0/4
port link type-access
port default vlan 20
interface g0/0/5
port link type-access
port default vlan 30
interface g0/0/6
port link type-access
port default vlan 40
設置trunk:
interface ge0/0/1
port link-type trunk
port trunk allow-pass vlan all
interface ge0/0/2
port link-type trunk
port trunk allow-pass vlan all
3.在sw3上創建vlan并將端口加入:
vlan batch 10 20 30 40
interface g0/0/6
port link type-access
port default vlan 10
interface g0/0/5
port link type-access
port default vlan 20
interface g0/0/4
port link type-access
port default vlan 30
interface g0/0/3
port link type-access
port default vlan 40
設置trunk:
interface ge0/0/1
port link-type trunk
port trunk allow-pass vlan all
interface ge0/0/2
port link-type trunk
port trunk allow-pass vlan all
三.配置MSTP生成樹
1.首先在sw1,sw2,sw3上確定根交換機和輔根交換機
display stp brief 查看stp
這里sw2是根交換機,sw1是輔根交換機
2.STP參數修改(華為):
(1)修改交換機的 STP 優先級:
[SW] stp priority {value} -> 必須得是4096的倍數
(2)修改交換機的 STP 模式
[SW] stp mode {stp | rstp | mstp }
(3)修改交換機的端口的 STP cost :
[SW]interface fas0/13
[sw-fas0/13]stp cost {value}
(4)在交換機上關閉/開啟 STP :
[sw]stp disable -> 關閉 STP ;
[sw]stp enable -> 開啟 STP ,默認是開啟的;
3.配置MSTP
MST域(region),同一個域中,可以同時包含多個實例;
MSTI(instance),即MST 實例,一個MSTI 可以同時關聯多個 VLAN
1.在sw1上配置 MST region
stp region-configuration
region-name aaa 配置 region 的名字;
instance 1 vlan 10 20
instance 2 vlan 30 40
active region-configuration
.在sw2上配置 MST region
stp region-configuration
region-name aaa 配置 region 的名字;
instance 1 vlan 10 20
instance 2 vlan 30 40
active region-configuration
3.配置主根和輔根
1.在sw2上配置主根
stp instance 1 priority 0
stp instance 2 priority 4096 將 SW2設置為 實例id 的根;
2.在sw1上配置主根
stp instance 2 priority 0
stp instance 1 priority 4096 將 SW1設置為 實例id 的根;
4.驗證
display stp instance (id)
四。驗證,測試
堵塞i交換機之間的任何一根線看是否能全網通
能實現全網通,說明實驗成功
關于“stp怎么生成樹協議”這篇文章就分享到這里了,希望以上內容可以對大家有一定的幫助,使各位可以學到更多知識,如果覺得文章不錯,請把它分享出去讓更多的人看到。
免責聲明:本站發布的內容(圖片、視頻和文字)以原創、轉載和分享為主,文章觀點不代表本網站立場,如果涉及侵權請聯系站長郵箱:is@yisu.com進行舉報,并提供相關證據,一經查實,將立刻刪除涉嫌侵權內容。