您好,登錄后才能下訂單哦!
您好,登錄后才能下訂單哦!
本篇內容介紹了“CentOS 8.4怎么安裝Docker”的有關知識,在實際案例的操作過程中,不少人都會遇到這樣的困境,接下來就讓小編帶領大家學習一下如何處理這些情況吧!希望大家仔細閱讀,能夠學有所成!
Docker 支持 64 位版本 CentOS 7/8,并且要求內核版本不低于 3.10。
需要啟用centos-extrasrepository。在 CentOS 7 中這個倉庫是默認啟用的,如果之前有將其禁用,則需要重新啟用
CentOS 7 滿足最低內核的要求,但由于內核版本比較低,部分功能(如overlay2存儲層驅動)無法使用,并且部分功能可能不太穩定。
本文主要是在Liunx操作系統CentOS8.4中安裝Docker,我們安裝之前可以先查看自己的系統版本,使用命令:lsb_release -a 進行查看(如下圖所示)。
注意:切勿在沒有配置 Docker YUM 源的情況下直接使用 yum 命令安裝 Docker.

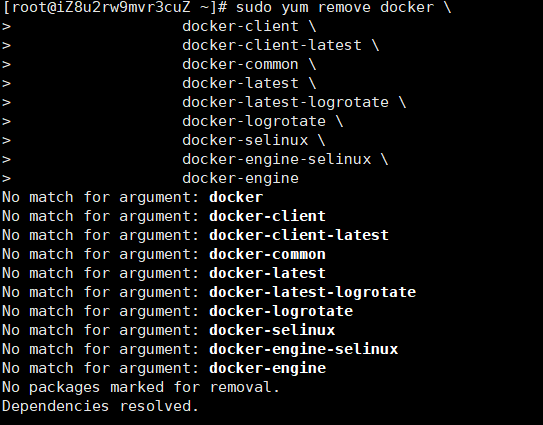
舊版本的Docker在CentOS中的包名為docker或者docker-engine。如果你之前的Linux CentOS系統中安裝了Docker的舊版本,你需要先卸載舊版Docker及其相關依賴,執行以下命令:
sudo yum remove docker \
                  docker-client \
                  docker-client-latest \
                  docker-common \
                  docker-latest \
                  docker-latest-logrotate \
                  docker-logrotate \
                  docker-selinux \
                  docker-engine-selinux \
                  docker-engine
因為我的系統系剛安裝的,所以執行上面的命令提示的是沒有找到需要移除的包!

如果yum報告沒有安裝這些軟件包,那也沒關系。
注意:/var/lib/docker/目錄下的內容,包括鏡像、容器、卷組、網絡等文件將被保留。Docker CE 的新包名為docker-ce。
簡單描述:yum稱為包管理器,主要用來解決:下載、依賴關系、安裝、卸載四種問題。
詳細說明:https://blog.csdn.net/weixin_43202123/article/details/119948927
執行以下命令安裝依賴包和必要的一些系統工具:
sudo yum install -y yum-utils device-mapper-persistent-data lvm2
因為國內網絡原因,推薦使用阿里云提供的Docker CE 鏡像源站!
sudo yum-config-manager --add-repo http://mirrors.aliyun.com/docker-ce/linux/centos/docker-ce.repo

官方鏡像源地址:
# 官方源
# sudo yum-config-manager --add-repo https://download.docker.com/linux/centos/docker-ce.repo
更新yum軟件源緩存,并安裝docker-ce(一路yes即可)。
sudo yum install docker-ce docker-ce-cli containerd.io
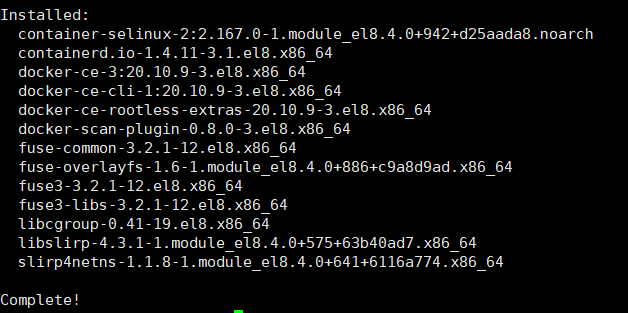
如下是成功安裝的依賴:

查看安裝成功的docker版本:docker -v

由于 CentOS8 防火墻使用了nftables,但 Docker 尚未支持nftables。
首先我們查看防火墻的狀態,假如防火墻狀態是開啟的我們執行下面的操作:
systemctl status firewalld

我們可以使用如下設置使用iptables:更改/etc/firewalld/firewalld.conf
# FirewallBackend=nftables
FirewallBackend=iptables
或者執行以下命令:
firewall-cmd --permanent --zone=trusted --add-interface=docker0

firewall-cmd --reload
執行sudo service docker start 命令開啟Docker服務提示異常:Redirecting to /bin/systemctl start docker.service

看異常就是需要執行systemctl的相關命令,因為Linux的不同發行版開啟Docker服務的命令也有所不同
sudo systemctl enable docker
sudo systemctl start docker
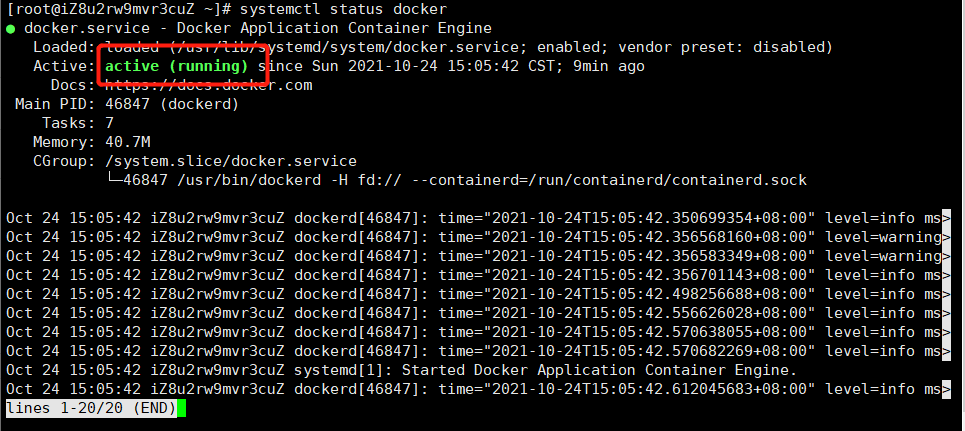
最后查看docker運行狀態
systemctl status docker

官方教程:https://docs.docker.com/config/daemon/systemd/
安裝 Docker 后,您需要啟動 Docker 守護程序。大多數 Linux 發行版用于systemctl啟動服務。
sudo systemctl start docker
如果您希望 Docker 在啟動時啟動,請參閱配置 Docker 以在啟動時啟動?。
啟動docker:systemctl start docker
停止docker:systemctl stop docker
重啟docker:systemctl restart docker
查看docker狀態:systemctl status docker
開機啟動:systemctl enable docker
當前系統docker信息:docker info
列舉出所有的容器:docker ps -a
停止容器:docker start 容器ID或容器名
直接關閉容器:docker kill 容器ID或容器名
重啟容器:docker restart 容器ID或者容器名
刪除容器:docker rm 容器ID或者容器名
查看鏡像:docker image ls
更多命令搜索(推薦):Docker命令在線速查手冊
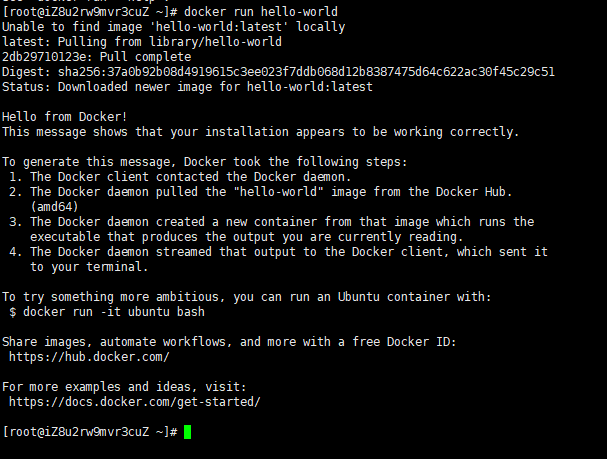
首先我們輸入docker run hello-world是否會出現下圖所示的提示,如果出現報錯,這環境配置可能出現了問題。
注意:這行命令會讓Docker從官方倉庫中拉去hello-world的鏡像到本地(是本地不存在該鏡像的情況),并且將其自動實例化容器。

Unable to find image 'hello-world:latest' locally
latest: Pulling from library/hello-world
2db29710123e: Pull complete
Digest: sha256:37a0b92b08d4919615c3ee023f7ddb068d12b8387475d64c622ac30f45c29c51
Status: Downloaded newer image for hello-world:latest

Hello from Docker!
This message shows that your installation appears to be working correctly.

To generate this message, Docker took the following steps:
 1. The Docker client contacted the Docker daemon.
 2. The Docker daemon pulled the "hello-world" image from the Docker Hub.
    (amd64)
 3. The Docker daemon created a new container from that image which runs the
    executable that produces the output you are currently reading.
 4. The Docker daemon streamed that output to the Docker client, which sent it
    to your terminal.

To try something more ambitious, you can run an Ubuntu container with:
 $ docker run -it ubuntu bash

Share images, automate workflows, and more with a free Docker ID:
 https://hub.docker.com/

For more examples and ideas, visit:
 https://docs.docker.com/get-started/
查看hello-World鏡像和容器:


“CentOS 8.4怎么安裝Docker”的內容就介紹到這里了,感謝大家的閱讀。如果想了解更多行業相關的知識可以關注億速云網站,小編將為大家輸出更多高質量的實用文章!
免責聲明:本站發布的內容(圖片、視頻和文字)以原創、轉載和分享為主,文章觀點不代表本網站立場,如果涉及侵權請聯系站長郵箱:is@yisu.com進行舉報,并提供相關證據,一經查實,將立刻刪除涉嫌侵權內容。