您好,登錄后才能下訂單哦!
您好,登錄后才能下訂單哦!
本篇文章給大家分享的是有關如何使用Spring自定義命名空間,小編覺得挺實用的,因此分享給大家學習,希望大家閱讀完這篇文章后可以有所收獲,話不多說,跟著小編一起來看看吧。
Spring在解析xml文件中的標簽的時候會區分當前的標簽是四種基本標簽(import、alias、bean和beans)還是自定義標簽,如果是自定義標簽,則會按照自定義標簽的邏輯解析當前的標簽。另外,即使是bean標簽,其也可以使用自定義的屬性或者使用自定義的子標簽。本文將對自定義標簽和自定義屬性的使用方式進行講解,并且會從源碼的角度對自定義標簽和自定義屬性的實現方式進行講解。
Spring框架從2.0版本開始,提供了基于Schema風格的Spring XML格式用來定義bean的擴展機制。引入Schema-based XML是為了對Traditional的XML配置形式進行簡化。通過Schema的定義,把一些原本需要通過幾個bean的定義或者復雜的bean的組合定義的配置形式,用另外一種簡單而可讀的配置形式呈現出來。
Schema-based XML由三部分構成,我們由一幅圖說明:

namespace —— 擁有很明確的邏輯分類
element —— 擁有很明確的過程語義
attributes —— 擁有很簡明的配置選項
例如,<mvc:annotation-driven />這段配置想要表達的意思,就是在mvc的空間內實現Annotation驅動的配置方式。其中,mvc表示配置的有效范圍,annotation-driven則表達了一個動態的過程,實際的邏輯含義是:整個SpringMVC的實現是基于Annotation模式,請為我注冊相關的行為模式。
下面將闡述一下怎么寫自定義XML的bean definition解析和集成這個解析到Spring IOC容器中。在后面的內容中我們將會提到一個重要的概念那就是bean definition.其實Spring中有一個重要的概念那就是bean.而BeanDefinition這個對象就是對應的標簽解析后的對象。
利用下面幾個簡答的步驟可以創建新的xml配置擴展:
Authoring一個XML schema用來描述你的自定義element(s)
Coding一個自定義的NamespaceHandler實現(這是一個很簡答的步驟,don't worry)
Coding一個或者多個BeanDefinitionParse實現(這是最主要的)
Registeringr把注冊上面的到Spring(這也是一個簡答的步驟)
下面將會依次闡述上面的步驟。例如:我們需要創建一個XML擴展(自定義xml element)允許我們可以用一種簡單的方式來配置SimpleDateFormat對象(在java.text包中)。最后我們可以定義一個SimpleDateFormat類型的bean definition如下:
<myns:dateformat id="dateFormat"
    pattern="yyyy-MM-dd HH:mm"
    lenient="true"/>
創建一個Spring IOC容器的XML配置擴展,我們需要編寫一個XML Schema用來描述這個擴展。下面的schema我們可以用來配置SimpleDateFormat對象
<!-- myns.xsd (inside package org/springframework/samples/xml) -->
<?xml version="1.0" encoding="UTF-8"?>
<xsd:schema xmlns="http://www.mycompany.com/schema/myns"
        xmlns:xsd="http://www.w3.org/2001/XMLSchema"
        xmlns:beans="http://www.springframework.org/schema/beans"
        targetNamespace="http://www.mycompany.com/schema/myns"
        elementFormDefault="qualified"
        attributeFormDefault="unqualified">

    <xsd:import namespace="http://www.springframework.org/schema/beans"/>
    <xsd:element name="dateformat">
        <xsd:complexType>
            <xsd:complexContent>
                <xsd:extension base="beans:identifiedType">
                    <xsd:attribute name="lenient" type="xsd:boolean"/>
                    <xsd:attribute name="pattern" type="xsd:string" use="required"/>
                </xsd:extension>
            </xsd:complexContent>
        </xsd:complexType>
    </xsd:element>
</xsd:schema>
上面的schema將會用來配置SimpleDateFormat對象。直接在一個xml應用context文件使用<myns:dateformat /> element.
<myns:dateformat id="dateFormat"
    pattern="yyyy-MM-dd HH:mm"
    lenient="true"/>
注意:上面的XML片段本質上和下面的XML片段意義一樣。
<bean id="dateFormat" class="java.text.SimpleDateFormat">
    <constructor-arg value="yyyy-HH-dd HH:mm"/>
    <property name="lenient" value="true"/>
</bean>
針對于上面的的schema,我們需要一個NamespaceHandler用來解析Spring遇到的所有這個特定的namespace配置文件中的所有elements.這個NamespaceHandler將會關心解析myns:dateformat元素。
這個NamespaceHandler接口相對簡單,它包括三個重要的方法。
init().會在spring使用handler之前實例化NamespaceHandler
BeanDefinition parse(Element, ParseContext) - 當Spring遇到上面定義的top-level元素(也就是myms)將會被調用,這個方法能夠注冊bean definitions并且可以返回一個bean definition.
BeanDefinitionHolder decorate(Node, BeanDefinitionHolder, ParserContext),當spring遇到一個attribute或者嵌入到namespace中的元素中將會被調用。
在很多情況下在spring xml配置文件中每個top-level的xml元素代表一個single類型的bean definition(在我們的例子中,是一個single的<myns:dateformat>元素代表一個single的SimpleDateFormat bean definition).Spring提供了很多便利的類用來支持這種場景。在這個例子中,我們將使用NamespaceHandlerSupport。
package org.springframework.samples.xml;
import org.springframework.beans.factory.xml.NamespaceHandlerSupport;
public class MyNamespaceHandler extends NamespaceHandlerSupport {
    public void init() {
        registerBeanDefinitionParser("dateformat", new SimpleDateFormatBeanDefinitionParser());
    }
}
下面講一下為什么要繼承NamespaceHandlerSupport這個抽象類
先看一下Spring自定義命名空間加載過程:
XmlBeanDefinitionReader入口
DefaultDocumentLoader加載并解析一個XML文件成Document實例,從BeanDefinitionReader中獲取EntityResolver和ErrorHandler。
在XmlBeanDefinitionReader中創建BeanDefinitionDocumentReader,在這個BeanDefinitionDocumentReader中遍歷Document中的每個Element。
對每個Element,如果是默認的URI(即beans命名空間內的定義),調用parseDefaultElement()方法,否則調用BeanDefinitionParserDelegate中的parseCustomElement()方法。
在parseCustomElement()方法中,它找到當前Element的namespaceURI,然后從NamespaceHandlerResolver中獲取自定義的NamespaceHandler,使用該NamespaceHandler來解析這個Element,由于我們已經在init()方法中注冊了不同的element name對應的BeanDefinitionParser,因而可以使用這個自定義的BeanDefinitionParser來解析自定義的Element。
其中默認的NamespaceHandlerResolver(DefaultNamespaceHandlerResolver)會找到當前classpath下的所有META-INF/spring.handlers文件,加載進來,讀取里面的內容成namespaceURI到NamespaceHandler的map,并初始化所有的NamespaceHandler。
看一下BeanDefinitionParserDelegate中的parseCustomElement()方法:
public BeanDefinition parseCustomElement(Element ele) {
        return this.parseCustomElement(ele, (BeanDefinition)null);
}

public BeanDefinition parseCustomElement(Element ele, BeanDefinition containingBd){
        String namespaceUri = this.getNamespaceURI(ele);
        NamespaceHandler handler = this.readerContext.getNamespaceHandlerResolver().resolve(namespaceUri);
        if (handler == null) {
            this.error("Unable to locate Spring NamespaceHandler for XML schema namespace [" + namespaceUri + "]", ele);
            return null;
        } else {
            return handler.parse(ele, new ParserContext(this.readerContext, this, containingBd));
        }
}
其中parse方法為抽象類NamespaceHandlerSupport中的方法:
public BeanDefinition parse(Element element, ParserContext parserContext) {
        return this.findParserForElement(element, parserContext).parse(element, parserContext);
}

private BeanDefinitionParser findParserForElement(Element element, ParserContext parserContext) {
        String localName = parserContext.getDelegate().getLocalName(element);
        BeanDefinitionParser parser = (BeanDefinitionParser)this.parsers.get(localName);
        if (parser == null) {
            parserContext.getReaderContext().fatal("Cannot locate BeanDefinitionParser for element [" + localName + "]", element);
        }
        return parser;
}
而其中的
BeanDefinitionParser parser = (BeanDefinitionParser)this.parsers.get(localName);這句中的parsers是一個HashMap 在繼承NamespaceHandlerSupport這個抽象類中的重寫了init()方法:
public void init() {
        registerBeanDefinitionParser("dateformat", new SimpleDateFormatBeanDefinitionParser());
    }
NamespaceHandlerSupport這個類的registerBeanDefinitionParser方法:
private final Map<String, BeanDefinitionParser> parsers = new HashMap();
protected final void registerBeanDefinitionParser(String elementName, BeanDefinitionParser parser) {
        this.parsers.put(elementName, parser);
    }
return this.findParserForElement(element, parserContext).parse(element, parserContext);中的parse方法為抽象類AbstractBeanDefinitionParser中的方法:
public final BeanDefinition parse(Element element, ParserContext parserContext) {
        AbstractBeanDefinition definition = this.parseInternal(element, parserContext);
        if (definition != null && !parserContext.isNested()) {
            try {
                String id = this.resolveId(element, definition, parserContext);
                if (!StringUtils.hasText(id)) {
                    parserContext.getReaderContext().error("Id is required for element '" + parserContext.getDelegate().getLocalName(element) + "' when used as a top-level tag", element);
                }

                String[] aliases = null;
                if (this.shouldParseNameAsAliases()) {
                    String name = element.getAttribute("name");
                    if (StringUtils.hasLength(name)) {
                        aliases = StringUtils.trimArrayElements(StringUtils.commaDelimitedListToStringArray(name));
                    }
                }

                BeanDefinitionHolder holder = new BeanDefinitionHolder(definition, id, aliases);
                this.registerBeanDefinition(holder, parserContext.getRegistry());
                if (this.shouldFireEvents()) {
                    BeanComponentDefinition componentDefinition = new BeanComponentDefinition(holder);
                    this.postProcessComponentDefinition(componentDefinition);
                    parserContext.registerComponent(componentDefinition);
                }
            } catch (BeanDefinitionStoreException var8) {
                parserContext.getReaderContext().error(var8.getMessage(), element);
                return null;
            }
        }
        return definition;
    }
this.registerBeanDefinition(holder, parserContext.getRegistry());最終會調用BeanDefinitionReaderUtils的registerBeanDefinition方法向IoC容器注冊解析的Bean,BeanDefinitionReaderUtils的注冊的源碼如下:
//將解析的BeanDefinitionHold注冊到容器中
public static void registerBeanDefinition(BeanDefinitionHolder definitionHolder, BeanDefinitionRegistry registry)
    throws BeanDefinitionStoreException {
        //獲取解析的BeanDefinition的名稱
         String beanName = definitionHolder.getBeanName();
        //向IoC容器注冊BeanDefinition
        registry.registerBeanDefinition(beanName, definitionHolder.getBeanDefinition());
        //如果解析的BeanDefinition有別名,向容器為其注冊別名
         String[] aliases = definitionHolder.getAliases();
        if (aliases != null) {
            for (String aliase : aliases) {
                registry.registerAlias(beanName, aliase);
            }
        }
}
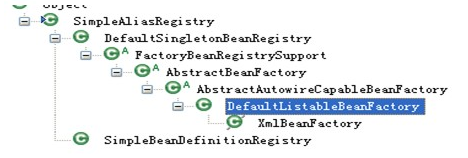
當調用BeanDefinitionReaderUtils向IoC容器注冊解析的BeanDefinition時,真正完成注冊功能的是DefaultListableBeanFactory。
DefaultListableBeanFactory向IoC容器注冊解析后的BeanDefinition:
DefaultListableBeanFactory中使用一個HashMap的集合對象存放IoC容器中注冊解析的BeanDefinition,向IoC容器注冊的主要源碼如下:

//存儲注冊的俄BeanDefinition
private final Map<String, BeanDefinition> beanDefinitionMap = new ConcurrentHashMap<String, BeanDefinition>();
   //向IoC容器注冊解析的BeanDefiniton
public void registerBeanDefinition(String beanName, BeanDefinition beanDefinition)
         throws BeanDefinitionStoreException {
     Assert.hasText(beanName, "Bean name must not be empty");
     Assert.notNull(beanDefinition, "BeanDefinition must not be null");
     //校驗解析的BeanDefiniton
      if (beanDefinition instanceof AbstractBeanDefinition) {
           try {
               ((AbstractBeanDefinition) beanDefinition).validate();
          }
          catch (BeanDefinitionValidationException ex) {
              throw new BeanDefinitionStoreException(beanDefinition.getResourceDescription(), beanName,
                      "Validation of bean definition failed", ex);
          }
      }
      //注冊的過程中需要線程同步,以保證數據的一致性
      synchronized (this.beanDefinitionMap) {
          Object oldBeanDefinition = this.beanDefinitionMap.get(beanName);
          //檢查是否有同名的BeanDefinition已經在IoC容器中注冊,如果已經注冊,
          //并且不允許覆蓋已注冊的Bean,則拋出注冊失敗異常
          if (oldBeanDefinition != null) {
              if (!this.allowBeanDefinitionOverriding) {
                  throw new BeanDefinitionStoreException(beanDefinition.getResourceDescription(), beanName,
                           "Cannot register bean definition [" + beanDefinition + "] for bean '" + beanName +
                          "': There is already [" + oldBeanDefinition + "] bound.");
              }
              else {//如果允許覆蓋,則同名的Bean,后注冊的覆蓋先注冊的
                  if (this.logger.isInfoEnabled()) {
                      this.logger.info("Overriding bean definition for bean '" + beanName +
                              "': replacing [" + oldBeanDefinition + "] with [" + beanDefinition + "]");
                  }
              }
          }
          //IoC容器中沒有已經注冊同名的Bean,按正常注冊流程注冊
          else {
              this.beanDefinitionNames.add(beanName);
              this.frozenBeanDefinitionNames = null;
          }
          this.beanDefinitionMap.put(beanName, beanDefinition);
          //重置所有已經注冊過的BeanDefinition的緩存
          resetBeanDefinition(beanName);
      }
}BeanDefinitionParser的責任是解析定義schema在top-level的XML元素.在解析過程中,我們必須訪問XML元素,因此我們可以解析我們自定義的XML內容,例如下面的例子:
package org.springframework.samples.xml;
import org.springframework.beans.factory.support.BeanDefinitionBuilder;
import org.springframework.beans.factory.xml.AbstractSingleBeanDefinitionParser;
import org.springframework.util.StringUtils;
import org.w3c.dom.Element;
import java.text.SimpleDateFormat;

public class SimpleDateFormatBeanDefinitionParser extends AbstractSingleBeanDefinitionParser { 1
    protected Class getBeanClass(Element element) {
        return SimpleDateFormat.class; 2
    }

    protected void doParse(Element element, BeanDefinitionBuilder bean) {
        // this will never be null since the schema explicitly requires that a value be supplied
        String pattern = element.getAttribute("pattern");
        bean.addConstructorArg(pattern);

        // this however is an optional property
        String lenient = element.getAttribute("lenient");
        if (StringUtils.hasText(lenient)) {
            bean.addPropertyValue("lenient", Boolean.valueOf(lenient));
        }
    }
}
注意:
我們使用Spring提供的AbstractSingleBeanDefinitionParser 來處理創建一個single的BeanDefinition的一些基本的工作。
我們重寫了AbstractSingleBeanDefinitionParser父類的doParse方法來實現我們自己創建single類型的BeanDefinition的邏輯。
編碼工作完成了.下面是事情就是在Spring XML解析的邏輯能夠織入我們定義的element;我們需要在兩個特定的目標properties文件中注冊我們自定義的namespaceHandler和自定義的XSD文件。這些properties文件都需要被放置在你項目中的'META-INF'應用下。
1) META-INF/spring.handlers
這個properties文件叫做'spring.handlers',包含XML Schema URIS與namespace處理類的映射。在我們的例子中,我們需要像下面:
http\://www.mycompany.com/schema/myns=org.springframework.samples.xml.MyNamespaceHandler
鍵值對的第一個部分(key)是關聯你自定義namespace擴展的URI,并且需要匹配你自定義XSD Schema中的'targetNamespace'屬性。
NamespaceHandlerResolver(DefaultNamespaceHandlerResolver)會找到當前classpath下的所有META-INF/spring.handlers文件,加載進來,讀取里面的內容成namespaceURI到NamespaceHandler的map,并初始化所有的NamespaceHandler。
DefaultNamespaceHandlerResolver的resolve方法:
public NamespaceHandler resolve(String namespaceUri) {
        Map<String, Object> handlerMappings = this.getHandlerMappings();
        Object handlerOrClassName = handlerMappings.get(namespaceUri);
        if (handlerOrClassName == null) {
            return null;
        } else if (handlerOrClassName instanceof NamespaceHandler) {
            return (NamespaceHandler)handlerOrClassName;
        } else {
            String className = (String)handlerOrClassName;

            try {
                Class<?> handlerClass = ClassUtils.forName(className, this.classLoader);
                if (!NamespaceHandler.class.isAssignableFrom(handlerClass)) {
                    throw new FatalBeanException("Class [" + className + "] for namespace [" + namespaceUri + "] does not implement the [" + NamespaceHandler.class.getName() + "] interface");
                } else {
                    NamespaceHandler namespaceHandler = (NamespaceHandler)BeanUtils.instantiateClass(handlerClass);
                    namespaceHandler.init();
                    handlerMappings.put(namespaceUri, namespaceHandler);
                    return namespaceHandler;
                }
            } catch (ClassNotFoundException var7) {
                throw new FatalBeanException("NamespaceHandler class [" + className + "] for namespace [" + namespaceUri + "] not found", var7);
            } catch (LinkageError var8) {
                throw new FatalBeanException("Invalid NamespaceHandler class [" + className + "] for namespace [" + namespaceUri + "]: problem with handler class file or dependent class", var8);
            }
        }
    }

    private Map<String, Object> getHandlerMappings() {
        if (this.handlerMappings == null) {
            synchronized(this) {
                if (this.handlerMappings == null) {
                    try {
                        Properties mappings = PropertiesLoaderUtils.loadAllProperties(this.handlerMappingsLocation, this.classLoader);
                        if (this.logger.isDebugEnabled()) {
                            this.logger.debug("Loaded NamespaceHandler mappings: " + mappings);
                        }

                        Map<String, Object> handlerMappings = new ConcurrentHashMap(mappings.size());
                        CollectionUtils.mergePropertiesIntoMap(mappings, handlerMappings);
                        this.handlerMappings = handlerMappings;
                    } catch (IOException var5) {
                        throw new IllegalStateException("Unable to load NamespaceHandler mappings from location [" + this.handlerMappingsLocation + "]", var5);
                    }
                }
            }
        }
        return this.handlerMappings;
    }
PropertiesLoaderUtils中的loadAllProperties方法:
public static Properties loadAllProperties(String resourceName, ClassLoader classLoader) throws IOException {
        Assert.notNull(resourceName, "Resource name must not be null");
        ClassLoader classLoaderToUse = classLoader;
        if (classLoader == null) {
            classLoaderToUse = ClassUtils.getDefaultClassLoader();
        }

        Enumeration<URL> urls = classLoaderToUse != null ? classLoaderToUse.getResources(resourceName) : ClassLoader.getSystemResources(resourceName);
        Properties props = new Properties();

        while(urls.hasMoreElements()) {
            URL url = (URL)urls.nextElement();
            URLConnection con = url.openConnection();
            ResourceUtils.useCachesIfNecessary(con);
            InputStream is = con.getInputStream();

            try {
                if (resourceName.endsWith(".xml")) {
                    props.loadFromXML(is);
                } else {
                    props.load(is);
                }
            } finally {
                is.close();
            }
        }
        return props;
    }
2) META-INF/spring.schemas
這個properties文件叫做'spring.schemas',包含XML Schema在classpath中的位置。這個文件主要是防止spring在網絡上加載這個schema文件。如果你指定這個properties文件影射,Spring將會在classpath中查找這個schema(在這種情況下會在'org.springframework.samples.xml'包下面的'myns.xsd')
http\://www.mycompany.com/schema/myns/myns.xsd=org/springframework/samples/xml/myns.xsd
你最好部署你的XSD文件在你的NamespaceHandler和BeanDefinition類的classpath中。
如果你已經完成了以上步驟,那么你就成功的定義了你自己的BeanDefinition在Spring IOC容器中。我們可以Spring IOC容器獲取到并使用這個Bean對象。
1)配置文件
schema-beans.xml
<?xml version="1.0" encoding="UTF-8"?>
<beans xmlns="http://www.springframework.org/schema/beans"
       xmlns:xsi="http://www.w3.org/2001/XMLSchema-instance"
       xmlns:myns="http://www.mycompany.com/schema/myns"
       xsi:schemaLocation="http://www.springframework.org/schema/beans
       http://www.springframework.org/schema/beans/spring-beans.xsd
       http://www.mycompany.com/schema/myns http://www.mycompany.com/schema/myns/myns.xsd">

    <myns:dateformat id="dateFormat"
                     pattern="yyyy-MM-dd HH:mm"
                     lenient="true"/>
</beans>
2)測試類
SchemaBeanDefinitionTest.java
package org.springframework.samples.xml;
import org.springframework.context.ApplicationContext;
import org.springframework.context.support.ClassPathXmlApplicationContext;
import java.text.SimpleDateFormat;

public class SchemaBeanDefinitionTest {
    public static void main(String[] args) {
        ApplicationContext context = new ClassPathXmlApplicationContext("schema-beans.xml");
        SimpleDateFormat dateFormat = context.getBean("dateFormat", SimpleDateFormat.class);
                System.out.println("-------------------gain object--------------------");
        System.out.println(dateFormat);
    }
}
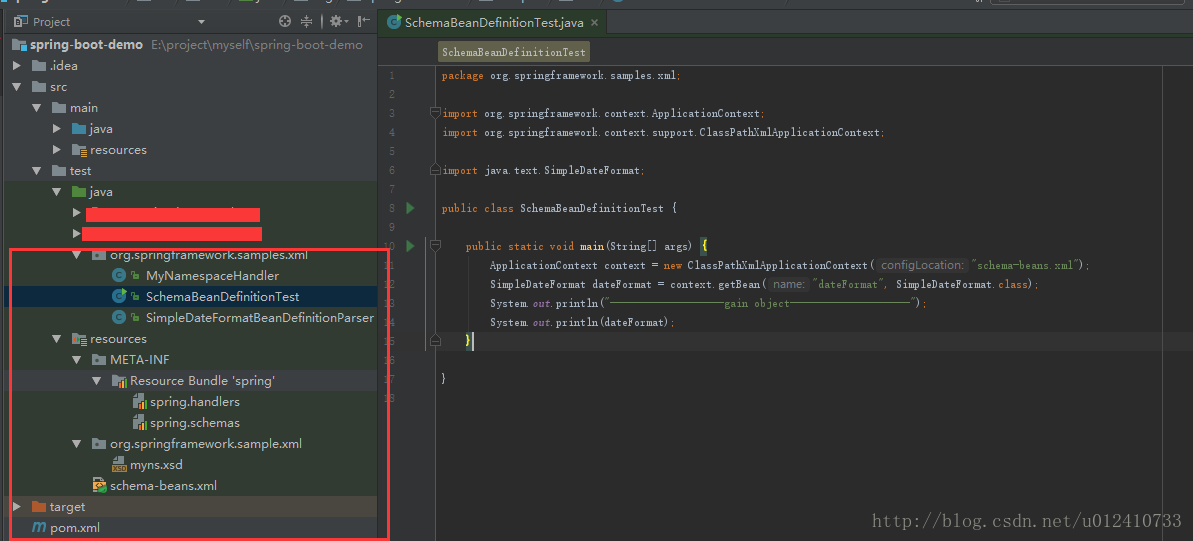
3)項目結構:

注意:在idea靜態資源必須放在resources下面,不然會報錯。
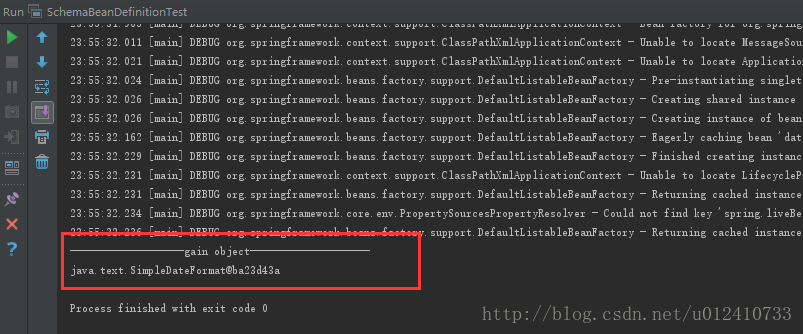
4)運行結果:

以上就是如何使用Spring自定義命名空間,小編相信有部分知識點可能是我們日常工作會見到或用到的。希望你能通過這篇文章學到更多知識。更多詳情敬請關注億速云行業資訊頻道。
免責聲明:本站發布的內容(圖片、視頻和文字)以原創、轉載和分享為主,文章觀點不代表本網站立場,如果涉及侵權請聯系站長郵箱:is@yisu.com進行舉報,并提供相關證據,一經查實,將立刻刪除涉嫌侵權內容。