溫馨提示×
您好,登錄后才能下訂單哦!
點擊 登錄注冊 即表示同意《億速云用戶服務條款》
您好,登錄后才能下訂單哦!
這篇文章將為大家詳細講解有關Django程序中如何添加js插件文本編輯器,小編覺得挺實用的,因此分享給大家做個參考,希望大家閱讀完這篇文章后可以有所收獲。
第一步:在首頁中添加寫博客的按鈕
    <li>
        <a href="{% url 'create_article' %}">寫博客</a>
    </li>
第二步:寫相應的創建博客視圖,編輯views.py文件
def create_article(request):
    if request.method == "GET" :
        return  render(request,'create_aritcle.html')
    elif request.method == "POST" :
        print request.FILES       ##查看上傳圖片的路徑
        bbs_generater = utils.ArticleGen(request)
        res = bbs_generater.create()
        html_ele ="""
        Your article <<a href="/article/%s/"> %s</a>> has been created successfully !!!,
        """ %(res.id, res.title)
        return HttpResponse(html_ele)
第三步:寫對于的編輯器html文件
    首先寫一個空html文件,測試主頁是否能成功調用這個html,
    {% extends 'index.html' %}
    {% block content-left  %}
    <div row>
    編輯器頁面
    </div>
    {% endblock %}
    {% block content-right %}
        right bar
    {% endblock %}
第四步:真正開始創建一個編輯器
    首先:到https://www.tinymce.com/download/下載一個編輯器到文件
    把這個js文件應用到頁面中:
    第一步:下載tinymce編輯器,在本程序中已經下載好,在/static/plugins/tinymce目錄中
第五步:在html文件中應用這個js問題,如下:
    <script src="/static/plugins/tinymce/js/tinymce/tinymce.min.js"> </script>
第六步:
<script src="/static/plugins/tinymce/js/tinymce/tinymce.min.js"> </script>
<script type="text/javascript">
tinymce.init({
    selector: "#create_bbs"
 });
</script>
第七步:在你需要的添加編輯起的地方應用下面代碼
<form method="post">{% csrf_token %}
    <textarea id="create_bbs" name="content" ></textarea>
</form>
第八步,這個免費的編輯器的功能有點少,可以點擊Advanced選擇其他
免費的插件
也就說把上面第六部的內容換為下面的內容
<script src="/static/plugins/tinymce/js/tinymce/tinymce.min.js"> </script>
<script type="text/javascript">
tinymce.init({
    selector: "#create_bbs",
    theme: "modern",
    width: 800,
    height: 300,
    plugins: [
         "advlist autolink link p_w_picpath lists charmap print preview hr anchor pagebreak spellchecker",
         "searchreplace wordcount visualblocks visualchars code fullscreen insertdatetime media nonbreaking",
         "save table contextmenu directionality emoticons template paste textcolor"
   ],
   content_css: "css/content.css",
   toolbar: "insertfile undo redo | styleselect | bold italic | alignleft aligncenter alignright alignjustify | bullist numlist outdent indent | l      ink p_w_picpath | print preview media fullpage | forecolor backcolor emoticons",
   style_formats: [
        {title: 'Bold text', inline: 'b'},
        {title: 'Red text', inline: 'span', styles: {color: '#ff0000'}},
        {title: 'Red header', block: 'h2', styles: {color: '#ff0000'}},
        {title: 'Example 1', inline: 'span', classes: 'example1'},
        {title: 'Example 2', inline: 'span', classes: 'example2'},
        {title: 'Table styles'},
        {title: 'Table row 1', selector: 'tr', classes: 'tablerow1'}
    ]
 });
</script>
第九部。這個編輯器上存到數據庫的內容是html內容。
把form表單頭改為下面內容,即可把文件提交到名稱為create_article的url中
<form class="form-horizontal" method="post" action="{% url 'create_article' %}" enctype="multipart/form-data"> {% csrf_token %}
具體的post請求到 create_article url的出來,上面第二步中有
views.py視圖調用上傳文件的模塊utils.py內容如下:
import os
import models
from s10day12bbs import settings
class ArticleGen(object):
def __init__(self,request):
self.requset = request
def parse_data(self):
form_data = {
'title' : self.requset.POST.get('title'),
'content' : self.requset.POST.get('content'),
'summary' : self.requset.POST.get('summary'),
'author_id' : self.requset.user.userprofile.id,
'head_img': '',
'category_id' : 1
}
return form_data
def create(self):
self.data = self.parse_data()
bbs_obj = models.Article(**self.data)
bbs_obj.save()
filename = handle_upload_file(self.requset,self.requset.FILES['head_img']) #獲取圖片路徑并保存到數據庫
bbs_obj.head_img = filename
bbs_obj.save()
return bbs_obj
def update(self):
pass
def handle_upload_file(request, file_obj):
upload_dir = '%s/%s' % (settings.BASE_DIR, settings.FileUploadDir)
if not os.path.isdir(upload_dir):
os.mkdir(upload_dir)
print '---->', dir(file_obj)
with open('%s/%s' % (upload_dir, file_obj.name), 'wb') as destination:
for chunk in file_obj.chunks():
destination.write(chunk)
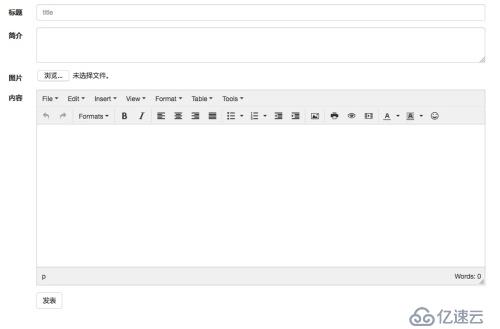
return file_obj.name完整的創建文本編輯器前端頁面:
{% extends 'index.html' %}


{% block container %}

<form class="form-horizontal" method="post" action="{% url 'create_article' %}" enctype="multipart/form-data"> {% csrf_token %}
  <div class="form-group">
    <label for="inputEmail3" class="col-sm-2 control-label">標題</label>
    <div class="col-sm-10">
      <input type="text" class="form-control" name="title" placeholder="title">
    </div>
  </div>

  <div class="form-group">
    <label for="inputEmail3" class="col-sm-2 control-label">簡介</label>
    <div class="col-sm-10">
        <textarea class="form-control" rows="3" name="summary"></textarea>
    </div>
  </div>

  <div class="form-group">
    <label for="inputEmail3" class="col-sm-2 control-label">圖片</label>
    <div class="col-sm-10">
        <input type="file" name="head_img">
    </div>
  </div>


  <div class="form-group">
    <label for="inputEmail3" class="col-sm-2 control-label">內容</label>
    <div class="col-sm-10">
        <textarea id="create_bbs" name="content" ></textarea>
    </div>
  </div>


  <div class="form-group">
    <div class="col-sm-offset-2 col-sm-10">
      <button type="submit" class="btn btn-default">發表</button>
    </div>
  </div>
</form>


<!-- 提交的內容必須包含name字段,提交的時候就是一個字典,key就是name的內容,值就是value,也就是你輸入的內容 -->


{% endblock %}

{% block bottom-js %}

<script src="/static/plugins/tinymce/js/tinymce/tinymce.min.js"> </script>
<script type="text/javascript">
tinymce.init({
    selector: "#create_bbs",
    theme: "modern",
    //width: 900,
    height: 300,
    plugins: [
         "advlist autolink link p_w_picpath lists charmap print preview hr anchor pagebreak spellchecker",
         "searchreplace wordcount visualblocks visualchars code fullscreen insertdatetime media nonbreaking",
         "save table contextmenu directionality emoticons template paste textcolor"
   ],
   content_css: "css/content.css",
   toolbar: "insertfile undo redo | styleselect | bold italic | alignleft aligncenter alignright alignjustify | bullist numlist outdent indent | l      ink p_w_picpath | print preview media fullpage | forecolor backcolor emoticons",
   style_formats: [
        {title: 'Bold text', inline: 'b'},
        {title: 'Red text', inline: 'span', styles: {color: '#ff0000'}},
        {title: 'Red header', block: 'h2', styles: {color: '#ff0000'}},
        {title: 'Example 1', inline: 'span', classes: 'example1'},
        {title: 'Example 2', inline: 'span', classes: 'example2'},
        {title: 'Table styles'},
        {title: 'Table row 1', selector: 'tr', classes: 'tablerow1'}
    ]
 });
</script>


{% endblock %}
效果圖:

關于“Django程序中如何添加js插件文本編輯器”這篇文章就分享到這里了,希望以上內容可以對大家有一定的幫助,使各位可以學到更多知識,如果覺得文章不錯,請把它分享出去讓更多的人看到。
免責聲明:本站發布的內容(圖片、視頻和文字)以原創、轉載和分享為主,文章觀點不代表本網站立場,如果涉及侵權請聯系站長郵箱:is@yisu.com進行舉報,并提供相關證據,一經查實,將立刻刪除涉嫌侵權內容。