您好,登錄后才能下訂單哦!
您好,登錄后才能下訂單哦!
本篇內容介紹了“如何用HTML5制作視頻拼圖”的有關知識,在實際案例的操作過程中,不少人都會遇到這樣的困境,接下來就讓小編帶領大家學習一下如何處理這些情況吧!希望大家仔細閱讀,能夠學有所成!
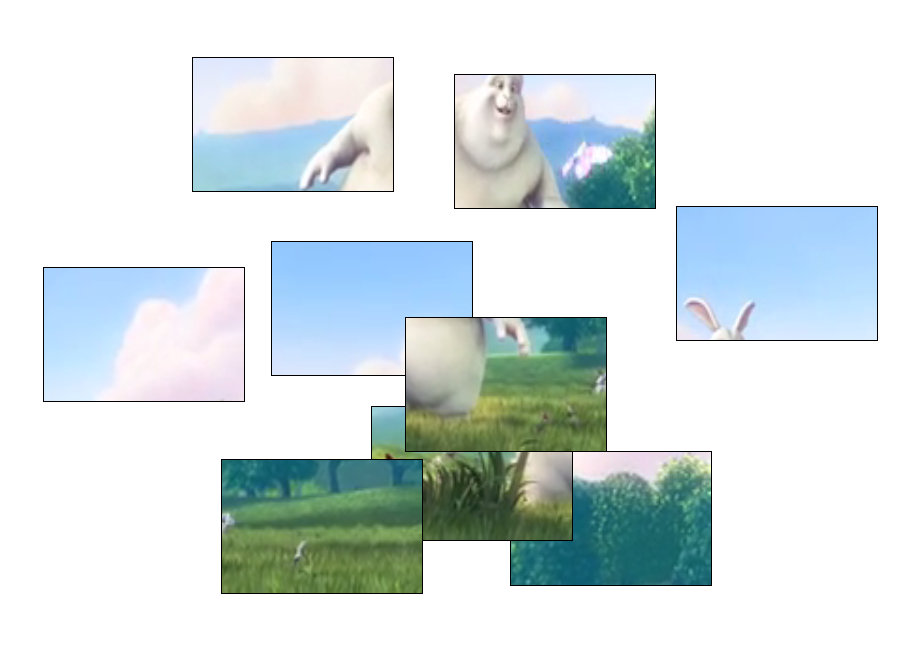
幾天前同事給我看了一個特效,是一個拼圖游戲,不同的是,拼圖里的是動畫。他讓我看下做個DEMO,于是就自己整了一會,也確實不難。用canvas很容易做。所以這篇博文不適合高手看。。。。就是隨便寫來玩玩的。
效果圖:
至少我剛看到這個的時候覺得挺新穎的,所以才會想到做出來玩玩,覺得樓主out的哥們請輕噴
不多說,先上DEMO:視頻拼圖 (或許要等一會才能看到效果,我是直接在w3school那里搞了個視頻鏈接過來的,拖動什么的都做的很簡單,或許還有些bug,畢竟就只是做一個DEMO玩玩而已,說說原理就行了),還有一點,直接把視頻的當前幀畫到canvas中在移動設備上好像還不支持。。。至少我用ipad看了一下,發現畫不上去,如果有知道腫么解決這問題的大牛請為小弟解答一下,不甚感激
原理:每一塊拼圖就是一個canvas,同時還需要一個離屏canvas。先整一個video標簽
代碼如下:
<p><video id="video" src="http://www.w3school.com.cn/example/html5/mov_bbb.mp4" width="600px" height="400px" controls="control" loop="loop" ></video></p>
并且把video隱藏掉,然后播放視頻的時候把每一幀都畫到離屏canvas中(離屏canvas就是隱藏了的canvas,用于保存數據),寫法很簡單:
代碼如下:
ctx.drawImage(video , 0 , 0 , vw , vh);
,直接用drawImage方法畫上去就行了。為何要先用離屏canvas呢,因為如果直接把每一幀數據同時畫到所有拼圖塊的canvas中,瀏覽器會瞬間崩掉。所以用一個離屏canvas作為緩沖。先把當前幀的數據保存到canvas,然后再將canvas畫到作為拼圖塊的canvas中。將canvas畫到canvas中也很簡單,也是用drawImage就可以搞定:
ctx2.drawImage(cs , -this.cols*this.w , -this.rows*this.h , vw , vh);
然后。。。。原理就這么簡單,之后提醒一點,用requestAnimationFrame循環取幀時,要限一下速,例如下面所寫的,我是每30毫秒取一次,推薦30~50毫秒,太低瀏覽器容易崩潰,太高的話視頻出現卡幀現象了:
代碼如下:
function animate(){ var newTime = new Date(); if(newTime - lastTime > 30){ lastTime = newTime; ctx.drawImage(video , 0 , 0 , vw , vh); canvases.forEach(function(){ var ctx2 = this.cas.getContext('2d'); ctx2.drawImage(cs , -this.cols*this.w , -this.rows*this.h , vw , vh); }); } if("requestAnimationFrame" in window){ requestAnimationFrame(animate); } else if("webkitRequestAnimationFrame" in window){ webkitRequestAnimationFrame(animate); } else if("msRequestAnimationFrame" in window){ msRequestAnimationFrame(animate); } else if("mozRequestAnimationFrame" in window){ mozRequestAnimationFrame(animate); } }
最后貼出所有代碼:
代碼如下:
<!DOCTYPE html PUBLIC "-//W3C//DTD XHTML 1.0 Transitional//EN" "http://www.w3.org/TR/xhtml1/DTD/xhtml1-transitional.dtd">
<html xmlns="http://www.w3.org/1999/xhtml" xml:lang="en">
<head>
    <meta http-equiv="Content-Type" content="text/html;charset=UTF-8">
    <style>
        body{margin:0;padding:0;}
        .allCanvas{
            position: relative;
            margin:50px auto;
            width:600px;
        }
        .vcanvas{
            position: absolute;
            display: block;
            border: 1px solid;
        }
    </style>
    <title>視頻拼圖</title>
</head>
<body>
    <div class="allCanvas">
        <canvas id="liping" width="600" height="400" ></canvas>
    </div>
    <video id="video" src="http://www.w3school.com.cn/example/html5/mov_bbb.mp4" width="600px" height="400px" controls="control" loop="loop" ></video>
    <script>
        var video = document.getElementById("video");
        var cs = document.getElementById("liping");
        var ctx = cs.getContext('2d')
        var rows = 3,
            cols = 3,
            cb = document.querySelector(".allCanvas"),
            vw = 600,
            vh = 400,
            canvases = [];</p>
<p>        function createCanvas(){
            var num = rows*cols;
            for(var i=0;i<cols;i++){
                for(var j=0;j<rows;j++){
                    var canvas = new vCanvas(Math.random()*600, Math.random()*600 , vw/rows , vh/cols , j , i);
                    canvases.push(canvas);
                }
            }
        }</p>
<p>        var vCanvas = function(x,y,w,h,cols,rows){
            this.x = x;
            this.y = y;
            this.w = w;
            this.h = h;
            this.cols = cols;
            this.rows = rows;
            this.creat();
            this.behavior();
        }
        vCanvas.prototype = {
            creat:function(){
                this.cas = document.createElement("canvas");
                cb.appendChild(this.cas);
                this.cas.className = "vcanvas";
                this.cas.id = "vc_"+(this.cols+1)*(this.rows+1);
                this.cas.style.left = this.x+"px";
                this.cas.style.top = this.y+"px";
                this.cas.width = this.w;
                this.cas.height = this.h;
            },
            behavior:function(){
                this.cas.onmousedown = function(e){
                    e = e || window.event;
                    var that = this;
                    var om = {
                        x:e.clientX,
                        y:e.clientY
                    }
                    window.onmousemove = function(e){
                        e = e || window.event;
                        var nm = {
                            x:e.clientX,
                            y:e.clientY
                        }
                        that.style.left = parseInt(that.style.left.replace("px","")) + (nm.x-om.x) + "px";
                        that.style.top = parseInt(that.style.top.replace("px","")) + (nm.y-om.y) + "px";
                        om = nm;
                    }
                    window.onmouseup = function(){
                        this.onmousemove = null;
                    }
                }
            }
        }</p>
<p>        Array.prototype.forEach = function(callback){
            for(var i=0;i<this.length;i++){
                callback.call(this[i]);
            }
        }</p>
<p>        var lastTime = 0;
        function initAnimate(){
            lastTime = new Date();
            createCanvas();
            animate();
        }</p>
<p>        function animate(){
            var newTime = new Date();
            if(newTime - lastTime > 30){
                lastTime = newTime;
                ctx.drawImage(video , 0 , 0 , vw , vh);
                canvases.forEach(function(){
                    var ctx2 = this.cas.getContext('2d');
                    ctx2.drawImage(cs , -this.cols*this.w , -this.rows*this.h , vw , vh);
                });
            }
            if("requestAnimationFrame" in window){
                requestAnimationFrame(animate);
            }
            else if("webkitRequestAnimationFrame" in window){
                webkitRequestAnimationFrame(animate);
            }
            else if("msRequestAnimationFrame" in window){
                msRequestAnimationFrame(animate);
            }
            else if("mozRequestAnimationFrame" in window){
                mozRequestAnimationFrame(animate);
            }
        }</p>
<p>        video.play();
        initAnimate();
    </script>
</body>
</html>
“如何用HTML5制作視頻拼圖”的內容就介紹到這里了,感謝大家的閱讀。如果想了解更多行業相關的知識可以關注億速云網站,小編將為大家輸出更多高質量的實用文章!
免責聲明:本站發布的內容(圖片、視頻和文字)以原創、轉載和分享為主,文章觀點不代表本網站立場,如果涉及侵權請聯系站長郵箱:is@yisu.com進行舉報,并提供相關證據,一經查實,將立刻刪除涉嫌侵權內容。