您好,登錄后才能下訂單哦!
您好,登錄后才能下訂單哦!
這篇文章主要介紹了css網頁有哪些布局,具有一定借鑒價值,感興趣的朋友可以參考下,希望大家閱讀完這篇文章之后大有收獲,下面讓小編帶著大家一起了解一下。
1、左邊固定,右邊自適應布局的兩種實現方式
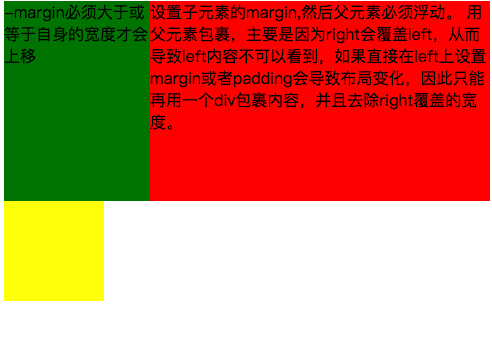
效果圖如下:
大屏展示:

小屏展示:

第一種實現方式通過負邊距與浮動 實現左邊固定,右邊自適應的布局。 主要代碼如下:
<style type="text/css">
	.left{
		float: left;
		width: 100%;
		height: 200px;
		background-color: red;
	}
	.left-content{
		margin-left: 30%;
	}
	.right{
		float: left;
		width: 30%;
		margin-left: -100%;
		height: 200px;
		background-color: green;
	}
	.layout0{
		clear: both;
		width: 100px;
		height: 100px;
		background-color: yellow;
	}
</style>
<body>
	<div id="body">
		<div class="left">
			<div class="left-content">
				設置子元素的margin,然后父元素必須浮動。
				用父元素包裹,主要是因為right會覆蓋left,從而導致left內容不可以看到,如果直接在left上設置margin或者padding會導致布局變化,因此只能再用一個div包裹內容,并且去除right覆蓋的寬度。
			</div>
		</div>
		<div class="right">-margin必須大于或等于自身的寬度才會上移</div>
		<div class="layout0"></div>
	</div>
</body>
實現過程中需要注意的是:
1.自適應的容器需要容器包裹住,否則容器內的內容會被覆蓋。
2.right容器的負邊距必須大于或等于自身的寬度才會上移。
3.如果right容器負邊距等于自身的寬度它會靠右對齊,如果負邊距等于-100%,則會靠左對齊。
第二種 通過浮動布局來實現左邊固定,右邊自適應的布局
主要的代碼如下:
<style type="text/css">
	.left{
		float: left;
		width: 200px;
		height: 200px;
		background-color: yellow;
	}
	.right{
		padding-left: 200px;
		height: 200px;
		background-color: red;
	}
	@media (min-width: 650px) and (max-width: 1000px){
		.left{
			width: 150px;
		}
		.right{
			margin-left: 150px;
		}
	}
	@media (max-width: 640px){
		.left{
			width: 100px;
		}
		.right{
			margin-left: 100px;
		}
	}
</style>
<body>
	<div id="main">
		<div class="left">左邊固定寬度,右邊自適應</div>
		<div class="right"></div>
	</div>
</body>
實現過程中需要注意的是: 1. left需要脫離文檔流,而right只需要正常顯示就可以。
2.left只是覆蓋在right上邊,因此想要讓right內容完整顯示需要給right padding-left或者margin-left。
大屏展示:

小屏展示:

主要代碼如下:
<style type="text/css">
	#head{
		height: 200px;
		background-color: yellow;
	}
	#body{
		width: 100%;
		float: left;
	}
	.main{
		background-color: green;
		min-height: 200px;
		margin: 0 210px;
	}
	.left{
		float: left;
		background-color: red;
		width: 200px;
		height: 200px;
		margin-left: -100%;
	}
	.right{
		float: right;
		background-color: blue;
		width: 200px;
		height: 200px;
		margin-left: -200px;
	}
	#footer{
		clear: both;
		height: 200px;
		background-color: orange;
	}
</style>
<body>
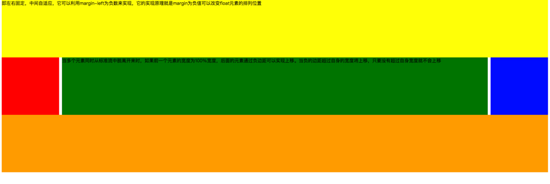
	<div id="head">即左右固定,中間自適應,它可以利用margin-left為負數來實現,它的實現原理就是margin為負值可以改變float元素的排列位置</div>
	<div id="body">
		<div class="main">當多個元素同時從標準流中脫離開來時,如果前一個元素的寬度為100%寬度,后面的元素通過負邊距可以實現上移。當負的邊距超過自身的寬度將上移,只要沒有超過自身寬度就不會上移</div>
	</div>
	<div class="left"></div>
	<div class="right"></div>
	<div id="footer"></div>
</body>
實現過程中需要注意:
1.中間自適應的div需要放在left和right容器前面并且內容div需要用父容器包裹
2.left和right容器向同一個方向浮動。
主要代碼如下:
<style type="text/css">
	#head{
		height: 200px;
		background-color: yellow;
	}
	#body{
		overflow: hidden;
	}
	.left{
		float: left;
		background-color: red;
		width: 200px;
		height: 200px;
	}
	.right{
		float: right;
		background-color: blue;
		width: 200px;
		height: 200px;
	}
	.main{
		background-color: green;
		height: 200px;
		margin: 0 210px;
	}
	#footer{
		clear: both;
		height: 200px;
		background-color: orange;
	}
</style>
<body>
	<div id="head">左右固定寬度并且向兩邊浮動,中間的div設置兩邊的margin</div>
	<div id="body">
		<div class="left"></div>
		<div class="right"></div>
		<div class="main">該方案有一個缺陷,在小屏幕情況下回導致right被擠下去,main沒有了</div>
	</div>
	<div id="footer"></div>
</body>
實現過程中需要注意:
1.該方式只需要注意中間自適應的div需要放在left和right容器的后面。
2.left和right容器向兩邊浮動。
主要代碼如下:
<!DOCTYPE html>
<html>
<meta charset="utf-8">
<head>
	<title>使用flex 實現“雙飛翼布局”</title>
</head>
<style type="text/css">
	#main{
		display: flex;
		display: -webkit-flex;//谷歌瀏覽器加前綴
		flex-flow: row nowrap;
		justify-content: flex-start;
		align-items: center;
	}
	.left{
		flex: 0 0 auto;
		width:100px;
		height: 200px;
		background-color: red;
		word-wrap: break-word;
		overflow: hidden;
	}
	.main{
		flex: 1 1 auto;
		height: 200px;
		background-color: green;
	}
	.right{
		flex: 0 0 auto;
		width: 100px;
		height: 200px;
		background-color: yellow;
	}
</style>
<body>
	<div id="main">
		<div class="left">flex 語法我參照了阮一峰關于flex語法介紹 http://www.ruanyifeng.com/blog/2015/07/flex-grammar.html</div>
		<div class="main"></div>
		<div class="right"></div>
	</div>
</body>
</html>
如果未了解過flex布局請移至文末點擊鏈接查看 阮一峰大神寫的關于flex語法
3、定位布局
這邊就不絮絮叨叨的講一些基礎的css定位知識了(ps:不會的請自行到w3c官網查閱),我主要來講解一下工作中遇到的坑。以免其他人和我一樣掉入坑中。
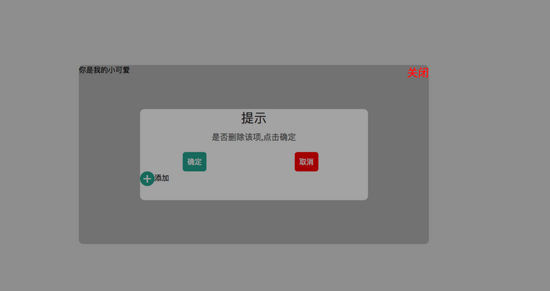
第一:使用多個fixed時,注意自己需要基于什么定位,因為如果父級有用transform屬性時,可能會導致子元素的fixed基于父元素容器定位,而不是基于body定位。效果如下:

在上圖中我可以發現中間黑色的小框是基于父級來定位,并且寬度也基于父容器的50%。詳細的請看下面代碼:
<!DOCTYPE html>
<html>
<head>
    <title>關于position的定位的坑</title>
</head>
<style type="text/css">
    body{
        margin: 0;
        padding: 0;
    }
    i{
        font-style: normal;
        cursor: pointer;
    }
    #delete-button{
        position: absolute;
        left: 45%;
        top: 45%;
        text-align: center;
        vertical-align: middle;
        height: 50px;
        margin: auto;
        cursor: pointer;
    }
    #delete-button > i{
        display: inline-block;
        width: 32px;
        height: 32px;
        border-radius: 16px;
        background-color: orange;
        color: red;
        font-size: 32px;
        vertical-align: middle;
        line-height: 28px;
    }
    /*第一個模態框的樣式*/
    #layout{
        display: none;
        width: 100%;
        height: 100%;
    }
    /*使用flex布局水平豎直居中*/
    /*#layout-box{
        position: fixed;
        width: 100%;
        height: 100%;
        left: 0;
        top: 0;
        display: flex;
        display: -webkit-flex;
        flex-flow: column nowrap;
        justify-content: center;
        align-items: center;
        background-color: rgba(0,0,0,0.3);
    }*/
    /*使用postion 和 transform 水平垂直居中*/
    #layout-box{
        position: fixed;
        width: 100%;
        height: 100%;
        background-color: rgba(0,0,0,0.3);
    }
    .modal-dialog{
        position: absolute;
        left: 50%;
        top: 50%;
        width: 500px;
        height: 200px;
        border-radius: 10px;
        transform: translate(-50%, -50%);
        -webkit-transform: translate(-50%, -50%);
        -moz-transform: translate(-50%, -50%);
        -o-transform: translate(-50%, -50%);
        background-color: #fff;
    }
    .dialog-title{
        text-align: center;
        color: #333;
        font-size: 28px;
        margin-bottom: 10px;
    }
    .dialog-content{
        text-align: center;
        color: #666;
        font-size: 18px;
    }
    .dialog-button{
        margin-top: 20px;
        width: 100%;
        color: #333;
    }
    .dialog-button >.button-box{
        display: inline-block;
        width: 48%;
        text-align: center;
    }
    .button-box span{
        display: inline-block;
        padding: 10px;
        color: #fff;
        border-radius: 6px;
        cursor: pointer;
    }
    #confirm{
        background-color: #27ad9a;
    }
    #cancel{
        background-color: red;
    }
    /*添加按鈕的樣式*/
    #add-button > i{
        display: inline-block;
        width: 32px;
        height: 32px;
        border-radius: 16px;
        background-color: #27ad9a;
        color: #fff;
        font-size: 32px;
        vertical-align: middle;
        line-height: 28px;
        text-align: center;
    }
    #add-button{
        display: inline-block;
        cursor: pointer;
    }
    /*第二個模態框的樣式*/
    .layout2{
        display: none;
        position: fixed;
        width: 100%;
        height: 100%;
        left: 0;
        top: 0;
        background-color: rgba(0,0,0,0.2);
    }
    .modal-dialog2{
        position: fixed;
        left: 50%;
        top: 50%;
        width: 50%;
        height: 50%;
        border-radius: 10px;
        transform: translate(-50%, -50%);
        -webkit-transform: translate(-50%, -50%);
        -moz-transform: translate(-50%, -50%);
        -o-transform: translate(-50%, -50%);
        background-color: rgba(0,0,0,0.2);
    }
    .modal-dialog2 > span{
        display: block;
    }
    .modal-text{
        float: left;
    }
    #close{
        color: red;
        font-size: 24px;
        float: right;
        cursor: pointer;
    }
</style>
<body>
    <div id="delete-button"><i>-</i>刪除</div>
    <div id="layout">
        <div id="layout-box">
            <div class="modal-dialog">
                <div class="dialog-title">提示</div>
                <div class="dialog-content">是否刪除該項,點擊確定</div>
                <div class="dialog-button">
                    <div class="button-box">
                        <span id="confirm">確定</span>
                    </div>
                    <div class="button-box">
                        <span id="cancel">取消</span>
                    </div>
                </div>
                <div id="add-button"><i>+</i>添加</div>
                <div class="layout2">
                    <div class="modal-dialog2">
                        <span class="modal-text">你是我的小可愛</span>
                        <span id="close">關閉</span>
                    </div>
                </div>
            </div>
        </div>
    </div>
</body>
<script type="text/javascript">
    document.getElementById("delete-button").onclick= function(){
        var layout = document.getElementById("layout")
        layout.style.display = "block"
    }
    document.getElementById("confirm").onclick=function(){
        var layout = document.getElementById("layout")
        layout.style.display = "none"
    }
    document.getElementById("cancel").onclick=function(){
        var layout = document.getElementById("layout")
        layout.style.display = "none"
    }
    document.getElementById("add-button").onclick=function(){
        var layout = document.getElementsByClassName("layout2")
        layout[0].style.display = "block"
    }
    document.getElementById("close").onclick=function(){
        var layout = document.getElementsByClassName("layout2")
        layout[0].style.display = "none"
    }
</script>
</html>
如果我們嘗試把父容器上的transform屬性去除,我們可以看到 子容器沒有基于父容器定位,而是基于body定位的,寬度也是基于body給的50%寬度。效果圖如下:

詳細請看代碼:
<!DOCTYPE html>
<html>
<head>
    <title>關于position的定位的坑</title>
</head>
<style type="text/css">
    body{
        margin: 0;
        padding: 0;
    }
    i{
        font-style: normal;
        cursor: pointer;
    }
    #delete-button{
        position: absolute;
        left: 45%;
        top: 45%;
        text-align: center;
        vertical-align: middle;
        height: 50px;
        margin: auto;
        cursor: pointer;
    }
    #delete-button > i{
        display: inline-block;
        width: 32px;
        height: 32px;
        border-radius: 16px;
        background-color: orange;
        color: red;
        font-size: 32px;
        vertical-align: middle;
        line-height: 28px;
    }
    /*第一個模態框的樣式*/
    #layout{
        display: none;
        width: 100%;
        height: 100%;
    }
    /*使用flex布局水平豎直居中*/
    #layout-box{
        position: fixed;
        width: 100%;
        height: 100%;
        left: 0;
        top: 0;
        display: flex;
        display: -webkit-flex;
        flex-flow: column nowrap;
        justify-content: center;
        align-items: center;
        background-color: rgba(0,0,0,0.3);
    }
    /*使用postion 和 transform 水平垂直居中*/
    .modal-dialog{
        width: 500px;
        height: 200px;
        border-radius: 10px;
        background-color: #fff;
    }
    .dialog-title{
        text-align: center;
        color: #333;
        font-size: 28px;
        margin-bottom: 10px;
    }
    .dialog-content{
        text-align: center;
        color: #666;
        font-size: 18px;
    }
    .dialog-button{
        margin-top: 20px;
        width: 100%;
        color: #333;
    }
    .dialog-button >.button-box{
        display: inline-block;
        width: 48%;
        text-align: center;
    }
    .button-box span{
        display: inline-block;
        padding: 10px;
        color: #fff;
        border-radius: 6px;
        cursor: pointer;
    }
    #confirm{
        background-color: #27ad9a;
    }
    #cancel{
        background-color: red;
    }
    /*添加按鈕的樣式*/
    #add-button > i{
        display: inline-block;
        width: 32px;
        height: 32px;
        border-radius: 16px;
        background-color: #27ad9a;
        color: #fff;
        font-size: 32px;
        vertical-align: middle;
        line-height: 28px;
        text-align: center;
    }
    #add-button{
        display: inline-block;
        cursor: pointer;
    }
    /*第二個模態框的樣式*/
    .layout2{
        display: none;
        position: fixed;
        width: 100%;
        height: 100%;
        left: 0;
        top: 0;
        background-color: rgba(0,0,0,0.2);
    }
    .modal-dialog2{
        position: fixed;
        left: 50%;
        top: 50%;
        width: 50%;
        height: 50%;
        border-radius: 10px;
        transform: translate(-50%, -50%);
        -webkit-transform: translate(-50%, -50%);
        -moz-transform: translate(-50%, -50%);
        -o-transform: translate(-50%, -50%);
        background-color: rgba(0,0,0,0.2);
    }
    .modal-dialog2 > span{
        display: block;
    }
    .modal-text{
        float: left;
    }
    #close{
        color: red;
        font-size: 24px;
        float: right;
        cursor: pointer;
    }
</style>
<body>
    <div id="delete-button"><i>-</i>刪除</div>
    <div id="layout">
        <div id="layout-box">
            <div class="modal-dialog">
                <div class="dialog-title">提示</div>
                <div class="dialog-content">是否刪除該項,點擊確定</div>
                <div class="dialog-button">
                    <div class="button-box">
                        <span id="confirm">確定</span>
                    </div>
                    <div class="button-box">
                        <span id="cancel">取消</span>
                    </div>
                </div>
                <div id="add-button"><i>+</i>添加</div>
                <div class="layout2">
                    <div class="modal-dialog2">
                        <span class="modal-text">你是我的小可愛</span>
                        <span id="close">關閉</span>
                    </div>
                </div>
            </div>
        </div>
    </div>
</body>
<script type="text/javascript">
    document.getElementById("delete-button").onclick= function(){
        var layout = document.getElementById("layout")
        layout.style.display = "block"
    }
    document.getElementById("confirm").onclick=function(){
        var layout = document.getElementById("layout")
        layout.style.display = "none"
    }
    document.getElementById("cancel").onclick=function(){
        var layout = document.getElementById("layout")
        layout.style.display = "none"
    }
    document.getElementById("add-button").onclick=function(){
        var layout = document.getElementsByClassName("layout2")
        layout[0].style.display = "block"
    }
    document.getElementById("close").onclick=function(){
        var layout = document.getElementsByClassName("layout2")
        layout[0].style.display = "none"
    }
</script>
</html>
第二:解決在手機上的抖動問題(ps:這個問題我參照了網上大神寫的一篇博客請移至文末查看)
**一、**在webkit內核瀏覽器中 給fixed加上防抖樣式 - webkit - transform: translateZ(0);
**二、**設置html 和body 的css {height:100%;overflow:auto;margin:0;} 這個影響全局樣式不建議使用。
三、在fiexd內設置position:absolute,如下:
<div style="position:fiexd;bottom:0px;">
  <div style="position:absolute;">
  </div>
</div>

4、百分比布局 主要通過設置元素的寬度為百分比或者高度為百分比。比如:width:50%; height:50%; 這樣的寫法。
5、響應式布局(主要使用媒體查詢來實現響應式設計) 主要使用CSS3 @media 來做不同終端的響應式設計
主要在css文件中寫入
@media screen and (max-width:600px){
    寫入當屏幕小于或等于600px時的樣式
}
@media screen and (min-width:900px){
    寫入當屏幕大于或等于900px時的樣式
}
@media screen and (min-width:600px) and (max-width:900px){
    寫入當屏幕在600px-900px之間的樣式
}
@media screen and (max-device-width: 480px){
    寫入最大設備寬度為480px,比如說iPhone上的顯示,這里的max-device-width所指的是設備的實際分辨率,也就是指可視面積分辨率
}
@media only screen and (-webkit-min-device-pixel-ratio: 2){
    寫入專門針對iPhone4的移動設備樣式
}
@media all and (orientation:portrait){
    寫入設備在縱向時的樣式
}
@media all and (orientation:landscape){
    寫入設備在橫向時的樣式
}
@media not print and (max-width: 1200px){
    not是用來排除某種制定的媒體類型
    寫入在除打印設備和設備寬度小于1200px下的所有設備的樣式
}
@media only screen and (max-device-width:240px){
    only用來定某種特定的媒體類型,可以用來排除不支持媒體查詢的瀏覽器。
    寫入只能在最大設備寬度為240px的屏幕下使用的樣式
}
感謝你能夠認真閱讀完這篇文章,希望小編分享的“css網頁有哪些布局”這篇文章對大家有幫助,同時也希望大家多多支持億速云,關注億速云行業資訊頻道,更多相關知識等著你來學習!
免責聲明:本站發布的內容(圖片、視頻和文字)以原創、轉載和分享為主,文章觀點不代表本網站立場,如果涉及侵權請聯系站長郵箱:is@yisu.com進行舉報,并提供相關證據,一經查實,將立刻刪除涉嫌侵權內容。