您好,登錄后才能下訂單哦!
您好,登錄后才能下訂單哦!
這期內容當中小編將會給大家帶來有關@Around注解怎么在Spring AOP中使用,文章內容豐富且以專業的角度為大家分析和敘述,閱讀完這篇文章希望大家可以有所收獲。
@Around注解可以用來在調用一個具體方法前和調用后來完成一些具體的任務。
比如我們想在執行controller中方法前打印出請求參數,并在方法執行結束后來打印出響應值,這個時候,我們就可以借助于@Around注解來實現;
再比如我們想在執行方法時動態修改參數值等
類似功能的注解還有@Before等等,用到了Spring AOP切面思想,Spring AOP常用于攔截器、事務、日志、權限驗證等方面。
需要說明的是,在以下例子中,我們即可以只用@Around注解,并設置條件,見方法run1();也可以用@Pointcut和@Around聯合注解,見方法pointCut2()和run2(),這2種用法是等價的。如果我們還想利用其進行參數的修改,則調用時必須用joinPoint.proceed(Object[] args)方法,將修改后的參數進行回傳。如果用joinPoint.proceed()方法,則修改后的參數并不會真正被使用。
import org.aspectj.lang.ProceedingJoinPoint;
import org.aspectj.lang.annotation.Around;
import org.aspectj.lang.annotation.Aspect;
import org.aspectj.lang.annotation.Pointcut;
import org.aspectj.lang.reflect.MethodSignature;
import org.slf4j.Logger;
import org.slf4j.LoggerFactory;
import org.springframework.beans.factory.annotation.Autowired;
import org.springframework.stereotype.Component;
import javax.persistence.EntityManager;

/**
 * 控制器切面
 *
 * @author lichuang
 */

@Component
@Aspect
public class ControllerAspect {

 private static final Logger logger = LoggerFactory.getLogger(ControllerAspect.class);

 @Autowired
 private EntityManager entityManager;

 /**
  * 調用controller包下的任意類的任意方法時均會調用此方法
  */
 @Around("execution(* com.company.controller.*.*(..))")
 public Object run1(ProceedingJoinPoint joinPoint) throws Throwable {
  //獲取方法參數值數組
  Object[] args = joinPoint.getArgs();
  //得到其方法簽名
  MethodSignature methodSignature = (MethodSignature) joinPoint.getSignature();
  //獲取方法參數類型數組
  Class[] paramTypeArray = methodSignature.getParameterTypes();
  if (EntityManager.class.isAssignableFrom(paramTypeArray[paramTypeArray.length - 1])) {
   //如果方法的參數列表最后一個參數是entityManager類型,則給其賦值
   args[args.length - 1] = entityManager;
  }
  logger.info("請求參數為{}",args);
  //動態修改其參數
  //注意,如果調用joinPoint.proceed()方法,則修改的參數值不會生效,必須調用joinPoint.proceed(Object[] args)
  Object result = joinPoint.proceed(args);
  logger.info("響應結果為{}",result);
  //如果這里不返回result,則目標對象實際返回值會被置為null
  return result;
 }

 @Pointcut("execution(* com.company.controller.*.*(..))")
 public void pointCut2() {}

 @Around("pointCut2()")
 public Object run2(ProceedingJoinPoint joinPoint) throws Throwable {
  //獲取方法參數值數組
  Object[] args = joinPoint.getArgs();
  //得到其方法簽名
  MethodSignature methodSignature = (MethodSignature) joinPoint.getSignature();
  //獲取方法參數類型數組
  Class[] paramTypeArray = methodSignature.getParameterTypes();
  if (EntityManager.class.isAssignableFrom(paramTypeArray[paramTypeArray.length - 1])) {
   //如果方法的參數列表最后一個參數是entityManager類型,則給其賦值
   args[args.length - 1] = entityManager;
  }
  logger.info("請求參數為{}",args);
  //動態修改其參數
  //注意,如果調用joinPoint.proceed()方法,則修改的參數值不會生效,必須調用joinPoint.proceed(Object[] args)
  Object result = joinPoint.proceed(args);
  logger.info("響應結果為{}",result);
  //如果這里不返回result,則目標對象實際返回值會被置為null
  return result;
 }
}
補充:Spring Aop實例(AOP 如此簡單)@Aspect、@Around 注解方式配置
IoC相關的基本內容告一段落,本次介紹Spring的第二個特性,AOP,面向切面編程,術語聽起來比較不容易理解,沒關系,一切盡在實例中,讓我們看一個簡單的實例,就能明白。
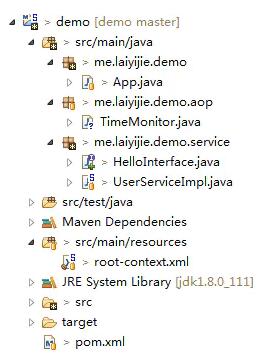
項目工程目錄結構和代碼獲取地址
獲取地址(版本Log將會注明每一個版本對應的課程)
https://github.com/laiyijie/SpringLearning

運行具有Main函數的 App.java
得到如下輸出
method start time:1480223298250
userHello
method end time:1480223299250
從App.java入手
App.java
package me.laiyijie.demo;
import org.springframework.context.support.ClassPathXmlApplicationContext;
import me.laiyijie.demo.service.HelloInterface;
public class App {
 public static void main(String[] args) {
  ClassPathXmlApplicationContext context = new ClassPathXmlApplicationContext("root-context.xml");
  HelloInterface userService = context.getBean(HelloInterface.class);
  userService.sayHello();
  context.close();
 }
}
調用的是HelloInterface的sayHello方法
HelloInterface.java
package me.laiyijie.demo.service;
public interface HelloInterface{

 void sayHello();

}
其實現類為UserServiceImpl.java
UserServiceImpl.java
package me.laiyijie.demo.service;
import org.springframework.stereotype.Service;
@Service
public class UserServiceImpl implements HelloInterface {
 public void sayHello() {
  try {
   Thread.sleep(1000);
  } catch (InterruptedException e) {
   // TODO Auto-generated catch block
   e.printStackTrace();
  }
  System.out.println("userHello");
 }

}
誒?情況跟我們看到的代碼有出入?
sayHello 應該只輸出 userHello,前后兩行輸出從何出現?
在Main函數中找不到一點兒線索!
這就是AOP的一個強大特性:
無侵入性,不改變原有的代碼,卻能增加功能!
那么究竟是如何增加功能的呢?
讓我們看看TimeMonitor.java
TimeMonitor.java
package me.laiyijie.demo.aop;
import org.aspectj.lang.ProceedingJoinPoint;
import org.aspectj.lang.annotation.Around;
import org.aspectj.lang.annotation.Aspect;
import org.springframework.stereotype.Service;
@Service
@Aspect
public class TimeMonitor {
 @Around("execution(* me.laiyijie.demo.service.UserServiceImpl.sayHello(..))")
 public void monitorAround(ProceedingJoinPoint pjp) throws Throwable {
  System.out.println("method start time:" + System.currentTimeMillis());
  Object re = pjp.proceed();
  System.out.println("method end time:" + System.currentTimeMillis());
 }
}
終于看到了 method start time:1480223298250 和 method end time:1480223299250這兩行輸出是從哪兒出現的了!
讓我們來仔細解讀一下這個類
類有兩個注釋,分別是@Service和@Aspect,第一個注解是使得TimeMonitor受Spring托管并實例化。@Aspect就是使得這個類具有AOP功能(你可以這樣理解)兩個注解缺一不可
類里面只有一個方法,名字叫做monitorAroud,其實就是為了檢測函數執行時間的!
那么關鍵點來了,兩個輸出語句是怎么插入到sayHello方法的前后的呢!
看這個注解:
@Around("execution(* me.laiyijie.demo.service.UserServiceImpl.sayHello(..))")@Around表示包圍一個函數,也就是可以在函數執行前做一些事情,也可以在函數執行后做一些事情
execution(* me.laiyijie.demo.service.UserServiceImpl.sayHello(..))
這個比較好理解,就是使用表達式的方式指定了要對哪個函數進行包圍!(除了execution以外還有很多,可以搜索AspectJ語法來學習)
也就是說,這個注解完整的說明了,應該在函數的什么位置插入變化,也就是所謂的切點
之后是函數的定義:
public Object monitorAround(ProceedingJoinPoint pjp)
這里引入了ProceedingJoinPoint,在使用了@Around之后可以帶入這個參數,代表的其實就是sayHello這個函數,不過做了一些封裝
而 Object re = pjp.proceed(); 就是相當于執行了 sayHello方法!
剩下的代碼就不用過多解釋了,就是在執行這個函數的前后分別進行了系統時間的獲取。
我們把這個函數體,也就是定義了要做那些事情的代碼,稱作增強
而包含切點和增強結合起來就稱作切面
面向切面由此而來!
需要配置兩項
1、pom.xml增加依賴(因為要用到AOP還需要不同的JAR包)
2、root-context.xml中增加切面相關配置
root-context.xml
<?xml version="1.0" encoding="UTF-8"?>
<beans xmlns="http://www.springframework.org/schema/beans"
 xmlns:xsi="http://www.w3.org/2001/XMLSchema-instance"
 xmlns:context="http://www.springframework.org/schema/context"
 xmlns:aop="http://www.springframework.org/schema/aop"
 xsi:schemaLocation="http://www.springframework.org/schema/beans http://www.springframework.org/schema/beans/spring-beans.xsd
  http://www.springframework.org/schema/context http://www.springframework.org/schema/context/spring-context-4.3.xsd
  http://www.springframework.org/schema/aop http://www.springframework.org/schema/aop/spring-aop-4.3.xsd">

 <aop:aspectj-autoproxy></aop:aspectj-autoproxy>
 <context:component-scan base-package="me.laiyijie.demo"></context:component-scan>
</beans>
root-context.xml 增加了兩行
1、xmlns:aop="http://www.springframework.org/schema/aop"
代表加入命名空間
2、<aop:aspectj-autoproxy></aop:aspectj-autoproxy>
使用1中引入的aop命名空間開起自動代理(自動代理具體含義后續慢慢解釋,簡單的理解就是AOP的實現是依靠自動代理實現的)
pom.xml
<project xmlns="http://maven.apache.org/POM/4.0.0" xmlns:xsi="http://www.w3.org/2001/XMLSchema-instance"
 xsi:schemaLocation="http://maven.apache.org/POM/4.0.0 http://maven.apache.org/xsd/maven-4.0.0.xsd">
 <modelVersion>4.0.0</modelVersion>
 <groupId>me.laiyijie</groupId>
 <artifactId>demo</artifactId>
 <version>0.0.1-SNAPSHOT</version>
 <packaging>jar</packaging>
 <dependencies>
  <!-- https://mvnrepository.com/artifact/org.springframework/spring-context -->
  <dependency>
   <groupId>org.springframework</groupId>
   <artifactId>spring-context</artifactId>
   <version>4.3.2.RELEASE</version>
  </dependency>

  <!-- https://mvnrepository.com/artifact/org.aspectj/aspectjweaver -->
  <dependency>
   <groupId>org.aspectj</groupId>
   <artifactId>aspectjweaver</artifactId>
   <version>1.8.9</version>
  </dependency>
 </dependencies>
</project>
增加了一個依賴
AspectJ 一個強大的AOP框架,也就是@Aspect和@Around以及ProceedingJoinPoint這些注解和方法的提供者
上述就是小編為大家分享的@Around注解怎么在Spring AOP中使用了,如果剛好有類似的疑惑,不妨參照上述分析進行理解。如果想知道更多相關知識,歡迎關注億速云行業資訊頻道。
免責聲明:本站發布的內容(圖片、視頻和文字)以原創、轉載和分享為主,文章觀點不代表本網站立場,如果涉及侵權請聯系站長郵箱:is@yisu.com進行舉報,并提供相關證據,一經查實,將立刻刪除涉嫌侵權內容。