您好,登錄后才能下訂單哦!
您好,登錄后才能下訂單哦!
這篇文章將為大家詳細講解有關如何實現MVC數據驗證,小編覺得挺實用的,因此分享給大家做個參考,希望大家閱讀完這篇文章后可以有所收獲。
一、一般情況
對于使用過MVC框架的人來說,對MVC的數據驗證不會陌生,比如,我有一個Model如下:
public class UserInfo
  {
    [Required(ErrorMessage = "UserName不可為空1111")]
    public string UserName { get; set; }
    public string Sex { get; set; }
    public string Mobile { get; set; }
    public string Address { get; set; }
  }
前端:
@using (Html.BeginForm())
{
  @Html.AntiForgeryToken()
  <div class="form-horizontal">
    <h5>UserInfo</h5>
    <hr />
    @Html.ValidationSummary(true, "", new { @class = "text-danger" })
    <div class="form-group">
      @Html.LabelFor(model => model.UserName, htmlAttributes: new { @class = "control-label col-md-2" })
      <div class="col-md-10">
        @Html.EditorFor(model => model.UserName, new { htmlAttributes = new { @class = "form-control" } })
        @Html.ValidationMessageFor(model => model.UserName, "", new { @class = "text-danger" })
      </div>
    </div>
    <div class="form-group">
      @Html.LabelFor(model => model.Sex, htmlAttributes: new { @class = "control-label col-md-2" })
      <div class="col-md-10">
        @Html.EditorFor(model => model.Sex, new { htmlAttributes = new { @class = "form-control" } })
        @Html.ValidationMessageFor(model => model.Sex, "", new { @class = "text-danger" })
      </div>
    </div>
    <div class="form-group">
      @Html.LabelFor(model => model.Mobile, htmlAttributes: new { @class = "control-label col-md-2" })
      <div class="col-md-10">
        @Html.EditorFor(model => model.Mobile, new { htmlAttributes = new { @class = "form-control" } })
        @Html.ValidationMessageFor(model => model.Mobile, "", new { @class = "text-danger" })
      </div>
    </div>
    <div class="form-group">
      @Html.LabelFor(model => model.Address, htmlAttributes: new { @class = "control-label col-md-2" })
      <div class="col-md-10">
        @Html.EditorFor(model => model.Address, new { htmlAttributes = new { @class = "form-control" } })
        @Html.ValidationMessageFor(model => model.Address, "", new { @class = "text-danger" })
      </div>
    </div>
    <div class="form-group">
      <div class="col-md-offset-2 col-md-10">
        <input type="submit" value="Create" class="btn btn-default" />
      </div>
    </div>
  </div>
}
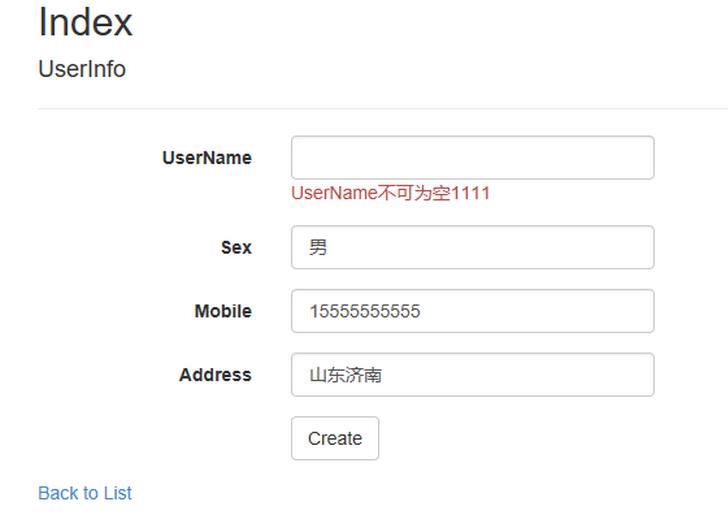
效果:

是的,MVC可以通過對一些屬性添加一定的特性來對數據進行驗證。這對大家來說可能并不陌生。
如果僅僅是這樣就完事了,那么也就沒事么意思了。
二、常用情況
在實際的開發中,我們大都是通過EF,或者其他方式,使得數據庫中的每一個表或視圖,都在代碼中對應的一個類模型,對于通過數據庫生成的模型,我們不宜修改,退一步講,即使我們在這個類中對一些屬性增加一些數據驗證的特性,那么,數據庫發生變化后,如果我再重新生成這些Model,我們之前添加好的驗證特性將沒有了,那么,我們如何解決這樣的問題呢?
假如:
public class UserInfo
  {
    public string UserName { get; set; }
    public string Sex { get; set; }
    public string Mobile { get; set; }
    public string Address { get; set; }
  }
UserInfo是通過數據庫生成的一個模型,對于數據庫生成的模型,我們不宜修改。但那是,我們又需要對這個模型中的某些屬性進行數據驗證,比如需要對UserName屬性進行非空驗證,那么我們如何做呢?
大家通常會想到部分類,是的,我們可以通過部分類來解決上述問題。
首先,我們將模型中的類加上關鍵字 partial ,然后我們再寫一個這個模型的部分類。
public partial class UserInfo
  {
    [Required(ErrorMessage = "UserName不可為空1111")]
    public string UserName { get; set; }
  }
但是,這樣會提示我們一個錯誤,就是類中存在重復的屬性,是的,部分類中,屬性是不可以重名的。那么,我們該怎么辦呢,MVC框架已經給了我們解決方案了。
我們可以這么寫:
[MetadataType(typeof(MeteUserInfo))]
  public partial class UserInfo
  {
    private class MeteUserInfo
    {
      [Required(ErrorMessage = "UserName不可為空1111")]
      public string UserName { get; set; }
    }
  }
關于“如何實現MVC數據驗證”這篇文章就分享到這里了,希望以上內容可以對大家有一定的幫助,使各位可以學到更多知識,如果覺得文章不錯,請把它分享出去讓更多的人看到。
免責聲明:本站發布的內容(圖片、視頻和文字)以原創、轉載和分享為主,文章觀點不代表本網站立場,如果涉及侵權請聯系站長郵箱:is@yisu.com進行舉報,并提供相關證據,一經查實,將立刻刪除涉嫌侵權內容。