您好,登錄后才能下訂單哦!
您好,登錄后才能下訂單哦!
小編給大家分享一下vue驗證器的使用示例,希望大家閱讀完這篇文章之后都有所收獲,下面讓我們一起去探討吧!
安裝驗證器
不添加自定義驗證器或者無需全局使用的公用驗證器,在main.js中安裝驗證器,使用 CommonJS 模塊規范, 需要顯式的使用 Vue.use() 安裝驗證器組件。
import Validator from 'vue-validator'
Vue.use(Validator)
與 vue-router 同時使用,必須在調用 router#map, router#start 等實例方法前安裝驗證。
若要自定義驗證器,建一個js文件,在該文件中安裝驗證器組件。例如:validation.js
import Vue from 'vue'
import Validator from 'vue-validator'
Vue.use(Validator)
//自定義驗證器
自定義驗證器
官方提供的api如下
input[type="text"]
input[type="radio"]
input[type="checkbox"]
input[type="number"]
input[type="password"]
input[type="email"]
input[type="tel"]
input[type="url"]
select
textarea
但是以上的不一定滿足我們的需求,這時就需要用到另一個全局api,用于注冊和獲取全局驗證器。
Vue.validator( id, [definition] )
示例 定義validation.js 內容如下
import Vue from 'vue'
import Validator from 'vue-validator'
Vue.use(Validator)
//自定義驗證器
//添加一個簡單的手機號驗證
//匹配0-9之間的數字,并且長度是11位
Vue.validator('tel', function (val) {
  return /^[0-9]{11}$/.test(val)
});
//添加一個密碼驗證
//匹配6-20位的任何字類字符,包括下劃線。與“[A-Za-z0-9_]”等效。
Vue.validator('passw', function (val) {
  return /^(\w){6,20}$/.test(val)
});
使用驗證器
驗證器語法
<validator name="validation">
  <input type="text" v-model='comment' id='comment'
  v-validate:comment="{ minlength: 3, maxlength: 15 }">
    <div>
   <span v-show="$validation.comment.minlength">不得少于3個字符</span>
   <span v-show="$validation.comment.maxlength">不得大于15個字符</span>
    </div>
 </validator>
默認情況下,vue-validator 會根據 validator 和 v-validate 指令自動進行驗證。然而有時候我們需要關閉自動驗證,在有需要時手動觸發驗證。如果你不需要自動驗證,可以通過 initial 屬性或 v-validate 驗證規則來關閉自動驗證。
如下:
<validator name="validation">
  <input type="text" v-model='comment' id='comment'
  v-validate:comment="{ minlength: 3, maxlength: 15 }"
  detect-change="off" initial='off'>
  <div>
 <span v-show="$validation.comment.minlength">不得少于3個字符</span>
 <span v-show="$validation.comment.maxlength">不得大于15個字符</span>
     </div>
</validator>
Terminal 指令問題
<validator name="test_validator">
  <!-- @invalid:valid的逆 ,表示驗證不通過 -->
  <input  @invalid="passwInvalid" @valid="passwok"
  type="password" v-model='passw' id='passw' v-validate:passw="['passw']"
  detect-change="off" initial='off' placeholder='請輸入密碼'>
  <input  @invalid="passwInvalid" @valid="passwok"
  type="password" v-model='passw2' id='passw2' v-validate:passw2="['passw']"
  detect-change="off" initial='off' placeholder='請輸入密碼'>
</validator>
<script>
//若是在main.js中導入  無需再次導入
//此處導入的是上面代碼的validation.js
import validator from '../validator/validation'
export default{
    data(){
        return{
            comment:'',
            passw:'',
            passw2:''
        }
    },
    methods:{
        passwInvalid(){
            alert('只能輸入6-20個字母、數字、下劃線');
        },
        passwok(){
            //alert('驗證碼符合規范')
        }
    }
}
</script>
示例:用戶注冊驗證
用了一個組件來顯示提示信息
toast.vue
<template>
    <div v-show="toastshow" transition="toast"
    class="toast font-normal">
        {{toasttext}}
    </div>
</template>
<script>
export default{
    props:{
        //是否顯示提示
        toastshow:{
            type:Boolean,
              required: false,
            default:function(){
                return false;
            }
        },
      //提示的內容
      toasttext:{
           type:String,
          required: false,
          default:function(){
              return 'no message';
           }
        },
        //顯示的時間
        duration: {
            type: Number,
            default:3000,//默認3秒
            required:false
        }
    },
    ready() {

    },
    watch:{
        toastshow(val){
        if (this._timeout) clearTimeout(this._timeout)
          if (val && !!this.duration) {
             this._timeout = setTimeout(()=>
             this.toastshow = false, this.duration)
            }
        }
    }
}
</script>
<style>
    .toast{
        position:absolute;
        left:50%;
        margin-left:-25%;
        bottom:30px;
        display:block;
        width:200px;
        height:auto;
        text-align:center;
        color:white;
        background-color:rgba(0,0,0,0.5);
        border-radius:10px;
        z-index:10;
        transform:scale(1);
        padding:5px;
    }
    .toast-transition{
        transition: all .3s ease;
    }
    .toast-enter{
        opacity:0;
        transform:scale(0.1);
    }
    .toast-leave{
        opacity:0;
        transform:scale(0.1);
    }
</style>
注冊用戶:假如我們需要填寫手機號和輸入兩次密碼
<template>
   <div class='register-box'>
   <!-- 組件:用于顯示提示信息 -->
   <Toast :toastshow.sync="toastshow" :toasttext="toasttext"></Toast>
   <validator name="validation_register1">
    <div class='register1'>
    <div class='pd05'>
   <input @invalid="telonInvalid" initial="off"
   detect-change="off" v-model="telphone" id="telphone" type="tel"
   class='phone-number' v-validate:telphone="['tel']"
   placeholder='請輸入手機號碼'>
    </div>
    <div class='pd05'>
     <input @invalid="passwInvalid" v-model="passw1" initial="off"
     detect-change="off" id="passw1" type="password"
     v-validate:passw1="['passw']"class='password-number'placeholder='請輸入密碼'>
            </div>
            <div class='pd05'>
            <input @invalid="passwInvalid" v-model="passw2"
           initial="off" detect-change="off" id="passw2" type="password"
          v-validate:passw2="['passw']" class='password-number'
             placeholder='請輸入密碼'>
         </div>
    <a class='greenBtn' v-on:click='register_user()'>下一步</a>
        </div>
        </validator>
    </div>
</template>
<script>
//導入validation.js  此處的validation.js就是上文中validation.js的內容
import validator from '../validator/validation';
//導入顯示提示信息的組件
import Toast from '../components/toast.vue';
export default{
    components: {
        //注冊組件
          Toast
      },
    data(){
        return{
            telphone:'',//電話號碼
            toastshow:false,//默認不現實提示信息
            toasttext:'',//提示信息內容
            passw1:'',//首次輸入密碼
            passw2:''//再次輸入密碼
        }
    },
    methods:{
        //手機號驗證失敗時執行的方法
        telonInvalid(){
            //設置提示信息內容
            this.$set('toasttext','手機不正確');
            //顯示提示信息組件
            this.$set('toastshow',true);
        },
        //密碼驗證失敗時執行的方法
        passwInvalid(){
          this.$set('toasttext','只能輸入6-20個字母、數字、下劃線');
          this.$set('toastshow',true);
        },
        register_user(){
            var that = this;
            var telephones = that.$get('telphone');
            var pw1 = that.$get('passw1');
            var pw2 = that.$get('passw2')
            that.$validate(true, function () {
                if (that.$validation_register1.invalid) {
                    //驗證無效
                      that.$set('toasttext','請完善表單');
                     that.$set('toastshow',true);
                }else{
       that.$set('toasttext','驗證通過');
       that.$set('toastshow',true);
       //驗證通過做注冊請求
       /*that.$http.post('http://192.168.30.235:9999/rest/user/register',
       'account':telephones,'pwd':pw1,'pwd2':pw2}).then(function(data){
       if(data.data.code == '0'){
         that.$set('toasttext','注冊成功');
           that.$set('toastshow',true);
           }else{
              that.$set('toasttext','注冊失敗');
             that.$set('toastshow',true);
                      }
             },function(error){
               //顯示返回的錯誤信息
              that.$set('toasttext',String(error.status));
                 that.$set('toastshow',true);
                    })*/
                }
            })

        }
    }
}
</script>
<style>
.register-box{
    padding: 10px;
}
.pd05{
    margin-top: 5px;
}
.greenBtn{
    width: 173px;
    height: 30px;
    text-align: center;
    line-height: 30px;
    background: red;
    color: #fff;
    margin-top: 5px;
}
</style>
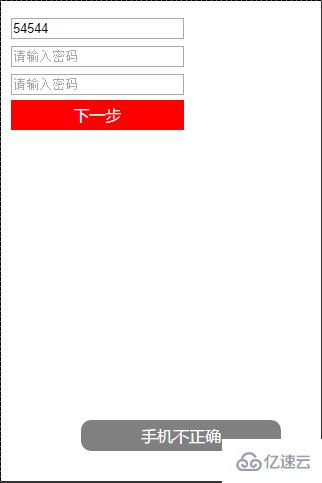
若點擊下一步,會提示“請完善表單”,因為驗證不通過;若是文本框獲得焦點后失去焦點則會提示相應的錯誤信息;若內容填寫正確,則會提示驗證通過并發送相應的請求。
效果如圖

看完了這篇文章,相信你對“vue驗證器的使用示例”有了一定的了解,如果想了解更多相關知識,歡迎關注億速云行業資訊頻道,感謝各位的閱讀!
免責聲明:本站發布的內容(圖片、視頻和文字)以原創、轉載和分享為主,文章觀點不代表本網站立場,如果涉及侵權請聯系站長郵箱:is@yisu.com進行舉報,并提供相關證據,一經查實,將立刻刪除涉嫌侵權內容。