您好,登錄后才能下訂單哦!
您好,登錄后才能下訂單哦!
SpringBoot部署Vue項目的方法?相信很多沒有經驗的人對此束手無策,為此本文總結了問題出現的原因和解決方法,通過這篇文章希望你能解決這個問題。
前言
前段時間公司外網部署的演示環境全部轉到內網環境中去,所有對外演示的環境都需要申請外網映射才能訪問某個服務。我用一個外網地址 www.a.com 映射到一個內網地址 http://ip:port ,然后在這個地址 http://ip:port 用 nginx 做代理轉發到各個組的項目 http://ipn:portn 上去,其中也遇到一些靜態資源 404,主要是是解決這個 404 問題。
最近又做了一個項目,考慮到用戶的體驗,減少部署的復雜性,我想了一個辦法用 SpringBoot 做 web 服務器映射前端資源為 web 資源 。
條件允許或者對性能要求比較高,推薦是前后端分離部署,nginx 做 web 服務器,后端只提供接口服務
以前部署的項目 A 外網訪問地址是 http://ip1:8080 ,外網映射后只能訪問 http://ip/app1 ,以前項目 B 外網訪問地址是 http://ip1:8081 ,項目訪問地址是 http://ip/app2 。這也算是一個不大不小的變動,但是切換之后遇到的第一個問題就是靜態資源轉發導致 404 。
比如以前項目 A 訪問地址是 http://ip1:8080 它是沒有上下文的。
而現在 A 的訪問地址為 http://ip/app1 ,有一個上下文 app1 在這里,導致有一些資源 404。
比如說:原來 http://ip1:8080 請求到了 index.html 資源,現在只能 http://ip/app1 請求到 index.html。
<!-- index.html -->
<!-- 原來部署環境寫法 -->
<link href="/index.css" rel="external nofollow" rel="external nofollow" rel="external nofollow" rel="stylesheet">
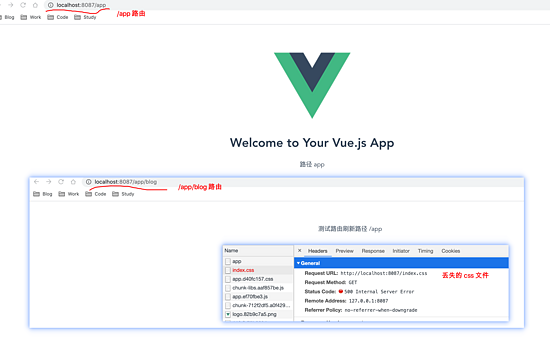
以前訪問 index.css 地址是 http://ip1:8080/index.css ,但是現在變成訪問了 http://ip/index.css 導致 404,實際 index.css 地址為 http://ip/app1/index.css
前端使用 vue 編寫,html 中的靜態資源路徑可以很好解決,修改 webpack 打包即可。
<!-- 原來部署環境寫法 -->
<link href="/index.css" rel="external nofollow" rel="external nofollow" rel="external nofollow" rel="stylesheet">

<!-- 寫成相對路徑 -->
<link href="./index.css" rel="external nofollow" rel="stylesheet">

<!-- 結合 webpack 打包時進行路徑補充 -->
<link href="<%= BASE_URL %>index.css" rel="external nofollow" rel="stylesheet">
但是項目中有一些組件的請求沒有辦法統一處理,只能改代碼。但我不想動代碼,webpack 打包都不想動,基于這些需求想了一個辦法來解決。
本文內容
演示代碼地址
Nginx 部署 Vue 項目
server {
  listen 8087;
  # 它的作用是不重定向地址,比如瀏覽器輸入 /app1 訪問,也可以訪問到 /app1/ ,而瀏覽器地址是不改變的 /app1 。沒辦法,強迫癥
  location / {
    try_files $uri $uri/;
  }
  root /Users/zhangpanqin/staic/;
  location ~ /(.*)/ {
    index index.html /index.html;
    try_files $uri $uri/ /$1/index.html;
  }
}
/Users/zhangpanqin/staic/ 放部署的項目,比如 app 的項目資源放到 /Users/zhangpanqin/staic/app 下。 訪問地址為 http://ip/8087/app
<!DOCTYPE html>
<html lang="en">
<head>
  <!-- 也可以改成類似的地址 BASE_URL 等于 vue.config.js 配置的 publicPath-->
  <link rel="icon" href="<%= BASE_URL %>favicon.ico" rel="external nofollow" >
  <!-- 部署之后,訪問不到 index.css -->
  <link href="/index.css" rel="external nofollow" rel="external nofollow" rel="external nofollow" rel="stylesheet">
</head>
</html>
為了可以在瀏覽器輸入 vue 的路由 /app/blog 也可以訪問頁面,需要添加 vue-router 中的 base 屬性。
import Vue from 'vue';
import VueRouter from 'vue-router';

Vue.use(VueRouter);

const routes = [
  {
    path: '/',
    name: 'Home',
    component: () => import('@/views/Home.vue'),
  },
  {
    path: '/blog',
    name: 'Blog',
    component: () => import('@/views/Blog.vue'),
  },
  {
    // 匹配不到路由的時候跳轉到這里
    path: '*',
    name: 'Error404',
    component: () => import('@/views/Error404.vue'),
  }
];
const router = new VueRouter({
  // 主要是修改這里,可以根據 vue mode 環境來取值。
  // https://cli.vuejs.org/zh/guide/mode-and-env.html
  // https://router.vuejs.org/zh/api/#base
  base: process.env.VUE_APP_DEPLOY_PATH,
  mode: 'history',
  routes,
});

export default router;
http://localhost:8087/app/index.css 為 css 的真實地址。所以想辦法為這些不以 /app 開頭的資源加上 /app 就可以了,想了想只有 cookie 能做到。
x_vue_path 記錄每個項目的路徑,然后靜態資源去這個路徑下尋找, $cookie_x_vue_path/$uri
下面這個配置使用了 try_files 內部重定向資源,是不會在瀏覽器端發生重定向的。
# gzip ,緩存 和 epoll 優化的都沒寫
server {
  listen 8087;
  # 它的作用是不重定向地址,比如瀏覽器輸入 /app1 訪問,也可以訪問到 /app1/ ,而瀏覽器地址是不改變的 /app1 。沒辦法,強迫癥
  location / {
    try_files $uri $uri/;
  }
  root /Users/zhangpanqin/staic/;

  # (.*) 匹配是哪個項目,比如說 app1 app2 等
  location ~ /(.*)/.*/ {
    index index.html /index.html;
    add_header Set-Cookie "x_vue_path=/$1;path=/;";
    # /Users/zhangpanqin/staic/+/$1/index.html 可以到每個項目下 index.html
    try_files $uri $uri/ /$1/index.html @404router;
  }
  # 查找靜態資源,也可以在這里添加緩存。
  location ~ (.css|js)$ {
    try_files $uri $cookie_x_vue_path/$uri @404router;
  }
  location @404router {
    return 404;
  }
}
下面這個是重定向的配置
server {
  listen 8087;
  root /Users/zhangpanqin/staic/;

  location ~ /(.*)/.*/? {
    index index.html /index.html;
    add_header Set-Cookie "x_vue_path=/$1;path=/;";
    try_files $uri $uri/ /$1/index.html @404router;
  }
  location ~ (.css|js)$ {
    # 匹配到 /app/index.css 的資源,直接訪問
    rewrite ^($cookie_x_vue_path)/.* $uri break;
    # 訪問的資源 /index.css 302 臨時重定向到 /app/index.css
    rewrite (.css|js)$ $cookie_x_vue_path$uri redirect;
  }
  location @404router {
    return 404;
  }
}
根據這個思路就可以把所有的資源進行轉發了,不用改業務代碼,只需給 vue-router 加上一個 base 基礎路由。
SpringBoot 部署 Vue 項目
Nginx 走通了,SpringBoot 依葫蘆畫瓢就行了,還是 java 寫的舒服,能 debug,哈哈。
SpringBoot 映射靜態資源
@Configuration
public class VueWebConfig implements WebMvcConfigurer {
  /**
   * 映射的靜態資源路徑
   * file:./static/ 路徑是相對于 user.dir 路徑,jar 包同級目錄下的 static
   */
  private static final String[] CLASSPATH_RESOURCE_LOCATIONS = {"file:./static/", "classpath:/META-INF/resources/",
      "classpath:/resources/", "classpath:/static/", "classpath:/public/"};

  @Override
  public void addResourceHandlers(ResourceHandlerRegistry registry) {
    // 添加靜態資源緩存
    CacheControl cacheControl = CacheControl.maxAge(5, TimeUnit.HOURS).cachePublic();
    registry.addResourceHandler("/**").addResourceLocations(CLASSPATH_RESOURCE_LOCATIONS).setCacheControl(cacheControl);
  }


  @Override
  public void addInterceptors(InterceptorRegistry registry) {
    // 配置要攔截的資源,主要用于 添加 cookie
    registry.addInterceptor(new VueCookieInterceptor()).addPathPatterns("/test/**");
  }

  // vue 路由轉發使用的,也做 接口請求找不到的
  @Bean
  public VueErrorController vueErrorController() {
    return new VueErrorController(new DefaultErrorAttributes());
  }
}
項目靜態資源路徑添加 cookie
public class VueCookieInterceptor implements HandlerInterceptor {
  public static final String VUE_HTML_COOKIE_NAME = "x_vue_path";

  public static final String VUE_HTML_COOKIE_VALUE = "/test";

  /**
   * 配置請求資源路徑 /test 下全部加上 cookie
   */
  @Override
  public boolean preHandle(HttpServletRequest request, HttpServletResponse response, Object handler) throws Exception {
    final Cookie cookieByName = getCookieByName(request, VUE_HTML_COOKIE_NAME);
    if (Objects.isNull(cookieByName)) {
      final Cookie cookie = new Cookie(VUE_HTML_COOKIE_NAME, VUE_HTML_COOKIE_VALUE);
      // 項目下的 url 都帶能帶上
      cookie.setPath("/");
      cookie.setHttpOnly(true);
      response.addCookie(cookie);
    }
    return true;
  }

  public static Cookie getCookieByName(HttpServletRequest httpServletRequest, String cookieName) {
    final Cookie[] cookies = httpServletRequest.getCookies();
    if (Objects.isNull(cookieName) || Objects.isNull(cookies)) {
      return null;
    }
    for (Cookie cookie : cookies) {
      final String name = cookie.getName();
      if (Objects.equals(cookieName, name)) {
        return cookie;
      }
    }
    return null;
  }
}
請求出現錯誤做資源的轉發
訪問錯誤的跳轉要分清楚 接口請求和靜態資源的請求,通過 accept 可以判斷。
@RequestMapping("/error")
public class VueErrorController extends AbstractErrorController {

  private static final String ONLINE_SAIL = VUE_HTML_COOKIE_NAME;

  private static final String ERROR_BEFORE_PATH = "javax.servlet.error.request_uri";

  public VueErrorController(DefaultErrorAttributes defaultErrorAttributes) {
    super(defaultErrorAttributes);
  }

  @Override
  public String getErrorPath() {
    return "/error";
  }

  @RequestMapping
  public ModelAndView errorHtml(HttpServletRequest httpServletRequest, HttpServletResponse response, @CookieValue(name = ONLINE_SAIL, required = false, defaultValue = "") String cookie) {
    final Object attribute = httpServletRequest.getAttribute(ERROR_BEFORE_PATH);
    if (cookie.length() > 0 && Objects.nonNull(attribute)) {
      response.setStatus(HttpStatus.OK.value());
      String requestURI = attribute.toString();
      // 訪問的路徑沒有以 vue 部署的路徑結尾,補充上路徑轉發去訪問
      if (!requestURI.startsWith(cookie)) {
        ModelAndView modelAndView = new ModelAndView();
        modelAndView.setStatus(HttpStatus.OK);
        // 靜態資源不想轉發,重定向的話,修改為 redirect
        String viewName = "forward:" + cookie + requestURI;
        modelAndView.setViewName(viewName);
        return modelAndView;
      }
    }
    ModelAndView modelAndView = new ModelAndView();
    modelAndView.setStatus(HttpStatus.OK);
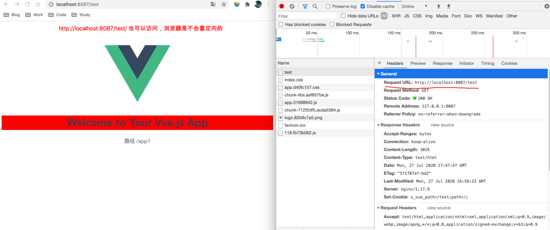
    modelAndView.setViewName("forward:/test/index.html");
    return modelAndView;
  }

  // 處理請求頭為 accept 為 application/json 的請求,就是接口請求返回json 數據
  @RequestMapping(produces = MediaType.APPLICATION_JSON_VALUE)
  public ResponseEntity<Map<String, Object>> error(HttpServletRequest request) {
    HttpStatus status = getStatus(request);
    if (status == HttpStatus.NO_CONTENT) {
      return new ResponseEntity<>(status);
    }
    final Map<String, Object> errorAttributes = getErrorAttributes(request, true);
    return new ResponseEntity<>(errorAttributes, status);
  }
首頁跳轉
@Controller
public class IndexController {
  @RequestMapping(value = {"/test", "/test"})
  public String index() {
    return "forward:/test/index.html";
  }
}
看完上述內容,你們掌握SpringBoot部署Vue項目的方法的方法了嗎?如果還想學到更多技能或想了解更多相關內容,歡迎關注億速云行業資訊頻道,感謝各位的閱讀!
免責聲明:本站發布的內容(圖片、視頻和文字)以原創、轉載和分享為主,文章觀點不代表本網站立場,如果涉及侵權請聯系站長郵箱:is@yisu.com進行舉報,并提供相關證據,一經查實,將立刻刪除涉嫌侵權內容。