您好,登錄后才能下訂單哦!
您好,登錄后才能下訂單哦!
這篇文章將為大家詳細講解有關如何實現keeplied +nginx +tomcat 高可用部署,文章內容質量較高,因此小編分享給大家做個參考,希望大家閱讀完這篇文章后對相關知識有一定的了解。

Tomcat 部署
本次實驗是在兩臺虛擬機上部署tomcat中間件,每臺虛擬機部署三個服務,分別使用7001、7002、7003三個端口,進行部署程序。
tomcat虛擬機地址:
192.168.56.57
192.168.56.58

Tomcat7001配置:
進入到tomcat配置文件,進行修改端口參數


將業務端口更改成7001端口,對外部瀏覽器訪問使用

將程序關閉的端口更改成8006 端口,該端口對內部使用。

其他幾個服務相應的去更改tomcat端口。
Nginx配置
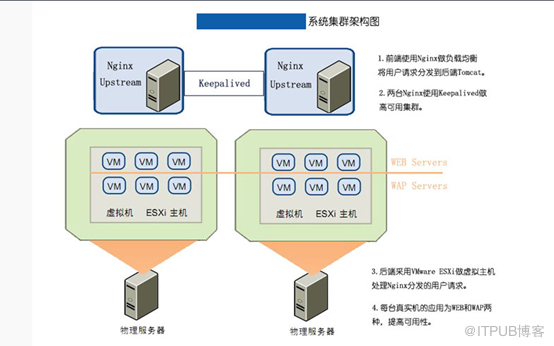
本次反向代理使用的是軟負載nginx進行代理,分別使用了兩臺虛擬進行主備切換,保證業務正常使用。
Nginx 兩臺服務器地址為:
192.168.56.55
192.168.56.56
Nginx 配置:
本次nginx 安裝在/usr/local/nginx目錄下面

Nginx配置文件更改:
[root@edsir1p8 conf]# cat nginx.conf
worker_processes 4;
error_log logs/error.log;
pid logs/nginx.pid;
events {
use epoll;
worker_connections 65000;
}
http {
include mime.types;
default_type application/octet-stream;
log_format main '$remote_addr - $remote_user [$time_local] "$request" '
'$status $body_bytes_sent "$http_referer" '
'"$http_user_agent" "$http_x_forwarded_for"';
log_format json '{"@timestamp":"$time_iso8601",'
'"@version":"1",'
'"client":"$remote_addr",'
'"url":"$uri",'
'"status":"$status",'
'"domian":"$host",'
'"host":"$server_addr",'
'"size":"$body_bytes_sent",'
'"responsetime":"$request_time",'
'"referer":"$http_referer",'
'"ua":"$http_user_agent"'
'}';
sendfile on;
include weixin.vhost.conf;
}
[root@edsir1p8 conf]# cat weixin.vhost.conf
upstream weixin {
# ip_hash;
server 192.168.56.57:7001 weight=1;
server 192.168.56.57:7002 weight=1;
server 192.168.56.57:7003 weight=1;
server 192.168.56.58:7001 weight=1;
server 192.168.56.58:7002 weight=1;
server 192.168.56.58:7003 weight=1;
}
server {
listen 80;
server_name localhost;
location / {
# include proxy_common.conf;
proxy_pass http://weixin;
}
access_log logs/weixin_access.log;
}
通過瀏覽器驗證


至此反向代理配置成功。
Keepalived 配置
安裝Keepalived略
本次實驗將keepalived 和nginx 安裝在一臺服務器上。
192.168.56.55
192.168.56.56
完成上述步驟之后keepalived已經可以實現虛擬IP轉移了,但是實際應用當中我們需要的是自動進行虛擬IP的轉移,所以我們還需要配置keepalived的腳本,使其能夠在某一個nginx無法提供服務的時候自動將虛擬IP轉移到備用服務器,以下腳本來自于上邊提供的鏈接,原理是通過curl訪問某一個鏈接,如果連續兩次三秒沒有響應則降低服務器的優先級,我們在/etc/keepalived目錄下創建一個名為check_status.sh的文件,然后鍵入以下內容
#!/bin/bash
count=0
for (( k=0; k<2; k++ )) do check_code=$( curl --connect-timeout 3 -sL -w "%{http_code}\\n" http://localhost/index.jsp -o /dev/null )
if [ "$check_code" != "200" ]; then
count=$(expr $count + 1)
sleep 3
continue
else
count=0
break
fi
done
if [ "$count" != "0" ]; then
exit 1
else
exit
0
Fi
chmod +x check_status.sh
后我們在keepalived.conf中配置腳本,配置內容如下:
vrrp_script check_status
{
script "/etc/keepalived/check_status.sh"
interval 5
weight -5
}
vrrp_instance VI_1
{ state MASTER #備keepalived 填寫BACKUP
interface eth0
virtual_router_id 51
priority 100 #備keepalived 填寫90
advert_int 1
authentication {
auth_type PASS
auth_pass 1111 }
virtual_ipaddress {
192.168.56.100
}
track_script {
check_status
}
}


配置完成后重啟keepavlied即可,此時如果關閉本機的nginx的話可以看到在5秒后虛擬IP會漂移到備用服務器上去,這里因為演示的話圖片太多了,就不上圖片了,nginx退出可以執行nginx -s stop命令,如果是使用yum安裝的nginx可以通過systemctl來停止nginx服務
模擬主nginx宕機
[root@edsir1p8 conf]# killall nginx
繼續訪問虛擬地址:

關于如何實現keeplied +nginx +tomcat 高可用部署就分享到這里了,希望以上內容可以對大家有一定的幫助,可以學到更多知識。如果覺得文章不錯,可以把它分享出去讓更多的人看到。
免責聲明:本站發布的內容(圖片、視頻和文字)以原創、轉載和分享為主,文章觀點不代表本網站立場,如果涉及侵權請聯系站長郵箱:is@yisu.com進行舉報,并提供相關證據,一經查實,將立刻刪除涉嫌侵權內容。