您好,登錄后才能下訂單哦!
您好,登錄后才能下訂單哦!
這篇文章給大家分享的是有關Tomcat中HTTP請求過程的示例分析的內容。小編覺得挺實用的,因此分享給大家做個參考,一起跟隨小編過來看看吧。

前言:
1.作為Java開發人員,大多都對Tomcat不陌生,由Apache基金會提供技術支持與維護,因為其免費開源且易用,作為Web服務器深受市場歡迎,所以有必要對其進行深入的研究,本系列皆以Tomcat 8.5為研究課題,下載地址:
https://tomcat.apache.org/download-80.cgi
2.下圖為 apache-tomcat-8.5.23.zip 在windows解壓后的目錄。

下面是解壓后的一些關鍵目錄:
* /bin - 啟動和停止服務等批處理文件. ( *.sh) 文件 (為Unix系統)、 (*.bat) 文件 (for Windows系統)是一個功能性的復制文件. 自從Win32 command-line 開始是一些單一的,缺乏功能的組件, 現在有一些拓展性的功能
* /conf - 配置文件和一些相關的DTD文件. 最重要的是 server.xml. 它是這個容器最主要的配置文件.
* /logs - 日志文件會打印到這里
* /webapps - 這里是你的應用程序部署的地方.
3.從最本質上講,tomcat為一個servlet容器,首先研究一下Tomcat的架構,如下圖:

架構詮釋:
1.Server(服務器)是Tomcat構成的頂級構成元素,所有一切均包含在Server中,Server的實現類StandardServer可以包含一個到多個Services,Service的實現類為StandardService調用了容器(Container)接口,其實是調用了Servlet Engine(引擎),而且StandardService類中也指明了該Service歸屬的Server;
2.Container: 引擎(Engine)、主機(Host)、上下文(Context)和Wraper均繼承自Container接口,所以它們都是容器。但是,它們是有父子關系的,在主機(Host)、上下文(Context)和引擎(Engine)這三類容器中,引擎是頂級容器,直接包含是主機容器,而主機容器又包含上下文容器,所以引擎、主機和上下文從大小上來說又構成父子關系,雖然它們都繼承自Container接口。
3.連接器(Connector)將Service和Container連接起來,首先它需要注冊到一個Service,它的作用就是把來自客戶端的請求轉發到Container(容器),這就是它為什么稱作連接器的原因。
從功能的角度將Tomcat源代碼分成5個子模塊,分別是:
Jsper模塊: 這個子模塊負責jsp頁面的解析、jsp屬性的驗證,同時也負責將jsp頁面動態轉換為java代碼并編譯成class文件。在Tomcat源代碼中,凡是屬于org.apache.jasper包及其子包中的源代碼都屬于這個子模塊;
Servlet和Jsp模塊: 這個子模塊的源代碼屬于javax.servlet包及其子包,如我們非常熟悉的javax.servlet.Servlet接口、javax.servet.http.HttpServlet類及javax.servlet.jsp.HttpJspPage就位于這個子模塊中;
Catalina模塊: 這個子模塊包含了所有以org.apache.catalina開頭的java源代碼。該子模塊的任務是規范了Tomcat的總體架構,定義了Server、Service、Host、Connector、Context、Session及Cluster等關鍵組件及這些組件的實現,這個子模塊大量運用了Composite設計模式。同時也規范了Catalina的啟動及停止等事件的執行流程。從代碼閱讀的角度看,這個子模塊應該是我們閱讀和學習的重點。
Connector模塊: 如果說上面三個子模塊實現了Tomcat應用服務器的話,那么這個子模塊就是Web服務器的實現。所謂連接器(Connector)就是一個連接客戶和應用服務器的橋梁,它接收用戶的請求,并把用戶請求包裝成標準的Http請求(包含協議名稱,請求頭Head,請求方法是Get還是Post等等)。同時,這個子模塊還按照標準的Http協議,負責給客戶端發送響應頁面,比如在請求頁面未發現時,connector就會給客戶端瀏覽器發送標準的Http 404錯誤響應頁面。
Resource模塊: 這個子模塊包含一些資源文件,如Server.xml及Web.xml配置文件。嚴格說來,這個子模塊不包含java源代碼,但是它還是Tomcat編譯運行所必需的。
Tomcat是一個基于組件的服務器,它的構成組件都是可配置的,其中最外層的是Catalina servlet容器,其他組件按照一定的格式要求配置在這個頂層容器中。
Tomcat的各種組件都是在Tomcat安裝目錄下的/conf/server.xml文件中配置的。
<Server>                                                //頂層類元素,可以包括多個Service
    <Service>                                           //頂層類元素,可包含一個Engine,多個Connecter
        <Connector>                                     //連接器類元素,代表通信接口
                <Engine>                                //容器類元素,為特定的Service組件處理客戶請求,要包含多個Host
                        <Host>                          //容器類元素,為特定的虛擬主機組件處理客戶請求,可包含多個Context
                                <Context>               //容器類元素,為特定的Web應用處理所有的客戶請求
                                </Context>
                        </Host>
                </Engine>
        </Connector>
    </Service>
</Server>
實際源碼如下:
<?xml version='1.0' encoding='utf-8'?>
<Server port="8005" shutdown="SHUTDOWN">
  <Listener className="org.apache.catalina.startup.VersionLoggerListener" />
  <!-- Security listener. Documentation at /docs/config/listeners.html
  <Listener className="org.apache.catalina.security.SecurityListener" />
  -->
  <!--APR library loader. Documentation at /docs/apr.html -->
  <Listener className="org.apache.catalina.core.AprLifecycleListener" SSLEngine="on" />
  <!--Initialize Jasper prior to webapps are loaded. Documentation at /docs/jasper-howto.html -->
  <Listener className="org.apache.catalina.core.JasperListener" />
  <!-- Prevent memory leaks due to use of particular java/javax APIs-->
  <Listener className="org.apache.catalina.core.JreMemoryLeakPreventionListener" />
  <Listener className="org.apache.catalina.mbeans.GlobalResourcesLifecycleListener" />
  <Listener className="org.apache.catalina.core.ThreadLocalLeakPreventionListener" />
  <!-- Global JNDI resources
       Documentation at /docs/jndi-resources-howto.html
  -->
  <GlobalNamingResources>
    <!-- Editable user database that can also be used by
         UserDatabaseRealm to authenticate users
    -->
    <Resource name="UserDatabase" auth="Container"
              type="org.apache.catalina.UserDatabase"
              description="User database that can be updated and saved"
              factory="org.apache.catalina.users.MemoryUserDatabaseFactory"
              pathname="conf/tomcat-users.xml" />
  </GlobalNamingResources>
  <!-- A "Service" is a collection of one or more "Connectors" that share
       a single "Container" Note:  A "Service" is not itself a "Container",
       so you may not define subcomponents such as "Valves" at this level.
       Documentation at /docs/config/service.html
   -->
  <Service name="Catalina">
    <!--The connectors can use a shared executor, you can define one or more named thread pools-->
    <!--
    <Executor name="tomcatThreadPool" namePrefix="catalina-exec-"
        maxThreads="150" minSpareThreads="4"/>
    -->
    <!-- A "Connector" represents an endpoint by which requests are received
         and responses are returned. Documentation at :
         Java HTTP Connector: /docs/config/http.html (blocking & non-blocking)
         Java AJP  Connector: /docs/config/ajp.html
         APR (HTTP/AJP) Connector: /docs/apr.html
         Define a non-SSL HTTP/1.1 Connector on port 8080
    -->
    <Connector port="8080" protocol="HTTP/1.1"
               connectionTimeout="20000"
               redirectPort="8443" />
    <!-- A "Connector" using the shared thread pool-->
    <!--
    <Connector executor="tomcatThreadPool"
               port="8080" protocol="HTTP/1.1"
               connectionTimeout="20000"
               redirectPort="8443" />
    -->
    <!-- Define a SSL HTTP/1.1 Connector on port 8443
         This connector uses the BIO implementation that requires the JSSE
         style configuration. When using the APR/native implementation, the
         OpenSSL style configuration is required as described in the APR/native
         documentation -->
    <!--
    <Connector port="8443" protocol="org.apache.coyote.http11.Http11Protocol"
               maxThreads="150" SSLEnabled="true" scheme="https" secure="true"
               clientAuth="false" sslProtocol="TLS" />
    -->
    <!-- Define an AJP 1.3 Connector on port 8009 -->
    <Connector port="8009" protocol="AJP/1.3" redirectPort="8443" />
    <!-- An Engine represents the entry point (within Catalina) that processes
         every request.  The Engine implementation for Tomcat stand alone
         analyzes the HTTP headers included with the request, and passes them
         on to the appropriate Host (virtual host).
         Documentation at /docs/config/engine.html -->
    <!-- You should set jvmRoute to support load-balancing via AJP ie :
    <Engine name="Catalina" defaultHost="localhost" jvmRoute="jvm1">
    -->
    <Engine name="Catalina" defaultHost="localhost">
      <!--For clustering, please take a look at documentation at:
          /docs/cluster-howto.html  (simple how to)
          /docs/config/cluster.html (reference documentation) -->
      <!--
      <Cluster className="org.apache.catalina.ha.tcp.SimpleTcpCluster"/>
      -->
      <!-- Use the LockOutRealm to prevent attempts to guess user passwords
           via a brute-force attack -->
      <Realm className="org.apache.catalina.realm.LockOutRealm">
        <!-- This Realm uses the UserDatabase configured in the global JNDI
             resources under the key "UserDatabase".  Any edits
             that are performed against this UserDatabase are immediately
             available for use by the Realm.  -->
        <Realm className="org.apache.catalina.realm.UserDatabaseRealm"
               resourceName="UserDatabase"/>
      </Realm>
      <Host name="localhost"  appBase="webapps"
            unpackWARs="true" autoDeploy="true">
        <!-- SingleSignOn valve, share authentication between web applications
             Documentation at: /docs/config/valve.html -->
        <!--
        <Valve className="org.apache.catalina.authenticator.SingleSignOn" />
        -->
        <!-- Access log processes all example.
             Documentation at: /docs/config/valve.html
             Note: The pattern used is equivalent to using pattern="common" -->
        <Valve className="org.apache.catalina.valves.AccessLogValve" directory="logs"
               prefix="localhost_access_log." suffix=".txt"
               pattern="%h %l %u %t "%r" %s %b" />
      </Host>
    </Engine>
  </Service>
</Server>
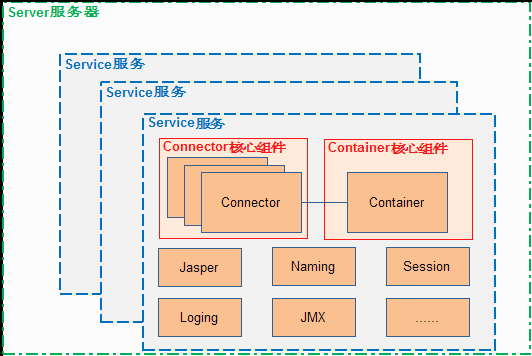
由上可得出Tomcat的體系結構:
圖一:Tomcat的體系結構
由上圖可看出Tomca的心臟是兩個組件:Connecter和Container。一個Container可以選擇多個Connecter,多個Connector和一個Container就形成了一個Service。Service可以對外提供服務,而Server服務器控制整個Tomcat的生命周期。

圖三:Tomcat Server處理一個HTTP請求的過程
Tomcat Server處理一個HTTP請求的過程
1、用戶點擊網頁內容,請求被發送到本機端口8080,被在那里監聽的Coyote HTTP/1.1 Connector獲得。
2、Connector把該請求交給它所在的Service的Engine來處理,并等待Engine的回應。
3、Engine獲得請求localhost/test/index.jsp,匹配所有的虛擬主機Host。
4、Engine匹配到名為localhost的Host(即使匹配不到也把請求交給該Host處理,因為該Host被定義為該Engine的默認主機),名為localhost的Host獲得請求/test/index.jsp,匹配它所擁有的所有的Context。Host匹配到路徑為/test的Context(如果匹配不到就把該請求交給路徑名為“ ”的Context去處理)。
5、path=“/test”的Context獲得請求/index.jsp,在它的mapping table中尋找出對應的Servlet。Context匹配到URL PATTERN為*.jsp的Servlet,對應于JspServlet類。
6、構造HttpServletRequest對象和HttpServletResponse對象,作為參數調用JspServlet的doGet()或doPost().執行業務邏輯、數據存儲等程序。
7、Context把執行完之后的HttpServletResponse對象返回給Host。
8、Host把HttpServletResponse對象返回給Engine。
9、Engine把HttpServletResponse對象返回Connector。
10、Connector把HttpServletResponse對象返回給客戶Browser。
感謝各位的閱讀!關于“Tomcat中HTTP請求過程的示例分析”這篇文章就分享到這里了,希望以上內容可以對大家有一定的幫助,讓大家可以學到更多知識,如果覺得文章不錯,可以把它分享出去讓更多的人看到吧!
免責聲明:本站發布的內容(圖片、視頻和文字)以原創、轉載和分享為主,文章觀點不代表本網站立場,如果涉及侵權請聯系站長郵箱:is@yisu.com進行舉報,并提供相關證據,一經查實,將立刻刪除涉嫌侵權內容。