您好,登錄后才能下訂單哦!
您好,登錄后才能下訂單哦!


上面左邊是我的個人微 信,如需進一步溝通,請加好 友。 右邊是我的公眾號“Openstack私有云”,如有興趣,請關注。
第一次安裝harbor的時候為了方便,安裝成了http方式,但是后面時候的時候發現各種不方便,因為docker客戶端登錄鏡像源的時候都是默認是https方式,所以每一個客戶端都要特別的設置,很是麻煩。因此決定將http方式改為https方式。記錄一下操作過程。
參考官網的安裝文檔進行操作,如下:
https://github.com/goharbor/harbor/blob/master/docs/configure_https.md
創建CA密鑰對:
openssl genrsa -out ca.key 4096
openssl req -x509 -new -nodes -sha512 -days 36500 \
    -subj "/C=SC/ST=CHENGDU/L=CHENGDU/O=example/OU=Personal/CN=yuweibnig.com" \
    -key ca.key \
    -out ca.crt
openssl genrsa -out yuweibing.com.key 4096
創建web服務器端秘鑰對:
openssl req -sha512 -new \
    -subj "/C=SC/ST=CHENGDU/L=CHENGDU/O=example/OU=Personal/CN=yuweibnig.com" \
    -key yuweibing.com.key \
    -out yuweibing.com.csr

使web服務器到CA進行簽約:
cat > v3.ext <<-EOF
authorityKeyIdentifier=keyid,issuer
basicConstraints=CA:FALSE
keyUsage = digitalSignature, nonRepudiation, keyEncipherment, dataEncipherment
extendedKeyUsage = serverAuth
subjectAltName = @alt_names

[alt_names]
DNS.1=yuweibing.com
DNS.2=yuweibing
DNS.3=harbor
EOF

openssl x509 -req -sha512 -days 3650 \
    -extfile v3.ext \
    -CA ca.crt -CAkey ca.key -CAcreateserial \
    -in yuweibing.com.csr \
    -out yuweibing.com.crt

執行結果顯示如下:
[root@harbor ssl]# openssl x509 -req -sha512 -days 3650 \
>     -extfile v3.ext \
>     -CA ca.crt -CAkey ca.key -CAcreateserial \
>     -in yuweibing.com.csr \
>     -out yuweibing.com.crt
Signature ok
subject=/C=SC/ST=CHENGDU/L=CHENGDU/O=example/OU=Personal/CN=yuweibnig.com
Getting CA Private Key
[root@harbor ssl]#
修改harbor.cfg配置文件中以下參數 :
hostname = yuweibing.com
ui_url_protocol = https
ssl_cert = /software/harbor/ssl/yuweibing.com.crt
ssl_cert_key = /software/harbor/ssl/yuweibing.com.key
secretkey_path = /software/harbor/ssl
然后執行prepare:
./prepare
然后執行install:
./install.sh
以下是執行結果:
[root@harbor harbor]# ./prepare
Clearing the configuration file: ./common/config/adminserver/env
Clearing the configuration file: ./common/config/core/env
Clearing the configuration file: ./common/config/core/app.conf
Clearing the configuration file: ./common/config/core/private_key.pem
Clearing the configuration file: ./common/config/db/env
Clearing the configuration file: ./common/config/jobservice/env
Clearing the configuration file: ./common/config/jobservice/config.yml
Clearing the configuration file: ./common/config/registry/config.yml
Clearing the configuration file: ./common/config/registry/root.crt
Clearing the configuration file: ./common/config/registryctl/env
Clearing the configuration file: ./common/config/registryctl/config.yml
Clearing the configuration file: ./common/config/nginx/nginx.conf
Clearing the configuration file: ./common/config/log/logrotate.conf
Generated and saved secret to file: /software/harbor/ssl/secretkey
Generated configuration file: ./common/config/nginx/nginx.conf
Generated configuration file: ./common/config/adminserver/env
Generated configuration file: ./common/config/core/env
Generated configuration file: ./common/config/registry/config.yml
Generated configuration file: ./common/config/db/env
Generated configuration file: ./common/config/jobservice/env
Generated configuration file: ./common/config/jobservice/config.yml
Generated configuration file: ./common/config/log/logrotate.conf
Generated configuration file: ./common/config/registryctl/env
Generated configuration file: ./common/config/core/app.conf
Generated certificate, key file: ./common/config/core/private_key.pem, cert fil
The configuration files are ready, please use docker-compose to start the servi
[root@harbor harbor]# ls
common                          docker-compose.clair.yml   docker-compose.yml
docker-compose.chartmuseum.yml  docker-compose.notary.yml  harbor.cfg
[root@harbor harbor]# ./install.sh
[Step 0]: checking installation environment ...
Note: docker version: 1.13.1
Note: docker-compose version: 1.18.0
[Step 1]: loading Harbor images ...
Loaded image: goharbor/registry-photon:v2.6.2-v1.7.1
Loaded image: goharbor/harbor-migrator:v1.7.1
Loaded image: goharbor/harbor-adminserver:v1.7.1
Loaded image: goharbor/harbor-core:v1.7.1
Loaded image: goharbor/harbor-log:v1.7.1
Loaded image: goharbor/harbor-jobservice:v1.7.1
Loaded image: goharbor/notary-server-photon:v0.6.1-v1.7.1
Loaded image: goharbor/clair-photon:v2.0.7-v1.7.1
Loaded image: goharbor/harbor-portal:v1.7.1
Loaded image: goharbor/harbor-db:v1.7.1
Loaded image: goharbor/redis-photon:v1.7.1
Loaded image: goharbor/nginx-photon:v1.7.1
Loaded image: goharbor/harbor-registryctl:v1.7.1
Loaded image: goharbor/notary-signer-photon:v0.6.1-v1.7.1
Loaded image: goharbor/chartmuseum-photon:v0.7.1-v1.7.1
[Step 2]: preparing environment ...
Clearing the configuration file: ./common/config/adminserver/env
Clearing the configuration file: ./common/config/core/env
Clearing the configuration file: ./common/config/core/app.conf
Clearing the configuration file: ./common/config/core/private_key.pem
Clearing the configuration file: ./common/config/db/env
Clearing the configuration file: ./common/config/jobservice/env
Clearing the configuration file: ./common/config/jobservice/config.yml
Clearing the configuration file: ./common/config/registry/config.yml
Clearing the configuration file: ./common/config/registry/root.crt
Clearing the configuration file: ./common/config/registryctl/env
Clearing the configuration file: ./common/config/registryctl/config.yml
Clearing the configuration file: ./common/config/nginx/cert/yuweibing.com.crt
Clearing the configuration file: ./common/config/nginx/cert/yuweibing.com.key
Clearing the configuration file: ./common/config/nginx/nginx.conf
Clearing the configuration file: ./common/config/log/logrotate.conf
loaded secret from file: /software/harbor/ssl/secretkey
Generated configuration file: ./common/config/nginx/nginx.conf
Generated configuration file: ./common/config/adminserver/env
Generated configuration file: ./common/config/core/env
Generated configuration file: ./common/config/registry/config.yml
Generated configuration file: ./common/config/db/env
Generated configuration file: ./common/config/jobservice/env
Generated configuration file: ./common/config/jobservice/config.yml
Generated configuration file: ./common/config/log/logrotate.conf
Generated configuration file: ./common/config/registryctl/env
Generated configuration file: ./common/config/core/app.conf
Generated certificate, key file: ./common/config/core/private_key.pem, cert fil
The configuration files are ready, please use docker-compose to start the servi
[Step 3]: checking existing instance of Harbor ...
Note: stopping existing Harbor instance ...
Stopping nginx              ... done
Stopping harbor-jobservice  ... done
Stopping harbor-portal      ... done
Stopping harbor-core        ... done
Stopping registry           ... done
Stopping harbor-adminserver ... done
Stopping registryctl        ... done
Stopping redis              ... done
Stopping harbor-db          ... done
Stopping harbor-log         ... done
Removing nginx              ... done
Removing harbor-jobservice  ... done
Removing harbor-portal      ... done
Removing harbor-core        ... done
Removing registry           ... done
Removing harbor-adminserver ... done
Creating harbor-log ... done
Removing redis              ... done
Removing harbor-db          ... done
Removing harbor-log         ... done
Removing network harbor_harbor
Creating redis ... done
Creating harbor-core ... done
[Step 4]: starting Harbor ...
Creating harbor-portal ... done
Creating nginx ... done
Creating registryctl ...
Creating harbor-adminserver ...
Creating redis ...
Creating registry ...
Creating harbor-db ...
Creating harbor-core ...
Creating harbor-portal ...
Creating harbor-jobservice ...
Creating nginx ...
? ----Harbor has been installed and started successfully.----
Now you should be able to visit the admin portal at https://reg.yuweibing.com.
For more details, please visit https://github.com/goharbor/harbor .
[root@harbor harbor]# ./install.sh
接下來修改windows本機客戶端的hosts文件強制解析域名: reg.yuweibing.com
192.168.1.44reg.yuweibing.com
192.168.170.44reg.yuweibing.com
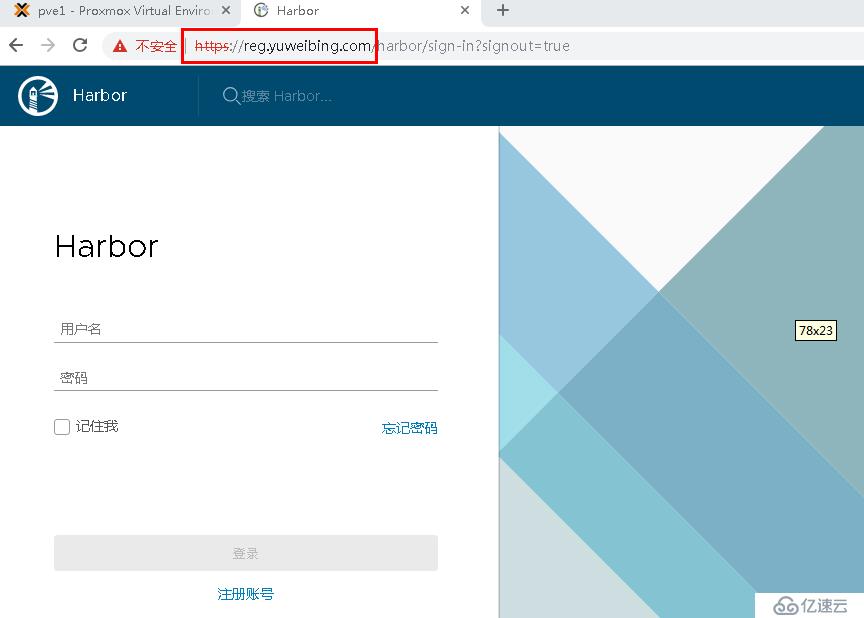
然后就可以在windows客戶端上輸入域名 reg.yuweibing.com進行訪問harbor的web網頁了,如下:

登錄進去后發現原來的用戶信息和鏡像數據都還在,還是不錯。
接下來驗證docker客戶端是否能夠正常從harbor拉取鏡像:
[root@k8s1 ~]# docker login yuweibing.com
Username: ywb
Password:
Error response from daemon: Get https://yuweibing.com/v2/: x509: certificate signed by unknown authority
發現認證失敗。原因是還需要設置docker對于yuweibing.com這個域名的認證信息,將這個域名的公鑰私鑰和CA文件拷貝到docker的認證目錄:/etc/docker/certs.d/yuweibing.com/ ,操作如下:
進入上面的秘鑰文件所在的ssl目錄,并執行如下命令:
openssl x509 -inform PEM -in yuweibing.com.crt -out yuweibing.com.cert
  cp yuweibing.com.cert /etc/docker/certs.d/yuweibing.com/
  cp yuweibing.com.key /etc/docker/certs.d/yuweibing.com/
  cp ca.crt /etc/docker/certs.d/yuweibing.com/
將上面生成的3個文件同樣scp拷貝到需要登錄harbor的所有docker客戶端的/etc/docker/certs.d/yuweibing.com/目錄中,注意這個目錄需要新建,同時需要在docker客戶端中修改hosts文件解析yuweibing.com。
再次驗證一下:
[root@k8s1 yuweibing.com]# docker login yuweibing.com
Username: ywb
Password:
WARNING! Your password will be stored unencrypted in /root/.docker/config.json.
Configure a credential helper to remove this warning. See
https://docs.docker.com/engine/reference/commandline/login/#credentials-store
Login Succeeded
[root@k8s1 yuweibing.com]#
驗證成功!
總結:
如果為了在安裝harbor的時候省事采用http的方式部署,使用的時候docker客戶端默認使用register倉庫的時候都是使用安全連接https,如果要改為http需要修改docker配置,很是麻煩。因此還是需要使用https方式。
從http方式改為https方式主要是需要重新生成CA證書(頒發機構),web服務器證書(harbor服務器),以及服務器向CA進行簽發注冊。之后修改harbor.cfg配置文件,將服務器證書文件配置到配置文件中,修改hostname從IP地址改為域名,重新prepare和install ,install程序會自己將原來的docker-compose中的容器刪除重新生成。
重新安裝后的用戶信息和鏡像數據都會保留。
最后不要忘記配置docker客戶端harbor服務器的公鑰私鑰,并且做好域名解析,如果沒有dns服務器解析,就直接修改docker客戶端上的hosts文件解析harbor配置的域名。
免責聲明:本站發布的內容(圖片、視頻和文字)以原創、轉載和分享為主,文章觀點不代表本網站立場,如果涉及侵權請聯系站長郵箱:is@yisu.com進行舉報,并提供相關證據,一經查實,將立刻刪除涉嫌侵權內容。