您好,登錄后才能下訂單哦!
您好,登錄后才能下訂單哦!
這篇文章主要講解了Android中URL轉換成二維碼的實現方法,內容清晰明了,對此有興趣的小伙伴可以學習一下,相信大家閱讀完之后會有幫助。
二維碼已經成為我們日常生活中的一個不可獲取的產物,火車票上,景區門票,超市付款等等都會有二維碼的身影。
本文將實現由URL轉換成二維碼的過程。
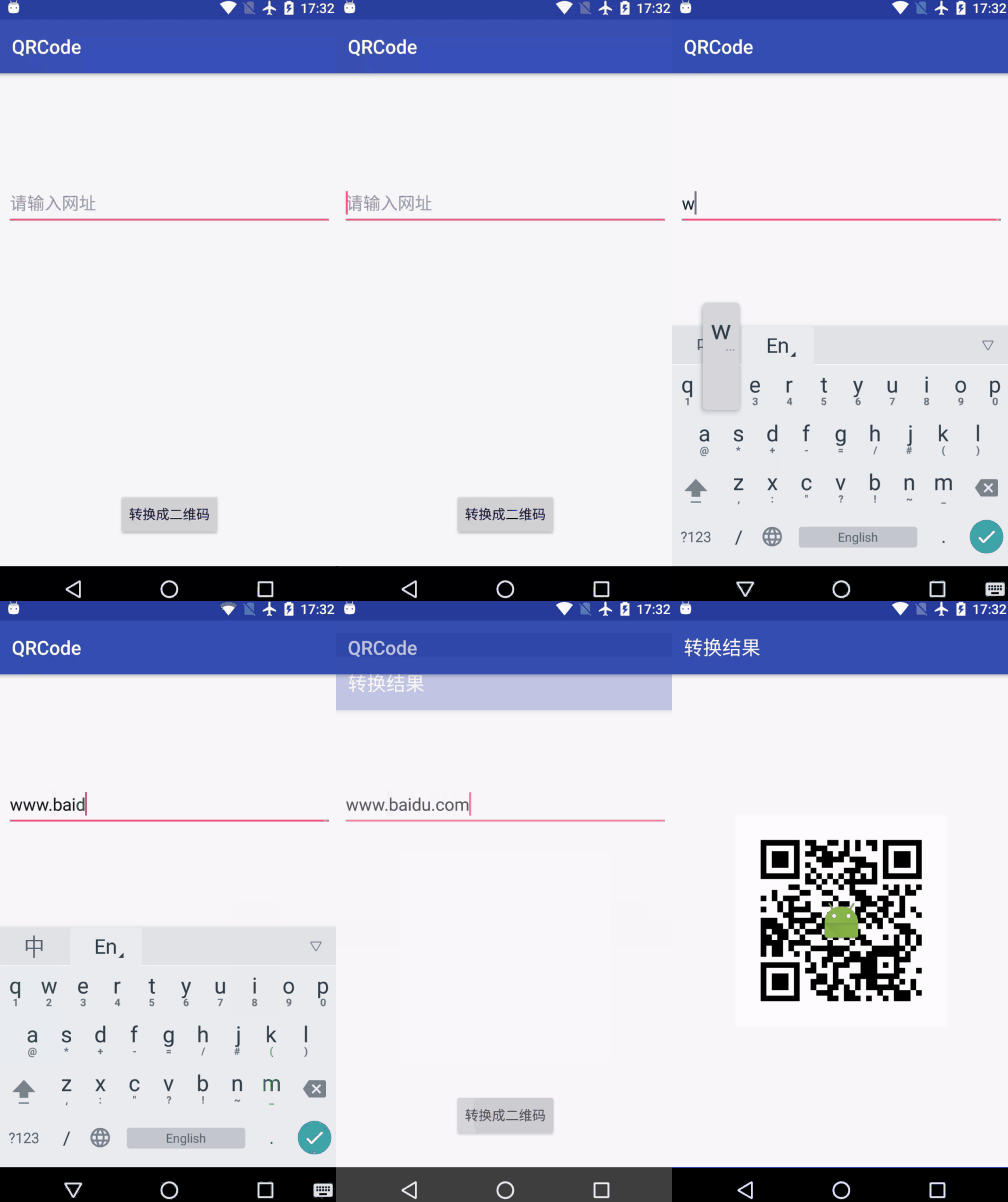
先看一下示例圖

從示例圖中我們可以清晰地看到,URL被轉換成了二維碼。
下面跟隨我來一起實現這個功能。
導入Google提供的開源庫
compile 'com.google.zxing:core:3.3.0'
來講解一下核心的部分:二維碼轉換
①生成二維碼Bitmap
public static boolean createQRImage(String content, int widthPix, int heightPix, Bitmap logoBm, String filePath) {
  try {
   if (content == null || "".equals(content)) {
    return false;
   }

   //配置參數
   Map<EncodeHintType, Object> hints = new HashMap<>();
   hints.put(EncodeHintType.CHARACTER_SET, "utf-8");
   //容錯級別
   hints.put(EncodeHintType.ERROR_CORRECTION, ErrorCorrectionLevel.H);
   //設置空白邊距的寬度
   hints.put(EncodeHintType.MARGIN, 2); //default is 4

   // 圖像數據轉換,使用了矩陣轉換
   BitMatrix bitMatrix = new QRCodeWriter().encode(content, BarcodeFormat.QR_CODE, widthPix, heightPix, hints);
   int[] pixels = new int[widthPix * heightPix];
   // 下面這里按照二維碼的算法,逐個生成二維碼的圖片,
   // 兩個for循環是圖片橫列掃描的結果
   for (int y = 0; y < heightPix; y++) {
    for (int x = 0; x < widthPix; x++) {
     if (bitMatrix.get(x, y)) {
      pixels[y * widthPix + x] = 0xff000000;
     } else {
      pixels[y * widthPix + x] = 0xffffffff;
     }
    }
   }

   // 生成二維碼圖片的格式,使用ARGB_8888
   Bitmap bitmap = Bitmap.createBitmap(widthPix, heightPix, Bitmap.Config.ARGB_8888);
   bitmap.setPixels(pixels, 0, widthPix, 0, 0, widthPix, heightPix);

   if (logoBm != null) {
    bitmap = addLogo(bitmap, logoBm);
   }

   //必須使用compress方法將bitmap保存到文件中再進行讀取。直接返回的bitmap是沒有任何壓縮的,內存消耗巨大!
   return bitmap != null && bitmap.compress(Bitmap.CompressFormat.JPEG, 100, new FileOutputStream(filePath));
  } catch (WriterException | IOException e) {
   e.printStackTrace();
  }

  return false;
 }
②在二維碼中間添加Logo圖案
private static Bitmap addLogo(Bitmap src, Bitmap logo) {
  if (src == null) {
   return null;
  }

  if (logo == null) {
   return src;
  }

  //獲取圖片的寬高
  int srcWidth = src.getWidth();
  int srcHeight = src.getHeight();
  int logoWidth = logo.getWidth();
  int logoHeight = logo.getHeight();

  if (srcWidth == 0 || srcHeight == 0) {
   return null;
  }

  if (logoWidth == 0 || logoHeight == 0) {
   return src;
  }

  //logo大小為二維碼整體大小的1/5
  float scaleFactor = srcWidth * 1.0f / 5 / logoWidth;
  Bitmap bitmap = Bitmap.createBitmap(srcWidth, srcHeight, Bitmap.Config.ARGB_8888);
  try {
   Canvas canvas = new Canvas(bitmap);
   canvas.drawBitmap(src, 0, 0, null);
   canvas.scale(scaleFactor, scaleFactor, srcWidth / 2, srcHeight / 2);
   canvas.drawBitmap(logo, (srcWidth - logoWidth) / 2, (srcHeight - logoHeight) / 2, null);

   canvas.save(Canvas.ALL_SAVE_FLAG);
   canvas.restore();
  } catch (Exception e) {
   bitmap = null;
   e.getStackTrace();
  }

  return bitmap;
 }
③創建二維碼文件存儲目錄
private static String getFileRoot(Context context) {
  if (Environment.getExternalStorageState().equals(Environment.MEDIA_MOUNTED)) {
   File external = context.getExternalFilesDir(null);
   if (external != null) {
    return external.getAbsolutePath();
   }
  }

  return context.getFilesDir().getAbsolutePath();
 }
④創建數據庫工具類來存儲臨時數據
public class SPUtil {

 private static final String CONFIG = "config";

 /**
  * 獲取SharedPreferences實例對象
  *
  * @param fileName
  */
 private static SharedPreferences getSharedPreference(String fileName) {
  return QRCodeApplication.getInstance().getSharedPreferences(fileName, Context.MODE_PRIVATE);
 }

 /**
  * 保存一個String類型的值!
  */
 public static void putString(String key, String value) {
  SharedPreferences.Editor editor = getSharedPreference(CONFIG).edit();
  editor.putString(key, value).apply();
 }

 /**
  * 獲取String的value
  */
 public static String getString(String key, String defValue) {
  SharedPreferences sharedPreference = getSharedPreference(CONFIG);
  return sharedPreference.getString(key, defValue);
 }

}
⑤展示二維碼
public static void showThreadImage(final Activity mContext, final String text, final ImageView imageView, final int centerPhoto) {
  String preContent = SPUtil.getString("share_code_content", "");
  if (text.equals(preContent)) {
   String preFilePath = SPUtil.getString("share_code_filePath", "");
   imageView.setImageBitmap(BitmapFactory.decodeFile(preFilePath));

  } else {
   SPUtil.putString("share_code_content", text);
   final String filePath = getFileRoot(mContext) + File.separator + "qr_" + System.currentTimeMillis() + ".jpg";
   SPUtil.putString("share_code_filePath", filePath);

   //二維碼圖片較大時,生成圖片、保存文件的時間可能較長,因此放在新線程中
   new Thread(new Runnable() {
    @Override
    public void run() {
     boolean success = QRCodeUtil.createQRImage(text, 800, 800, BitmapFactory.decodeResource(mContext.getResources(), centerPhoto),
       filePath);

     if (success) {
      mContext.runOnUiThread(new Runnable() {
       @Override
       public void run() {
        imageView.setImageBitmap(BitmapFactory.decodeFile(filePath));
       }
      });
     }
    }
   }).start();
  }
 }
構造一個輸入頁面的類,使用Bundle通過<key,value>傳值(后期會改為MVVM-DataBinding形式)
public class ContentActivity extends AppCompatActivity implements View.OnClickListener {

 private EditText etUrl;

 private Button btnConvert;

 @Override
 protected void onCreate(Bundle savedInstanceState) {
  super.onCreate(savedInstanceState);
  setContentView(R.layout.activity_content);

  initView();
 }

 private void initView() {
  etUrl = (EditText) findViewById(R.id.et_url);
  btnConvert = (Button) findViewById(R.id.btn_convert);

  btnConvert.setOnClickListener(this);

 }

 @Override
 public void onClick(View v) {
  switch (v.getId()) {
   case R.id.btn_convert:
    String str_url = "https://" + etUrl.getText().toString();
    Bundle bundle = new Bundle();
    bundle.putString("url", str_url);
    // 當輸入框為空時,提示用戶
    if (str_url.equals("https://")) {
     Toast.makeText(getApplicationContext(), "輸入框不能為空", Toast.LENGTH_SHORT).show();
    } else {
     Intent intent = new Intent(ContentActivity.this, MainActivity.class);
     intent.putExtras(bundle);
     startActivity(intent);
    }
    break;
   default:
    break;
  }
 }
}
將二維碼圖片展示在頁面上(后期會改為MVVM-DataBinding形式)
public class MainActivity extends AppCompatActivity {

 private ImageView iv;

// private String url = "http://weibo.com/cnwutianhao";

 @Override
 protected void onCreate(Bundle savedInstanceState) {
  super.onCreate(savedInstanceState);
  setContentView(R.layout.activity_main);

  String str_url = getIntent().getExtras().getString("url");

  iv = (ImageView) findViewById(R.id.iv_qrcode);

  QRCodeUtil.showThreadImage(this, str_url, iv, R.mipmap.ic_launcher);
 }
}
布局文件
①輸入頁面(后期會改為DataBinding形式)
<?xml version="1.0" encoding="utf-8"?> <RelativeLayout xmlns:android="http://schemas.android.com/apk/res/android" android:layout_width="match_parent" android:layout_height="match_parent" android:orientation="vertical" android:padding="10dp"> <EditText android:id="@+id/et_url" android:layout_width="match_parent" android:layout_height="50dp" android:layout_marginTop="100dp" android:hint="請輸入網址" android:inputType="textUri" /> <Button android:id="@+id/btn_convert" android:layout_width="wrap_content" android:layout_height="wrap_content" android:layout_alignParentBottom="true" android:layout_centerHorizontal="true" android:layout_marginBottom="20dp" android:text="轉換成二維碼" /> </RelativeLayout>
②二維碼展示頁面
<RelativeLayout xmlns:android="http://schemas.android.com/apk/res/android"
 xmlns:tools="http://schemas.android.com/tools"
 android:layout_width="match_parent"
 android:layout_height="match_parent"
 tools:context="com.tnnowu.android.qrcode.MainActivity">

 <ImageView
  android:id="@+id/iv_qrcode"
  android:layout_width="220dp"
  android:layout_height="220dp"
  android:layout_centerInParent="true"
  android:layout_marginTop="40dp"
  android:background="#FFFFFF" />

</RelativeLayout>
看完上述內容,是不是對Android中URL轉換成二維碼的實現方法有進一步的了解,如果還想學習更多內容,歡迎關注億速云行業資訊頻道。
免責聲明:本站發布的內容(圖片、視頻和文字)以原創、轉載和分享為主,文章觀點不代表本網站立場,如果涉及侵權請聯系站長郵箱:is@yisu.com進行舉報,并提供相關證據,一經查實,將立刻刪除涉嫌侵權內容。