您好,登錄后才能下訂單哦!
您好,登錄后才能下訂單哦!
這篇文章給大家分享的是有關Android如何實現使用手勢解鎖功能的內容。小編覺得挺實用的,因此分享給大家做個參考,一起跟隨小編過來看看吧。
Android手勢解鎖
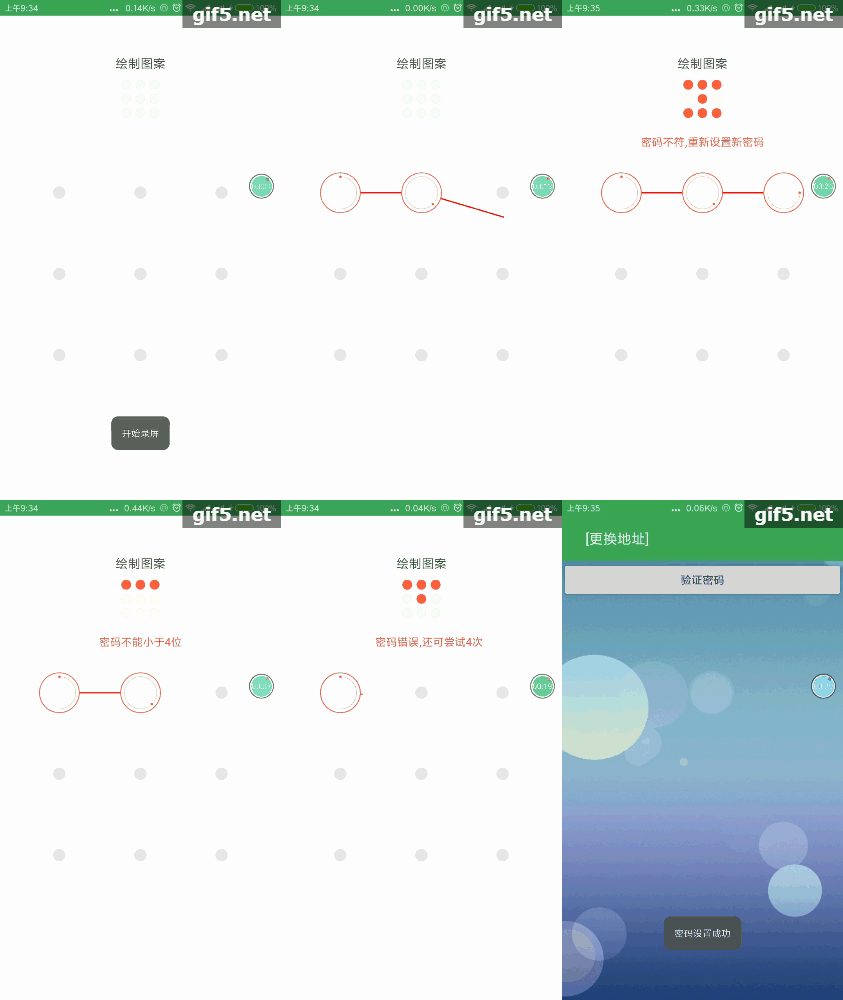
先來一波效果效果展示:

手勢解鎖效果
今天給大家介紹的是本人良心制作的一個手勢解鎖開源庫,大家有什么建議和想法都可以發到我的郵箱: diosamolee2014@gmail.com 或者評論,我會為大家提供我力所能及的幫助!
GitHub地址:
https://github.com/Diosamo/Gesture_Lock
添加依賴:
添加的gradle
第一步:
Add it in your root build.gradle at the end of repositories:
repositories {
 maven {  url "https://dl.bintray.com/freecoders/GestureLock"
 }
}
第二步:
Step 2. Add the dependency

dependencies {
   compile 'com.gesturelock:GestureLock:1.0'
}
布局使用:
下面是我測試時寫的完整的所有布局:(懶人直接copy)
<?xml version="1.0" encoding="utf-8"?>
<RelativeLayout
 xmlns:android="http://schemas.android.com/apk/res/android"
 xmlns:app="http://schemas.android.com/apk/res-auto"
 android:background="#ffffff"
 android:layout_width="match_parent"
 android:layout_height="match_parent"
 android:gravity="center"
 >
 <LinearLayout
  android:layout_width="match_parent"
  android:layout_height="match_parent"
  android:orientation="vertical"
  android:gravity="center_horizontal"
  android:padding="50dp">
  <TextView
   android:textColor="#434242"
   android:layout_width="wrap_content"
   android:layout_height="wrap_content"
   android:textSize="16sp"
   android:text="繪制圖案"
   android:paddingBottom="10dp"/>
  <com.gestruelock.IndicatorLockView
   android:id="@+id/lockviewIndicator"
   android:layout_width="wrap_content"
   android:layout_height="wrap_content"
   app:indicator_selected="@drawable/indicator_selected"
   app:indicator_unselected="@drawable/indicator_unselected"
   android:layout_gravity="center_horizontal"/>
  <TextView
   android:id="@+id/tvMessage"
   android:layout_width="wrap_content"
   android:layout_height="wrap_content"
   android:textSize="14sp"
   android:text=""
   android:paddingTop="20dp"
   />
  <RelativeLayout
   android:id="@+id/rl"
   android:layout_width="wrap_content"
   android:layout_height="wrap_content"
   android:paddingTop="30dp"
   >
   <com.gestruelock.ExpandLockView
    android:id="@+id/lockviewExpand"
    android:layout_width="280dp"
    android:layout_height="280dp"
    app:lock_selected1="@drawable/gusture_icon_left"
    app:lock_selected2="@drawable/gusture_icon_center"
    app:lock_selected3="@drawable/gusture_icon_right"
    app:lock_trackColor="#ff0432"
    app:lock_selected_error="@drawable/circle_error"
    app:lock_unselected="@drawable/gusture_icon_default"
    android:layout_gravity="center_horizontal"/>
  </RelativeLayout>
 </LinearLayout>
</RelativeLayout>
到這里小伙伴直接運行,就可以看到手勢解鎖的布局,大家也可以根據自己的需求去改變這個xml.
com.gestruelock.IndicatorLockView : 路徑顯示圖,小的九個點
com.gestruelock.ExpandLockView: 手勢解鎖的九宮格
使用配置:
下面的代碼是在Activity中直接使用的代碼:(懶人直接copy)
public class MainActivity extends AppCompatActivity implements ExpandLockView.OnLockPanelListener, ExpandLockView.OnUpdateIndicatorListener, ExpandLockView.OnUpdateMessageListener, ExpandLockView.OnFinishDrawPasswordListener {
 private ExpandLockView mLockviewExpand;
 private IndicatorLockView lockviewIndicator;
 private TextView tvMessage;
 private Animation mShakeAnimal;
 private Vibrator mVibrator;
 //返回信息如果是正確的
 private String succeeMsg="再次輸入密碼,密碼已設置,密碼正確,密碼正確,請輸入新密碼";
 @Override
 protected void onCreate(Bundle savedInstanceState) {
  super.onCreate(savedInstanceState);
  setContentView(R.layout.activity_main);
   mLockviewExpand = (ExpandLockView) findViewById(R.id.lockviewExpand);
  tvMessage = (TextView) findViewById(R.id.tvMessage);
  lockviewIndicator = (IndicatorLockView) findViewById(R.id.lockviewIndicator);
  mVibrator =(Vibrator)getApplication().getSystemService(Service.VIBRATOR_SERVICE); //震動
//  mLockviewExpand.getPaintL().setStrokeWidth(20); //獲取paint 修改連接線段的樣式
//  mLockviewExpand.setLock_trackColor(0xff0000); //給路徑設置不同顏色
  //加載動畫資源文件
  mShakeAnimal = AnimationUtils.loadAnimation(this, R.anim.shake);
  mLockviewExpand.setActionMode(0);//set mode 設置手勢密碼
//  mLockviewExpand.setActionMode(1);//set mode 驗證手勢密碼
//  mLockviewExpand.setActionMode(2);//set mode 更換手勢密碼
//  mLockviewExpand.setHiddenTrack(true); //隱藏軌跡和按鈕
  mLockviewExpand.setShowError(true); //顯示失敗視圖
//  mLockviewExpand.setLockTime(2);//設置顯示的鎖住的時間
  //設置各種回調事件
  mLockviewExpand.setOnLockPanelListener(this);
  mLockviewExpand.setOnUpdateIndicatorListener(this);
  mLockviewExpand.setOnUpdateMessageListener(this);
  mLockviewExpand.setOnFinishDrawPasswordListener(this);
 }
 @Override
 public void initData() {
 }
 //密碼盤被鎖住發生的回調
 @Override
 public void onLockPanel() {
 }
 //更新小點顯示圖
 @Override
 public void onUpdateIndicator() {
  if (mLockviewExpand.getPointTrace().size() > 0) {
   lockviewIndicator.setPath(mLockviewExpand.getPointTrace());
  }
 }
 //返回信息如果是正確的
 @Override
 public void onUpdateMessage(String message) {
  if (succeeMsg.contains(message)){
   tvMessage.setTextColor(0xff434242);//設置提示文字顏色
  }else {//Error
   tvMessage.setTextColor(0xffe44d4d);
   tvMessage.startAnimation(mShakeAnimal); //動畫效果
  }
  tvMessage.setText(message);
 }
 //vibration 震動對應的接口
 @Override
 public void vibration(String time) {
  if ("long".equals(time)){
   mVibrator.vibrate(new long[]{50,200},-1);//長震動
  }else {
   mVibrator.vibrate(new long[]{50,50},-1);//震動
  }
 }
 //設置密碼成功
 @Override
 public void onSetPassword() {
  Toast.makeText(mContext, "密碼設置成功", Toast.LENGTH_SHORT).show();
  finish();
 }
 //解開密碼鎖成功
 @Override
 public void onOpenLock() {
  Toast.makeText(mContext, "成功解鎖", Toast.LENGTH_SHORT).show();
  finish();
 }
 /* 禁止返回按鈕的點擊 */
 @Override
 public boolean onKeyDown(int keyCode, KeyEvent event) {
  if (keyCode == KeyEvent.KEYCODE_BACK && event.getAction()== KeyEvent.ACTION_DOWN &&activityNum == 0) {
   return true;
  } else {
   return super.onKeyDown(keyCode, event);
  }
 }
}
手勢解鎖一共有3種模式,對應設置密碼,驗證密碼,修改密碼:
mLockviewExpand.setActionMode(0);//set mode 設置手勢密碼
mLockviewExpand.setActionMode(1);//set mode 驗證手勢密碼
mLockviewExpand.setActionMode(2);//set mode 更換手勢密碼
對應回調接口設置:
mLockviewExpand.setOnLockPanelListener(this);// 手勢解鎖次數超出后,鎖定解鎖的回調
 mLockviewExpand.setOnUpdateIndicatorListener(this);//手勢完成后的回調,設置上面的路徑顯示圖
 mLockviewExpand.setOnUpdateMessageListener(this);//手勢完成后,返回提示的信息
 mLockviewExpand.setOnFinishDrawPasswordListener(this);//手勢解鎖成功,密碼設置成功的回調
其他配置:
mLockviewExpand.getPaintL().setStrokeWidth(20); //獲取paint 修改連接線段的樣式
mLockviewExpand.setLock_trackColor(0xff0000); //給路徑設置不同顏色
mLockviewExpand.setHiddenTrack(true); //隱藏軌跡和按鈕
mLockviewExpand.setShowError(true); //顯示失敗視圖
mLockviewExpand.setLockTime(2);//設置顯示的鎖住的時間
xml配置(com.gestruelock.ExpandLockView 只針對這個控件):
圖片的指定就是在這里,可以設置左邊,中間和右邊的圖片,如果一樣就全部指定同一張圖片,庫里面自帶上面圖片顯示效果的圖片資源!
app:lock_selected1="@drawable/left" //設置最左邊圖片
 app:lock_selected2="@drawable/center" //設置最中間圖片
 app:lock_selected3="@drawable/right" //設置最右邊圖片
 app:lock_trackColor="#04ff9b"  //設置軌跡顏色 app:lock_selected_error="@drawable/circle_error" //設置錯誤圖片
app:lock_unselected="@drawable/gusture_icon_default" //設置未選中圖片
感謝各位的閱讀!關于“Android如何實現使用手勢解鎖功能”這篇文章就分享到這里了,希望以上內容可以對大家有一定的幫助,讓大家可以學到更多知識,如果覺得文章不錯,可以把它分享出去讓更多的人看到吧!
免責聲明:本站發布的內容(圖片、視頻和文字)以原創、轉載和分享為主,文章觀點不代表本網站立場,如果涉及侵權請聯系站長郵箱:is@yisu.com進行舉報,并提供相關證據,一經查實,將立刻刪除涉嫌侵權內容。