您好,登錄后才能下訂單哦!
您好,登錄后才能下訂單哦!
本文介紹了android開發修改狀態欄背景色和圖標顏色的示例,分享給大家,具體如下:
修改狀態欄背景色和圖標顏色
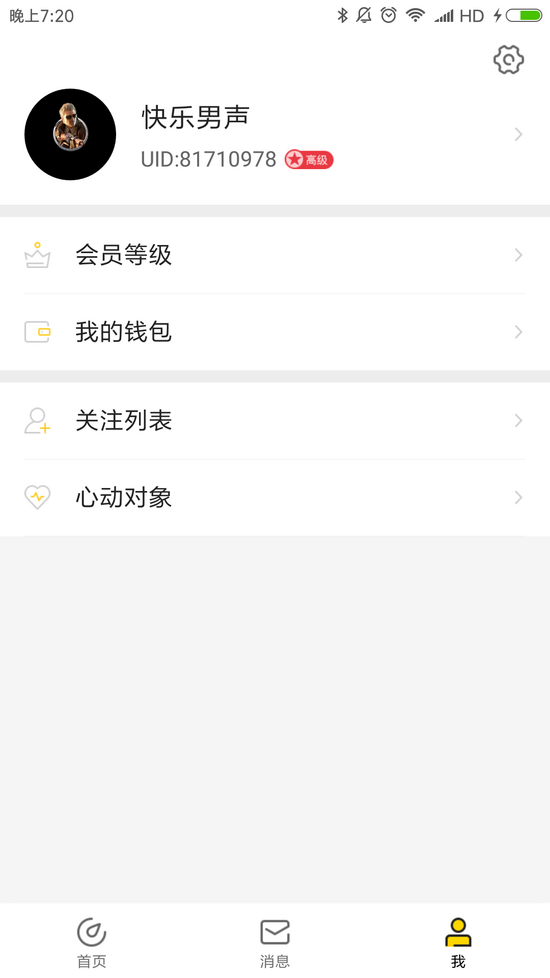
默認是黑底白字的,現在要改為白底黑字的
先看下效果圖:

1、狀態欄背景是白色: 在style中設置
<item name="colorPrimaryDark">@color/white</item>
2、寫修改狀態欄圖標的顏色(暫時只知道黑色和白色)
public class StatusBarUtil {
/**
 * 修改狀態欄為全透明
 * @param activity
 */
@TargetApi(19)
public static void transparencyBar(Activity activity){
 if(Build.VERSION.SDK_INT >= Build.VERSION_CODES.LOLLIPOP) {
 Window window = activity.getWindow();
 window.clearFlags(WindowManager.LayoutParams.FLAG_TRANSLUCENT_STATUS);
 window.getDecorView().setSystemUiVisibility(View.SYSTEM_UI_FLAG_LAYOUT_FULLSCREEN
  | View.SYSTEM_UI_FLAG_LAYOUT_STABLE);
 window.addFlags(WindowManager.LayoutParams.FLAG_DRAWS_SYSTEM_BAR_BACKGROUNDS);
 window.setStatusBarColor(Color.TRANSPARENT);

 } else
 if (Build.VERSION.SDK_INT >= Build.VERSION_CODES.KITKAT) {
 Window window =activity.getWindow();
 window.setFlags(WindowManager.LayoutParams.FLAG_TRANSLUCENT_STATUS,
  WindowManager.LayoutParams.FLAG_TRANSLUCENT_STATUS);
 }


}

/**
 * 修改狀態欄顏色,支持4.4以上版本
 * @param activity
 * @param colorId
 */
public static void setStatusBarColor(Activity activity,int colorId) {

 if (Build.VERSION.SDK_INT >= Build.VERSION_CODES.LOLLIPOP) {
 Window window = activity.getWindow();
  //window.addFlags(WindowManager.LayoutParams.FLAG_DRAWS_SYSTEM_BAR_BACKGROUNDS);
 //window.getDecorView().setSystemUiVisibility( View.SYSTEM_UI_FLAG_LIGHT_STATUS_BAR);
 window.setStatusBarColor(activity.getResources().getColor(colorId));

 } else if (Build.VERSION.SDK_INT >= Build.VERSION_CODES.KITKAT) {
 //使用SystemBarTint庫使4.4版本狀態欄變色,需要先將狀態欄設置為透明
 transparencyBar(activity);
 SystemBarTintManager tintManager = new SystemBarTintManager(activity);
 tintManager.setStatusBarTintEnabled(true);
 tintManager.setStatusBarTintResource(colorId);
 }
}

/**
 *狀態欄亮色模式,設置狀態欄黑色文字、圖標,
 * 適配4.4以上版本MIUIV、Flyme和6.0以上版本其他Android
 * @param activity
 * @return 1:MIUUI 2:Flyme 3:android6.0
 */
public static int statusBarLightMode(Activity activity){
 int result=0;
 if (Build.VERSION.SDK_INT >= Build.VERSION_CODES.KITKAT) {
 if(MIUISetStatusBarLightMode(activity, true)){
  result=1;
 }else if(FlymeSetStatusBarLightMode(activity.getWindow(), true)){
  result=2;
 }else {
  activity.getWindow().getDecorView().setSystemUiVisibility( View.SYSTEM_UI_FLAG_LAYOUT_FULLSCREEN|View.SYSTEM_UI_FLAG_LIGHT_STATUS_BAR);
  result=3;
 }
 }
 return result;
}

/**
 * 設置狀態欄圖標為深色和魅族特定的文字風格
 * 可以用來判斷是否為Flyme用戶
 * @param window 需要設置的窗口
 * @param dark 是否把狀態欄文字及圖標顏色設置為深色
 * @return boolean 成功執行返回true
 *
 */
public static boolean FlymeSetStatusBarLightMode(Window window, boolean dark) {
 boolean result = false;
 if (window != null) {
 try {
  WindowManager.LayoutParams lp = window.getAttributes();
  Field darkFlag = WindowManager.LayoutParams.class
   .getDeclaredField("MEIZU_FLAG_DARK_STATUS_BAR_ICON");
  Field meizuFlags = WindowManager.LayoutParams.class
   .getDeclaredField("meizuFlags");
  darkFlag.setAccessible(true);
  meizuFlags.setAccessible(true);
  int bit = darkFlag.getInt(null);
  int value = meizuFlags.getInt(lp);
  if (dark) {
  value |= bit;
  } else {
  value &= ~bit;
  }
  meizuFlags.setInt(lp, value);
  window.setAttributes(lp);
  result = true;
 } catch (Exception e) {

 }
 }
 return result;
}

/**
 * 需要MIUIV6以上
 * @param activity
 * @param dark 是否把狀態欄文字及圖標顏色設置為深色
 * @return boolean 成功執行返回true
 *
 */
public static boolean MIUISetStatusBarLightMode(Activity activity, boolean dark) {
 boolean result = false;
 Window window=activity.getWindow();
 if (window != null) {
 Class clazz = window.getClass();
 try {
  int darkModeFlag = 0;
  Class layoutParams = Class.forName("android.view.MiuiWindowManager$LayoutParams");
  Field field = layoutParams.getField("EXTRA_FLAG_STATUS_BAR_DARK_MODE");
  darkModeFlag = field.getInt(layoutParams);
  Method extraFlagField = clazz.getMethod("setExtraFlags", int.class, int.class);
  if(dark){
  extraFlagField.invoke(window,darkModeFlag,darkModeFlag);//狀態欄透明且黑色字體
  }else{
  extraFlagField.invoke(window, 0, darkModeFlag);//清除黑色字體
  }
  result=true;

  if (Build.VERSION.SDK_INT >= Build.VERSION_CODES.M) {
  //開發版 7.7.13 及以后版本采用了系統API,舊方法無效但不會報錯,所以兩個方式都要加上
  if(dark){
   activity.getWindow().getDecorView().setSystemUiVisibility( View.SYSTEM_UI_FLAG_LAYOUT_FULLSCREEN| View.SYSTEM_UI_FLAG_LIGHT_STATUS_BAR);
  }else {
   activity.getWindow().getDecorView().setSystemUiVisibility(View.SYSTEM_UI_FLAG_VISIBLE);
  }
  }
 }catch (Exception e){

 }
 }
 return result;
}}
上面代碼是https://www.jb51.net/article/125520.htm 上找到,具體可以去看看
3、具體引用列子在BaseActivity中
@Override
protected void onCreate(@Nullable Bundle savedInstanceState) {
 super.onCreate(savedInstanceState);
 ActivityUtils.add(this, getClass());
 mContext = this;
 StatusBarUtil.statusBarLightMode(this);
}
4、正常狀態欄已經改變
狀態欄是改變了,但你會看到整個activity布局都會上移充滿整個屏幕
解決方法1:在style中的AppTheme添加
<item name="android:fitsSystemWindows">true</item>
如果添加上面代碼布局下移了且不會影響到其他的東西。那就不用往下看了
android:fitsSystemWindows很坑,很多彈框的樣式都有問題
解決方法2:自己為每個布局添加paddingTop
LibUtils:
/**
 * 獲取狀態欄高度
 * @return
 */
public static int getStatusBarHeight(Context context) {
 int result = 0;
 int resourceId = context.getResources().getIdentifier("status_bar_height", "dimen", "android");
 if (resourceId > 0) {
  result = context.getResources().getDimensionPixelSize(resourceId);
 }
 return result;
}

//設置布局距離狀態欄高度
public static void setLayoutPadding(Activity activity, View contentLayout) {
 if (Build.VERSION.SDK_INT >= Build.VERSION_CODES.KITKAT) {
  contentLayout
    .setPadding(contentLayout.getPaddingLeft(), getStatusBarHeight(activity) + contentLayout.getPaddingTop(),
      contentLayout.getPaddingRight(), contentLayout.getPaddingBottom());
 }
}
引用地方:
protected void onCreate(@NonNull Bundle savedInstanceState, int resId, int titleId) {
 super.onCreate(savedInstanceState);
 mContext = this;
 setContentView(R.layout.activity_base);
 StatusBarUtil.statusBarLightMode(this);
 LibUtils.setLayoutPadding(this,((ViewGroup)findViewById(android.R.id.content)).getChildAt(0));}
注:LibUtils.setLayoutPadding調用要做setContentView后面,android.R.id.content是獲取每個布局的根布局,不理解自行百度
還要考慮android版本的問題,一般5.0下的系統還是用默認的
以上就是本文的全部內容,希望對大家的學習有所幫助,也希望大家多多支持億速云。
免責聲明:本站發布的內容(圖片、視頻和文字)以原創、轉載和分享為主,文章觀點不代表本網站立場,如果涉及侵權請聯系站長郵箱:is@yisu.com進行舉報,并提供相關證據,一經查實,將立刻刪除涉嫌侵權內容。