您好,登錄后才能下訂單哦!
您好,登錄后才能下訂單哦!
這篇文章將為大家詳細講解有關Android編程怎么實現在自定義對話框中獲取EditText數據,小編覺得挺實用的,因此分享給大家做個參考,希望大家閱讀完這篇文章后可以有所收獲。
在項目中忽然遇到這樣的問題,需要自定義對話框,對話框需要有一個輸入框,以便修改所選中的價格,然后點擊確定之后,修改所顯示的價格。遇到的最大的問題就是如何能夠獲取到自定義對話框當中edittext輸入的數值,百度了很久,看到的答案都是如下:
//得到自定義對話框
final View DialogView = a .inflate ( R.layout.loand, null);
這是關鍵的代碼
//創建對話框
AlertDialog dlg = new AlertDialog.Builder(loand.this)
.setTitle("登錄框")
.setView(DialogView)//設置自定義對話框的樣式
.setPositiveButton("登陸", //設置"確定"按鈕
new DialogInterface.OnClickListener() //設置事件監聽
{
  public void onClick(DialogInterface dialog, int whichButton)
  {
   editText1 =(EditText) DialogView.findViewById(R.id.editText1);
   editText2 =(EditText) DialogView.findViewById(R.id.editText2);
   String id = editText1.getText().toString();
   String password = editText2.getText().toString();
   //輸入完成后,點擊“確定”開始登陸
   c_log judge = new c_log();
   boolean b_judge = judge.aa(id,password);
   if(b_judge){
   bar();
   }else{
//加東西
   DisplayToast("NO");
   }
  }
})
上述方法對于使用系統自帶的alertdialog來說,的確是沒有問題,能夠取到你輸入的edittext的值,但對于自定義的alertdialog來說,就會始終拿到的是空的,我的解決方案是在自定義alertdialog里面取到edittext并且實例化,避免在activity里面進行初始化,步驟如下:
1.主要的activity主類代碼:
package client.verbank.mtp.allone.frame.systemsettings;
import android.app.AlertDialog;
import android.content.DialogInterface;
import android.content.Intent;
import android.os.Bundle;
import android.os.Handler;
import android.view.LayoutInflater;
import android.view.View;
import android.view.View.OnClickListener;
import android.view.ViewGroup;
import android.widget.CompoundButton;
import android.widget.CompoundButton.OnCheckedChangeListener;
import android.widget.TextView;
import android.widget.ToggleButton;
import client.verbank.mtp.allone.R;
import client.verbank.mtp.allone.component.CustomDialogPriceModify;
import client.verbank.mtp.allone.consts.IBundleCommData;
import client.verbank.mtp.allone.consts.ISystemCommData;
import client.verbank.mtp.allone.frame.ControlFragment;
import client.verbank.mtp.allone.frame.MainActivity;
import client.verbank.mtp.allone.frame.systemsettings.nextpage.ChangePasswordActivity;
import client.verbank.mtp.allone.frame.systemsettings.nextpage.ChangePhonePinActivity;
import client.verbank.mtp.allone.frame.systemsettings.nextpage.ChooseRssActivity;
import client.verbank.mtp.allone.frame.systemsettings.nextpage.SelectInstrumentActivity;
import client.verbank.mtp.allone.util.SharepreferencesUtilSystemSettings;
/**
 * 系統設置界面
 *
 * @Project: FEIB_AndroidStation
 * @Title: SystemSettingsFragment.java
 * @Package client.verbank.mtp.allone.frame.systemsettings
 * @Description: TODO
 * @author qiulinhe qiu.linhe@allone.cn
 * @date 2015年9月29日 上午11:48:53
 * @Copyright: 2015 www.allone.cn Inc. All rights reserved.
 * @version V3.0.0
 */
public class SystemSettingsFragment extends ControlFragment implements
    ISystemCommData {
  // 四組需要打鉤的textview初始化
  private TextView currencypairs;
  private TextView openpositionprice;
  private TextView floatingprofit;
  private TextView dealtime;
  private TextView ordercurrencypairs;
  private TextView pricehighend;
  private TextView priceendhigh;
  private TextView summarycurrencypairs;
  private TextView summaryfloatingprofit;
  private TextView riseandfall;
  private TextView applies;
  // 三個自定義輸入金額
  private TextView inputamount2;
  private TextView inputamount5;
  private TextView inputamount10;
  // 跳轉到下一個頁面的4個textview,貨幣對選擇、密碼修改、憑證密碼修改、RSS源選擇
  private TextView Currencyofchoice;
  private TextView changepassword;
  private TextView changecertificatepassword;
  private TextView rsssource;
  ToggleButton mosthightoggle;
  ToggleButton mostlowtoggle;
  ToggleButton riseandfallmenutoggle;
  ToggleButton pricetimetoggle;
  View layout;
  // EditText price;
  AlertDialog dlg;
  int flagprice = 0;
  private Handler handler = new Handler();
  public SystemSettingsFragment(MainActivity activity) {
    super(activity);
  }
  @Override
  public View onCreateView(LayoutInflater inflater, ViewGroup container,
      Bundle savedInstanceState) {
    View vi = inflater.inflate(R.layout.system_settings, container, false);
    // 價格修改彈出對話框
    layout = inflater.inflate(
        R.layout.activity_systemsettings_pricecustom_dialog,
        (ViewGroup) vi.findViewById(R.id.dialog));
  //。。。。。。。。。。省略了部分代碼,因為是公司項目的。。。。。。。。。。。。。。
  // 三個自定義金額的監聽事件
  private void selfThreeMoneyLister(View vi) {
    inputamount2.setOnClickListener(new OnClickListener() {
      @Override
      public void onClick(View v) {
        modifyPriceDialog();
        flagprice = 1;
      }
    });
    inputamount5.setOnClickListener(new OnClickListener() {
      @Override
      public void onClick(View v) {
        modifyPriceDialog();
        flagprice = 2;
      }
    });
    inputamount10.setOnClickListener(new OnClickListener() {
      @Override
      public void onClick(View v) {
        modifyPriceDialog();
        flagprice = 3;
      }
    });
  }
  // 點擊價格,彈出編輯框,對價格進行修改
  private void modifyPriceDialog() {
    LayoutInflater factory = LayoutInflater.from(getActivity());
    final View DialogView = factory.inflate(
        R.layout.activity_systemsettings_pricecustom_dialog, null);
    final CustomDialogPriceModify.Builder builder = new CustomDialogPriceModify.Builder(
        getActivity());
    builder.setTitle("價格修改");
    builder.setPositiveButton(R.string.confirm,
        new DialogInterface.OnClickListener() {
          @Override
          public void onClick(DialogInterface dialog, int which) {
            // 獲取edittext的值
            String priceStr = builder.getPrice();//關鍵代碼,getPrice放在自定義的alertdialog類里面,進行初始化
            if (flagprice == 1) {
              inputamount2.setText(priceStr);
              SharepreferencesUtilSystemSettings.putValue(
                  getActivity(), System_key_SelfAmout2,
                  priceStr);
            } else if (flagprice == 2) {
              inputamount5.setText(priceStr);
              SharepreferencesUtilSystemSettings.putValue(
                  getActivity(), System_key_SelfAmout5,
                  priceStr);
            } else {
              inputamount10.setText(priceStr);
              SharepreferencesUtilSystemSettings.putValue(
                  getActivity(), System_key_SelfAmout10,
                  priceStr);
            }
            // price.setText("");
            /**
             * 取得view的父組件,然后移除view
             */
            dialog.dismiss();
          }
        });
    builder.setNegativeButton(R.string.cancel,
        new android.content.DialogInterface.OnClickListener() {
          @Override
          public void onClick(DialogInterface dialog, int which) {
            // TODO Auto-generated method stub
            // ((ViewGroup) layout.getParent()).removeView(layout);
            dialog.dismiss();
          }
        });
    builder.create().show();
  }
}
2.自定義alertdialog類,CustomDialogPriceModify.java,如下:
package client.verbank.mtp.allone.component;
import android.app.Dialog;
import android.content.Context;
import android.content.DialogInterface;
import android.view.LayoutInflater;
import android.view.View;
import android.view.ViewGroup.LayoutParams;
import android.widget.Button;
import android.widget.EditText;
import android.widget.TextView;
import client.verbank.mtp.allone.R;
/**
 * 系統設定中修改價格的彈出對話窗口
 *
 * @author wangyubo
 *
 */
public class CustomDialogPriceModify extends Dialog {
  public CustomDialogPriceModify(Context context) {
    super(context);
  }
  public CustomDialogPriceModify(Context context, int theme) {
    super(context, theme);
  }
  public static class Builder {
    private Context context;
    private String title;
    private float textSize;
    private String message;
    private String positiveButtonText;
    private String negativeButtonText;
    private View contentView;
    private EditText priceText;
    private DialogInterface.OnClickListener positiveButtonClickListener;
    private DialogInterface.OnClickListener negativeButtonClickListener;
    public Builder(Context context) {
      this.context = context;
    }
    public Builder setMessage(String message) {
      this.message = message;
      return this;
    }
    public Builder setMessage(String message, float textSize) {
      this.message = message;
      this.textSize = textSize;
      return this;
    }
    /**
     * Set the Dialog message from resource
     *
     * @param title
     * @return
     */
    public Builder setMessage(int message) {
      this.message = (String) context.getText(message);
      return this;
    }
    /**
     * Set the Dialog title from resource
     *
     * @param title
     * @return
     */
    public Builder setTitle(int title) {
      this.title = (String) context.getText(title);
      return this;
    }
    /**
     * Set the Dialog title from String
     *
     * @param title
     * @return
     */
    public Builder setTitle(String title) {
      this.title = title;
      return this;
    }
    public Builder setContentView(View v) {
      this.contentView = v;
      return this;
    }
    /**
     * Set the positive button resource and it's listener
     *
     * @param positiveButtonText
     * @return
     */
    public Builder setPositiveButton(int positiveButtonText,
        DialogInterface.OnClickListener listener) {
      this.positiveButtonText = (String) context
          .getText(positiveButtonText);
      this.positiveButtonClickListener = listener;
      return this;
    }
    //關鍵代碼
    public String getPrice() {
      return priceText.getText().toString();
    }
    public Builder setPositiveButton(String positiveButtonText,
        DialogInterface.OnClickListener listener) {
      this.positiveButtonText = positiveButtonText;
      this.positiveButtonClickListener = listener;
      return this;
    }
    public Builder setNegativeButton(int negativeButtonText,
        DialogInterface.OnClickListener listener) {
      this.negativeButtonText = (String) context
          .getText(negativeButtonText);
      this.negativeButtonClickListener = listener;
      return this;
    }
    public Builder setNegativeButton(String negativeButtonText,
        DialogInterface.OnClickListener listener) {
      this.negativeButtonText = negativeButtonText;
      this.negativeButtonClickListener = listener;
      return this;
    }
    public CustomDialogPriceModify create() {
      LayoutInflater inflater = (LayoutInflater) context
          .getSystemService(Context.LAYOUT_INFLATER_SERVICE);
      // instantiate the dialog with the custom Theme
      final CustomDialogPriceModify dialog = new CustomDialogPriceModify(
          context, R.style.Dialog);
      dialog.setCanceledOnTouchOutside(false);
      dialog.setCancelable(false);
      View layout = inflater.inflate(
          R.layout.activity_systemsettings_pricecustom_dialog, null);
      dialog.addContentView(layout, new LayoutParams(
          LayoutParams.FILL_PARENT, LayoutParams.WRAP_CONTENT));
      // set the dialog title
      ((TextView) layout.findViewById(R.id.title)).setText(title);
      priceText = (EditText) layout.findViewById(R.id.price);
      //對edittext進行初始化,關鍵代碼
      if (positiveButtonText != null) {
        ((Button) layout.findViewById(R.id.positiveButton))
            .setText(positiveButtonText);
        if (positiveButtonClickListener != null) {
          ((Button) layout.findViewById(R.id.positiveButton))
              .setOnClickListener(new View.OnClickListener() {
                @Override
                public void onClick(View v) {
                  positiveButtonClickListener.onClick(dialog,
                      DialogInterface.BUTTON_POSITIVE);
                }
              });
        }
      } else {
        // if no confirm button just set the visibility to GONE
        layout.findViewById(R.id.positiveButton).setVisibility(
            View.GONE);
      }
      // set the cancel button
      if (negativeButtonText != null) {
        ((Button) layout.findViewById(R.id.negativeButton))
            .setText(negativeButtonText);
        if (negativeButtonClickListener != null) {
          ((Button) layout.findViewById(R.id.negativeButton))
              .setOnClickListener(new View.OnClickListener() {
                @Override
                public void onClick(View v) {
                  negativeButtonClickListener.onClick(dialog,
                      DialogInterface.BUTTON_NEGATIVE);
                }
              });
        }
      } else {
        // if no confirm button just set the visibility to GONE
        layout.findViewById(R.id.negativeButton).setVisibility(
            View.GONE);
      }
      // set the content message
      if (message != null) {
        TextView msgView = (TextView) layout.findViewById(R.id.message);
        msgView.setText(message);
        if (textSize != 0) {
          msgView.setTextSize(textSize);
        }
      } else if (contentView != null) {
      }
      dialog.setContentView(layout);
      return dialog;
    }
  }
}
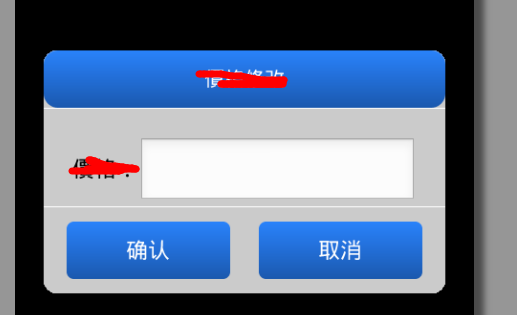
3.剩下的就是布局代碼,包括一些圓角的,如果需要的可以參考我之前的博文,就不貼代碼了。完成效果如下:

Android是一種基于Linux內核的自由及開放源代碼的操作系統,主要使用于移動設備,如智能手機和平板電腦,由美國Google公司和開放手機聯盟領導及開發。
關于“Android編程怎么實現在自定義對話框中獲取EditText數據”這篇文章就分享到這里了,希望以上內容可以對大家有一定的幫助,使各位可以學到更多知識,如果覺得文章不錯,請把它分享出去讓更多的人看到。
免責聲明:本站發布的內容(圖片、視頻和文字)以原創、轉載和分享為主,文章觀點不代表本網站立場,如果涉及侵權請聯系站長郵箱:is@yisu.com進行舉報,并提供相關證據,一經查實,將立刻刪除涉嫌侵權內容。