您好,登錄后才能下訂單哦!
您好,登錄后才能下訂單哦!
怎么在spring cloud中使用Eureka 實現服務治理?針對這個問題,這篇文章詳細介紹了相對應的分析和解答,希望可以幫助更多想解決這個問題的小伙伴找到更簡單易行的方法。
一、搭建服務注冊中心
先列出完整目錄結構:
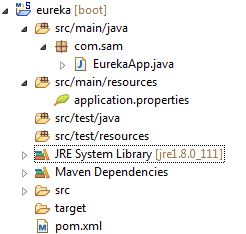
搭建過程如下:
1.創建maven工程:eureka(具體實現略)
2.修改pom文件,引入依賴
<project xmlns="http://maven.apache.org/POM/4.0.0"
 xmlns:xsi="http://www.w3.org/2001/XMLSchema-instance" xsi:schemaLocation="http://maven.apache.org/POM/4.0.0 http://maven.apache.org/xsd/maven-4.0.0.xsd">
 <modelVersion>4.0.0</modelVersion>
 <groupId>com.sam</groupId>
 <artifactId>eureka</artifactId>
 <version>0.0.1-SNAPSHOT</version>

 <parent>
  <groupId>org.springframework.boot</groupId>
  <artifactId>spring-boot-starter-parent</artifactId>
  <version>1.5.1.RELEASE</version>
 </parent>

 <properties>
  <javaVersion>1.8</javaVersion>
 </properties>
 <!-- 使用dependencyManagement進行版本管理 -->
 <dependencyManagement>
  <dependencies>
   <dependency>
    <groupId>org.springframework.cloud</groupId>
    <artifactId>spring-cloud-dependencies</artifactId>
    <version>Camden.SR6</version>
    <type>pom</type>
    <scope>import</scope>
   </dependency>
  </dependencies>
 </dependencyManagement>

 <dependencies>
  <!-- 引入eureka server依賴 -->
  <dependency>   <groupId>org.springframework.cloud</groupId>
   <artifactId>spring-cloud-starter-eureka-server</artifactId>
  </dependency>
 </dependencies>
</project>
3.創建啟動類
/**
 *
 * @EnableEurekaServer
 * 用來指定該項目為Eureka的服務注冊中心
 */
@EnableEurekaServer
@SpringBootApplication
public class EurekaApp {

 public static void main(String[] args) {
  SpringApplication.run(EurekaApp.class, args);
 }
}
4.配置application.properties文件
#設置tomcat服務端口號
server.port=1111
#設置服務名稱
spring.application.name=eureka-service

eureka.instance.hostname=localhost
#注冊中心不需要注冊自己
eureka.client.register-with-eureka=false
#注冊中心不需要去發現服務
eureka.client.fetch-registry=false
#設置服務注冊中心的URL
eureka.client.serviceUrl.defaultZone=http://${eureka.instance.hostname}:${server.port}/eureka
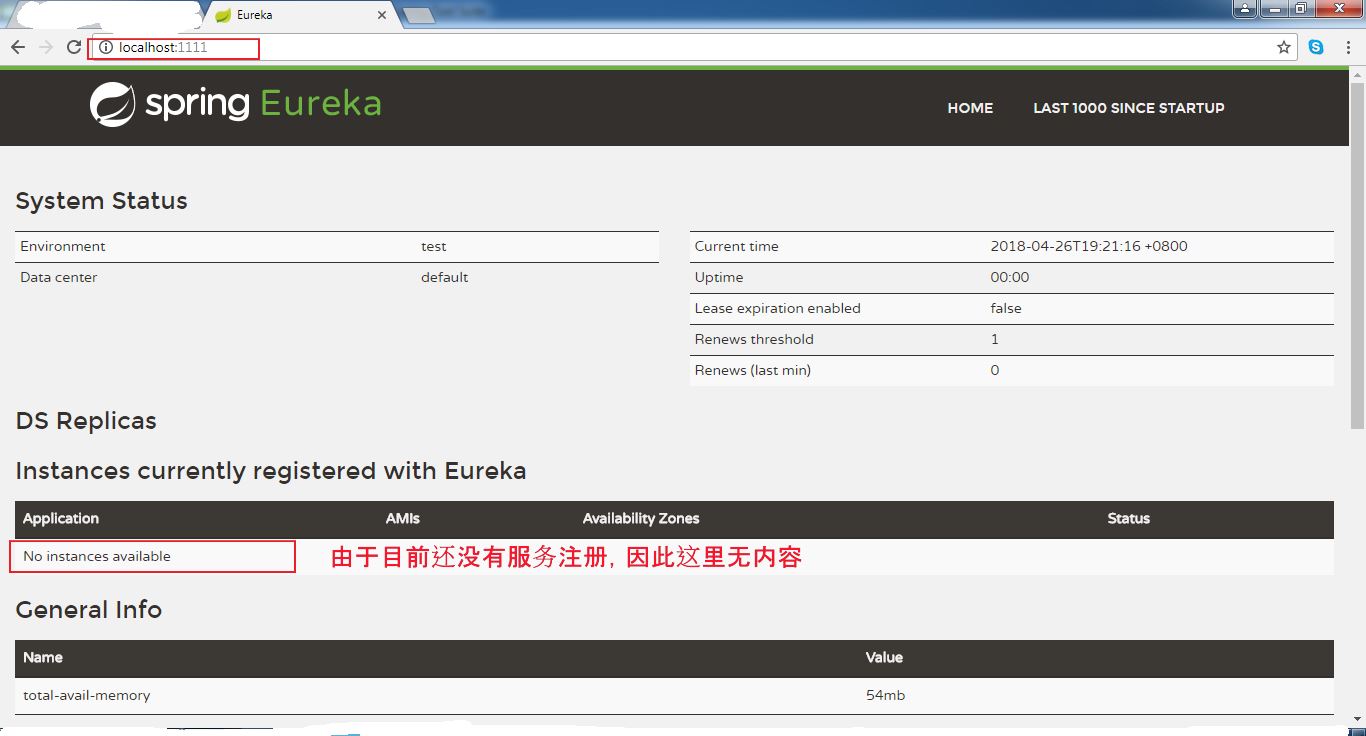
5.啟動服務并訪問,我們會看到這樣的畫面:
二、注冊服務提供者
先列出完整目錄結構:
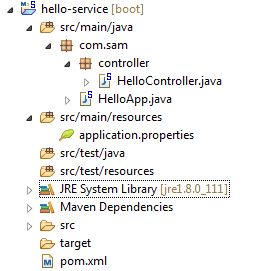
搭建過程如下:
1.創建maven工程:hello-service(具體實現略)
2.修改pom文件,引入依賴
<project xmlns="http://maven.apache.org/POM/4.0.0"
 xmlns:xsi="http://www.w3.org/2001/XMLSchema-instance" xsi:schemaLocation="http://maven.apache.org/POM/4.0.0 http://maven.apache.org/xsd/maven-4.0.0.xsd">
 <modelVersion>4.0.0</modelVersion>
 <groupId>com.sam</groupId>
 <artifactId>hello-service</artifactId>
 <version>0.0.1-SNAPSHOT</version>
 <parent>
  <groupId>org.springframework.boot</groupId>
  <artifactId>spring-boot-starter-parent</artifactId>
  <version>1.5.1.RELEASE</version>
 </parent>

 <properties>
  <javaVersion>1.8</javaVersion>
 </properties>

 <dependencyManagement>
  <dependencies>
   <dependency>
    <groupId>org.springframework.cloud</groupId>
    <artifactId>spring-cloud-dependencies</artifactId>
    <version>Camden.SR6</version>
    <type>pom</type>
    <scope>import</scope>
   </dependency>
  </dependencies>
 </dependencyManagement>

 <dependencies>
  <!-- 引入eureka 客戶端依賴 -->
  <dependency>
   <groupId>org.springframework.cloud</groupId>
   <artifactId>spring-cloud-starter-eureka</artifactId>
  </dependency>
 </dependencies>
</project>
3.創建啟動類
/***
 *
 * @EnableDiscoveryClient
 * 讓服務使用eureka服務器
 * 實現服務注冊和發現
 *
 */
@EnableDiscoveryClient
@SpringBootApplication
public class HelloApp {
 public static void main(String[] args) {
  SpringApplication.run(HelloApp.class, args);
 }
}
4.創建controller
@RestController
public class HelloController {

 Logger logger = LoggerFactory.getLogger(HelloController.class);

 @Autowired
 DiscoveryClient discoveryClient;

 @RequestMapping("/hello")
 public String hello() {
  ServiceInstance instance = discoveryClient.getLocalServiceInstance();
  //打印服務的服務id
  logger.info("*********" + instance.getServiceId());
  return "hello,this is hello-service";
 }
}
5.配置application.properties文件
server.port=9090
#設置服務名
spring.application.name=hello-service
#設置服務注冊中心的URL,本服務要向該服務注冊中心注冊自己
eureka.client.serviceUrl.defaultZone=http://localhost:1111/eureka
6.啟動并測試
1.)啟動后再hello-service的控制臺會有這種字樣(xxx代表你的PC名)
復制代碼 代碼如下:
Registered instance HELLO-SERVICE/xxx:hello-service:9090 with status UP (replication=false)
eureka的控制臺會打印出如下字樣(xxx代表你的PC名)
復制代碼 代碼如下:
Registered instance HELLO-SERVICE/xxx:hello-service:9090 with status UP (replication=false)
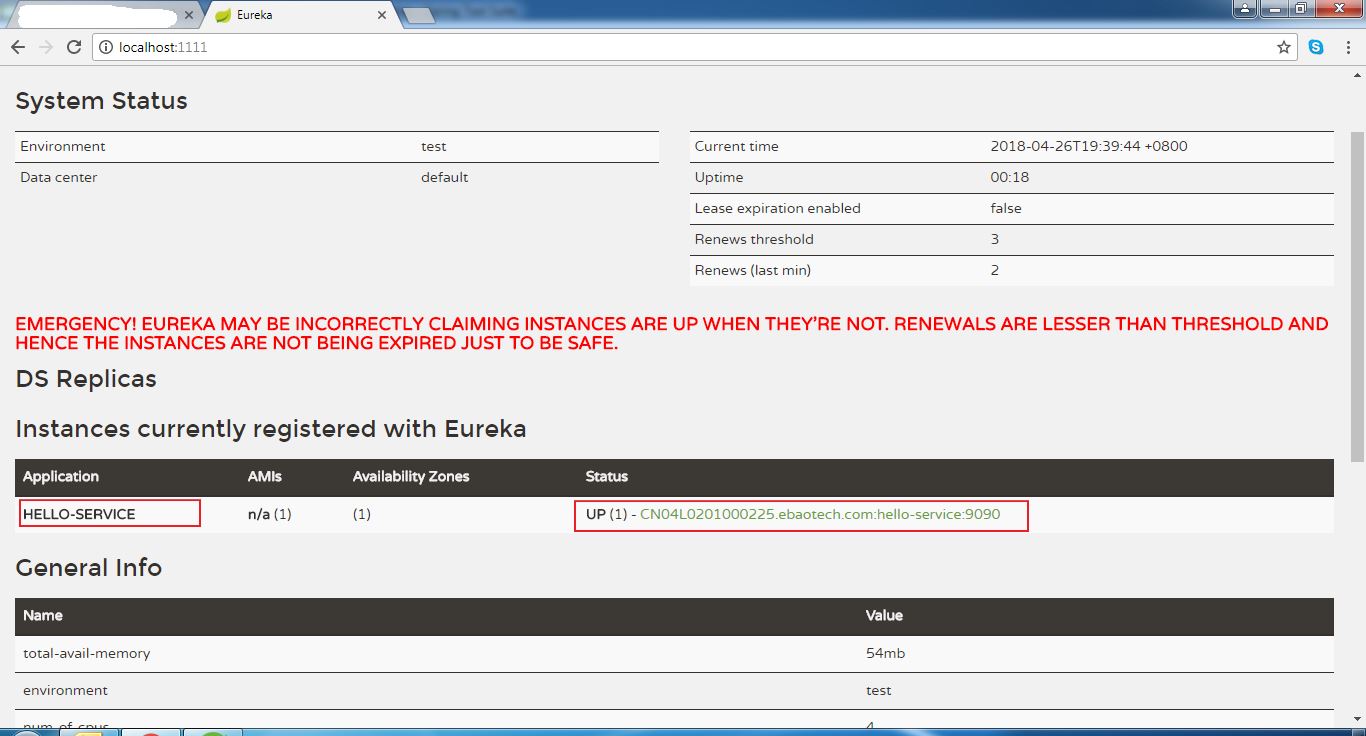
2.)再次訪問localhost:1111,會發現有服務注冊到注冊中心了
三、服務發現和消費
完整目錄結構如下:

搭建過程:
1.創建maven工程(具體實現略)
2.修改pom文件,引入依賴
<project xmlns="http://maven.apache.org/POM/4.0.0"
 xmlns:xsi="http://www.w3.org/2001/XMLSchema-instance"
 xsi:schemaLocation="http://maven.apache.org/POM/4.0.0 http://maven.apache.org/xsd/maven-4.0.0.xsd">
 <modelVersion>4.0.0</modelVersion>
 <groupId>com.sam</groupId>
 <artifactId>hello-consumer</artifactId>
 <version>0.0.1-SNAPSHOT</version>
 <parent>
  <groupId>org.springframework.boot</groupId>
  <artifactId>spring-boot-starter-parent</artifactId>
  <version>1.5.1.RELEASE</version>
 </parent>

 <properties>
  <javaVersion>1.8</javaVersion>
 </properties>

 <dependencyManagement>
  <dependencies>
   <dependency>
    <groupId>org.springframework.cloud</groupId>
    <artifactId>spring-cloud-dependencies</artifactId>
    <version>Camden.SR6</version>
    <type>pom</type>
    <scope>import</scope>
   </dependency>
  </dependencies>

 </dependencyManagement>

 <dependencies>
  <!-- 引入eureka 客戶端依賴 -->
  <dependency>
   <groupId>org.springframework.cloud</groupId>
   <artifactId>spring-cloud-starter-eureka</artifactId>
  </dependency>
  <!-- 引入ribbon 依賴 ,用來實現負載均衡,我們這里只是使用,先不作其他介紹-->
  <dependency>
   <groupId>org.springframework.cloud</groupId>
   <artifactId>spring-cloud-starter-ribbon</artifactId>
  </dependency>

 </dependencies>
</project>
這里比hello-service服務提供者,多了ribbon的依賴
3.創建啟動類
@EnableDiscoveryClient
@SpringBootApplication
public class ConsumerApp {


 //@Bean 應用在方法上,用來將方法返回值設為為bean
 @Bean
 @LoadBalanced //@LoadBalanced實現負載均衡
 public RestTemplate restTemplate() {
  return new RestTemplate();
 }

 public static void main(String[] args) {
  SpringApplication.run(ConsumerApp.class, args);
 }
}
這里也要用到@EnableDiscoveryClient, 讓服務使用eureka服務器, 實現服務注冊和發現
4.創建controller
@RestController
public class ConsumerController {
 //這里注入的restTemplate就是在com.sam.ConsumerApp中通過@Bean配置的實例
 @Autowired
 RestTemplate restTemplate;
 @RequestMapping("/hello-consumer")
 public String helloConsumer() {
  //調用hello-service服務,注意這里用的是服務名,而不是具體的ip+port
  restTemplate.getForObject("http://hello-service/hello", String.class);
  return "hello consumer finish !!!";
 }
}
5.配置application.properties文件
server.port=9999
spring.application.name=hello-consumer
eureka.client.serviceUrl.defaultZone=http://localhost:1111/eureka
#這里的配置項目和服務提供者hello-service一樣
6.啟動,測試1.)啟動eureka。為了展示負責均衡的效果,我們的hello-service啟動兩個服務,啟動兩個服務的具體步驟如下
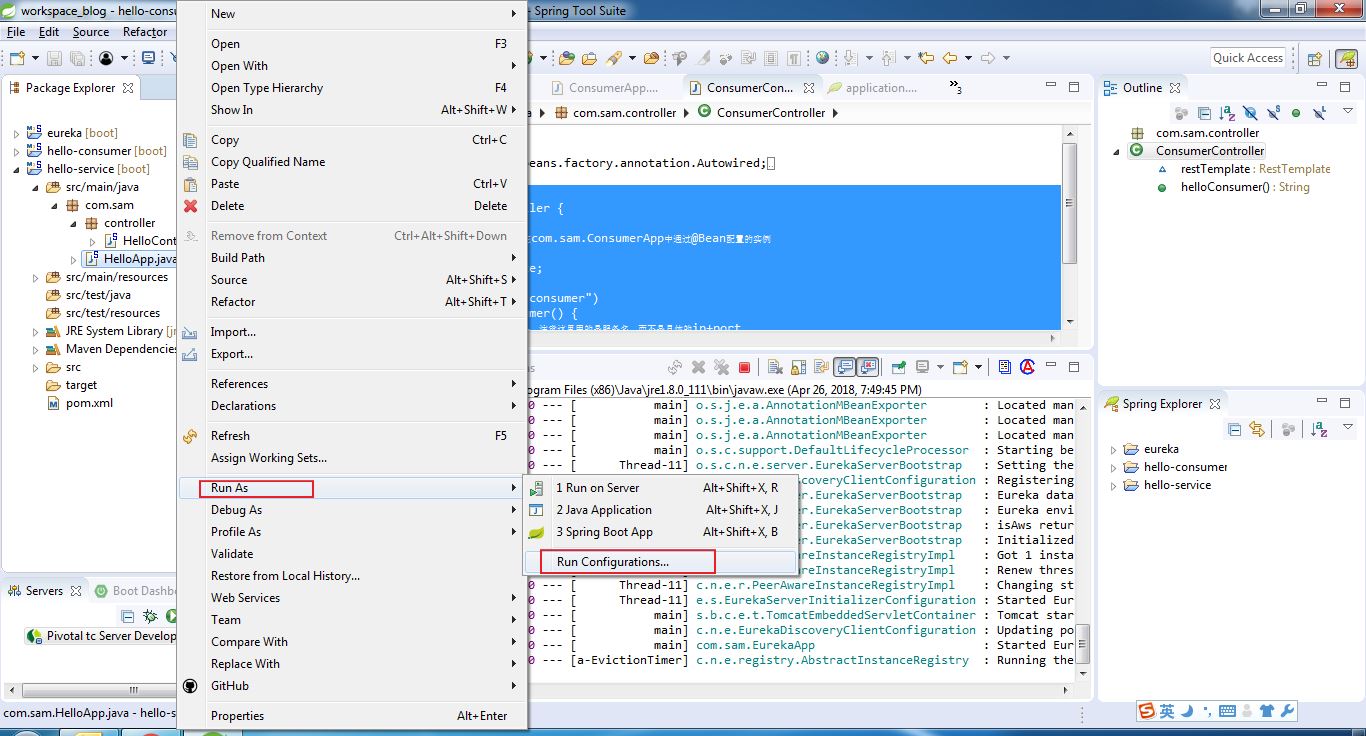
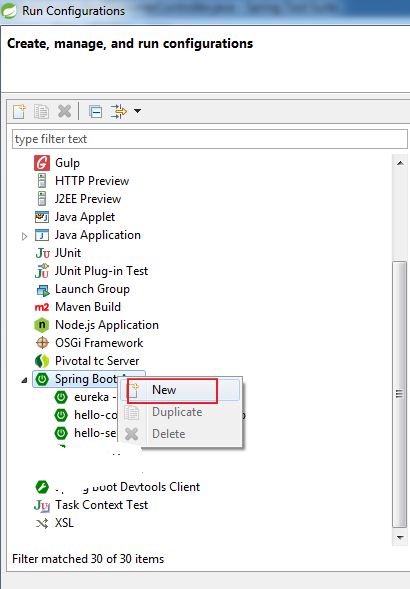
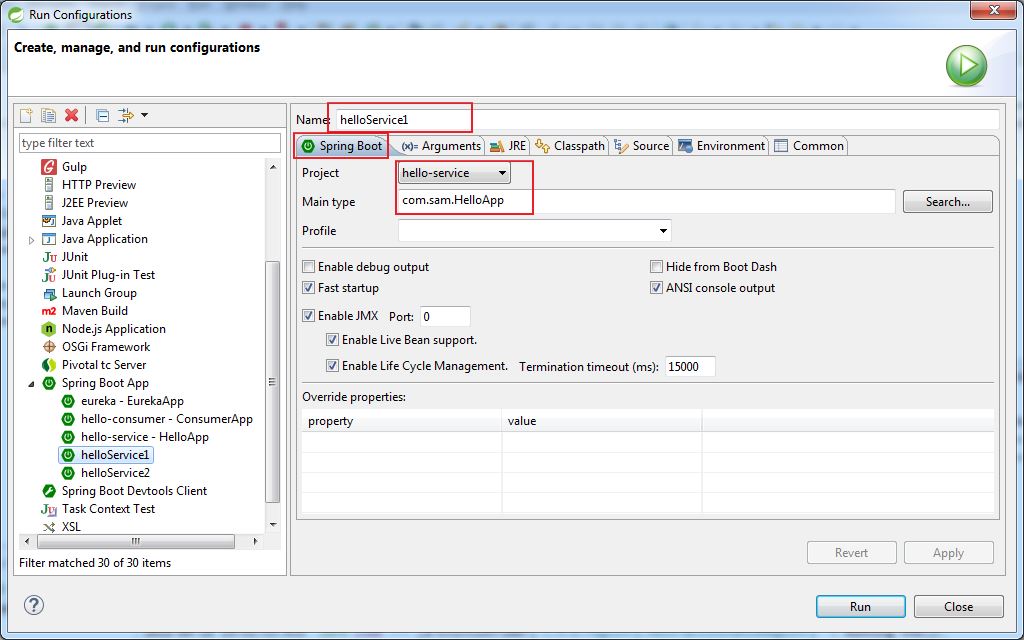
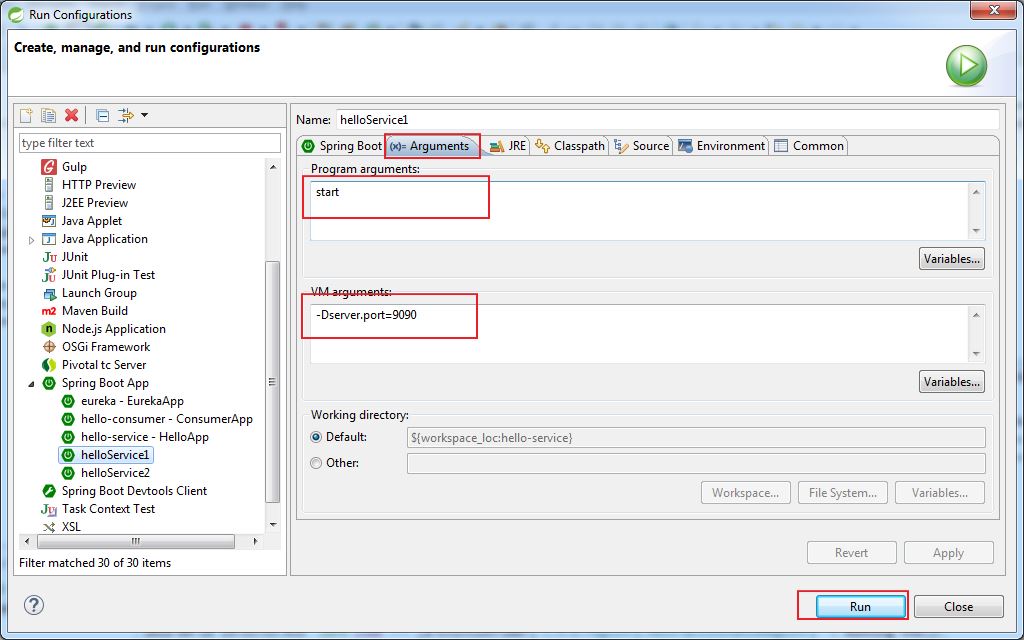
以上是hello-service1的啟動步驟,端口號為9090;同樣方法設置hello-service2,端口號為9091(具體實現略)。
2.)啟動hello-consumer
3.)再次訪問http://localhost:1111/,會發現有2個hello-service服務(端口號一個是9090,一個是9091),1個hello-consume服務
4.) 多次訪問http://localhost:9999/hello-consumer,會發現hello-service1和hello-service2會輪流被調用(已經實現了負責均衡),可以通過兩者的控制臺打印內容確認(還記得我們在hello-service的controller中有個loggerlogger.info("*********" + instance.getServiceId());嗎?對,就是這個打印)


關于怎么在spring cloud中使用Eureka 實現服務治理問題的解答就分享到這里了,希望以上內容可以對大家有一定的幫助,如果你還有很多疑惑沒有解開,可以關注億速云行業資訊頻道了解更多相關知識。
免責聲明:本站發布的內容(圖片、視頻和文字)以原創、轉載和分享為主,文章觀點不代表本網站立場,如果涉及侵權請聯系站長郵箱:is@yisu.com進行舉報,并提供相關證據,一經查實,將立刻刪除涉嫌侵權內容。