溫馨提示×
您好,登錄后才能下訂單哦!
點擊 登錄注冊 即表示同意《億速云用戶服務條款》
您好,登錄后才能下訂單哦!
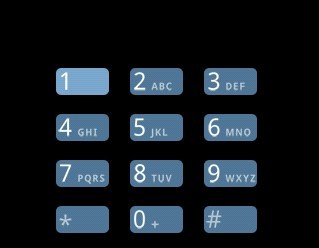
關于Android的自定義控件,之前也寫了兩個,一個是簡單地繼承View,另一個通過繼承Layout實現一個省市聯動控件。這篇,將通過繼承ViewGroup來實現一個電話撥打小鍵盤。本人一貫風格,懶得羅里吧嗦講一大堆,直接上圖上代碼,一切盡在注釋中!

1、MyPhoneCard.java
/**
 *
 * 自定義一個4*3的撥打電話的布局控件,
 *
 *
 */
public class MyPhoneCard extends ViewGroup{

  private static final int COLUMNS = 3;
  private static final int ROWS = 4;
  private static final int NUM_BUTTON = COLUMNS*ROWS;

  private View[] mButtons = new View[NUM_BUTTON];

  private int mButtonWidth;
  private int mButtonHeight;
  private int mPaddingLeft;
  private int mPaddingRight;
  private int mPaddingTop;
  private int mPaddingBottom;
  private int mWidthInc;
  private int mHeightInc;
  private int mWidth;
  private int mHeight;

  public MyPhoneCard(Context context) {
    super(context);
  }

  public MyPhoneCard(Context context, AttributeSet attrs){
    super(context,attrs);
  }

  public MyPhoneCard(Context context, AttributeSet attrs, int defStyle){
    super(context,attrs,defStyle);
  }

  /**
   * 當從xml將所有的控件都調入內存后,觸發的動作
   * 在這里獲取控件的大小,并計算整個ViewGroup需要的總的寬和高
   */
  @Override
  protected void onFinishInflate(){
    super.onFinishInflate();
    final View[] btns = mButtons;

    for(int i=0; i<NUM_BUTTON; i++){
      btns[i] = this.getChildAt(i);
      btns[i].measure(MeasureSpec.UNSPECIFIED, MeasureSpec.UNSPECIFIED);
    }

    //緩存大小
    final View child = btns[0];
    mButtonWidth = child.getMeasuredWidth();
    mButtonHeight = child.getMeasuredHeight();
    mPaddingLeft = this.getPaddingLeft();
    mPaddingRight = this.getPaddingRight();
    mPaddingTop = this.getPaddingTop();
    mPaddingBottom = this.getPaddingBottom();
    mWidthInc = mButtonWidth + mPaddingLeft + mPaddingRight;
    mHeightInc = mButtonHeight + mPaddingTop + mPaddingBottom;

    mWidth = mWidthInc*COLUMNS;
    mHeight = mHeightInc*ROWS;

    Log.v("Finish Inflate:", "btnWidth="+mButtonWidth+",btnHeight="+mButtonHeight+",padding:"+mPaddingLeft+","+mPaddingTop+","+mPaddingRight+","+mPaddingBottom);


  }

  /**
   * 這個方法在onFinishInflate之后,onLayout之前調用。這個方面調用兩次
   */
  @Override
  protected void onMeasure(int widthMeasureSpec, int heightMeasureSpec){
    super.onMeasure(widthMeasureSpec, heightMeasureSpec);
    Log.v("ViewGroup SIZE:width=", mWidth+"");
    Log.v("ViewGroup SIZE: height=",mHeight+"");
    final int width = resolveSize(mWidth, widthMeasureSpec);//傳入我們希望得到的寬度,得到測量后的寬度
    final int height = resolveSize(mHeight,heightMeasureSpec);//傳入我們希望得到的高度,得到測量后的高度
    Log.v("ViewGroup Measured SIZE: width=", width+"");
    Log.v("ViewGroup Measured SIZE: height=", height+"");
    //重新計算后的結果,需要設置。下面這個方法必須調用
    setMeasuredDimension(width, height);
  }

  /**
   * 這個方法在onMeasure之后執行,這個自定義控件中含有12個子控件(每個小鍵),所以,重寫這個方法,
   * 調用每個鍵的layout,將他們一個一個布局好
   * 就是4*3的放置,很簡單,一個嵌套循環搞定
   */
  @Override
  protected void onLayout(boolean changed, int left, int top, int right, int bottom) {
    final View[] buttons = mButtons;
    int i = 0;
    Log.v("BOTTOM:", bottom+"");
    Log.v("TOP", top+"");

    int y = (bottom - top) - mHeight + mPaddingTop;//這里其實bottom-top=mHeight,所以y=mPaddingTop
    Log.v("Y=", y+"");
    for(int row=0; row<ROWS; row++){
      int x = mPaddingLeft;
      for(int col = 0; col < COLUMNS; col++){
        buttons[i].layout(x, y, x+mButtonWidth, y+mButtonHeight);
        x = x + mWidthInc;
        i++;
      }
      y = y + mHeightInc;
    }
  }

}
2、布局文件:
<?xml version="1.0" encoding="utf-8"?>
<demo.phone.card.MyPhoneCard
 xmlns:android="http://schemas.android.com/apk/res/android"
 android:id = "@+id/dialpad"
 android:paddingLeft="7dp"
 android:paddingRight="7dp"
 android:paddingTop="6dp"
 android:paddingBottom="6dp"
 android:layout_gravity="center"
 android:layout_width="wrap_content"
 android:layout_height="wrap_content"
 android:layout_marginBottom="5dp">

  <ImageButton android:id="@+id/one"
    android:src="@drawable/dial_num_1_no_vm"

    />

  <ImageButton android:id="@+id/two"
    android:src="@drawable/dial_num_2"
    />

  <ImageButton android:id="@+id/three"
    android:src="@drawable/dial_num_3"
    />

  <ImageButton android:id="@+id/four"
    android:src="@drawable/dial_num_4"
    />

  <ImageButton android:id="@+id/five"
    android:src="@drawable/dial_num_5"
    />

  <ImageButton android:id="@+id/six"
    android:src="@drawable/dial_num_6"
    />

  <ImageButton android:id="@+id/seven"
    android:src="@drawable/dial_num_7"
    />

  <ImageButton android:id="@+id/eight"
    android:src="@drawable/dial_num_8"
    />

  <ImageButton android:id="@+id/nine"
    android:src="@drawable/dial_num_9"
    />

  <ImageButton android:id="@+id/star"
    android:src="@drawable/dial_num_star"
    />

  <ImageButton android:id="@+id/zero"
    android:src="@drawable/dial_num_0"
    />

  <ImageButton android:id="@+id/pound"
    android:src="@drawable/dial_num_pound"
    />

</demo.phone.card.MyPhoneCard>
這樣,就實現了上圖的小鍵盤。這個例子參考Android自帶電話應用的實現。可見,在開發中,靈活運用自定義的控件,可以實現獨特而富有魅力的效果!
以上就是本文的全部內容,希望對大家的學習有所幫助,也希望大家多多支持億速云。
免責聲明:本站發布的內容(圖片、視頻和文字)以原創、轉載和分享為主,文章觀點不代表本網站立場,如果涉及侵權請聯系站長郵箱:is@yisu.com進行舉報,并提供相關證據,一經查實,將立刻刪除涉嫌侵權內容。