您好,登錄后才能下訂單哦!
您好,登錄后才能下訂單哦!
怎么在SpringCloud 中利用mysql實現配置中心?很多新手對此不是很清楚,為了幫助大家解決這個難題,下面小編將為大家詳細講解,有這方面需求的人可以來學習下,希望你能有所收獲。
一、項目搭建
本次主要用三個微服務
(1)Eureka-server: 7001 注冊中心
(2)config-server : 5001 配置中心
(3)product-server : 8001 商品微服務

1、Eureka-server注冊中心
2、配置中心微服務
1、pom.xml
<!--服務中心jar包-->
<dependency>
<groupId>org.springframework.cloud</groupId>
<artifactId>spring-cloud-starter-netflix-eureka-client</artifactId>
</dependency>

<!--配置中心jar包-->
<dependency>
<groupId>org.springframework.cloud</groupId>
<artifactId>spring-cloud-config-server</artifactId>
</dependency>

<!--連接msql數據庫相關jar包-->
<dependency>
<groupId>org.springframework.boot</groupId>
<artifactId>spring-boot-starter-jdbc</artifactId>
</dependency>
<dependency>
<groupId>mysql</groupId>
<artifactId>mysql-connector-java</artifactId>
<version>5.1.21</version>
</dependency>
2、application.yml
#服務名稱
 server:
  port: 5001

#連接配置信息
 spring:
  application:
   name: config-server-jdbc
  profiles:
   active: jdbc
  cloud:
   config:
    server:
     default-label: dev
     jdbc:
      sql: SELECT akey , avalue FROM config_server where APPLICATION=? and APROFILE=? and LABEL=?
 #####################################################################################################
 # mysql 屬性配置
  datasource:
   driver-class-name: com.mysql.jdbc.Driver
   url: jdbc:mysql://127.0.0.1:3306/test
   username: root
   password: root
 #####################################################################################################

#指定注冊中心地址
 eureka:
  client:
   serviceUrl:
    defaultZone: http://localhost:7001/eureka/
這里主要講下連接配置信息
(1) spring.profiles.active=jdbc ,自動實現JdbcEnvironmentRepository。
(2)sql語句自定義,否則會默認為“SELECT KEY, VALUE from PROPERTIES where APPLICATION=? and PROFILE=? and LABEL=?”,具體可以參考 JdbcEnvironmentRepository 實現。
(3)本人數據庫建表為config_server,由于key,value和profile是mysql關鍵字,所以我都在最前面加了a。當然表名字段名都可以自定義。
(4) {application} 對應客戶端的"spring.application.name"屬性;
{aprofile} 對應客戶端的 "spring.profiles.active"屬性(逗號分隔的列表); 和
{label} 對應服務端屬性,這個屬性能標示一組配置文件的版本.
(5)只要 select出來是兩個字段 ,框架會 自動包裝到environment的map<key,value> 。
3、mysql數據

4、springboot啟動類
添加 @EnableConfigServer 注解
@SpringBootApplication
@EnableConfigServer
public class ConfigserverApplication {

public static void main(String[] args) {
SpringApplication.run(ConfigserverApplication.class, args);
  }
}
3、product-service微服務
1、pom.xml
<!--服務中心jar-->
    <dependency>
      <groupId>org.springframework.cloud</groupId>
      <artifactId>spring-cloud-starter-netflix-eureka-client</artifactId>
    </dependency>

    <!--配置中心客戶端jar-->
    <dependency>
      <groupId>org.springframework.cloud</groupId>
      <artifactId>spring-cloud-config-client</artifactId>
2、bootstrap.yml
#指定注冊中心地址
eureka:
 client:
  serviceUrl:
   defaultZone: http://localhost:7001/eureka/

#服務的名稱
spring:
 application:
  name: product-service
 #指定從哪個配置中心讀取
 cloud:
  config:
   discovery:
    service-id: config-server-jdbc
    enabled: true
   profile: dev
   label: dev

server:
 port: 8001
這里為什么用bootstrap.yml而不用application.yml,是因為若application.yml 和bootStrap.yml 在同一目錄下,
則 bootStrap.yml 的加載順序要高于application.yml ,即bootStrap.yml 會優先被加載。
為何需要把 config server 的信息放在 bootstrap.yml 里?
當使用 Spring Cloud 的時候,配置信息一般是從 config server 加載的,為了取得配置信息(比如密碼等),你需要一些提早的或引導配置。
因此,把 config server 信息放在 bootstrap.yml,用來加載真正需要的配置信息。
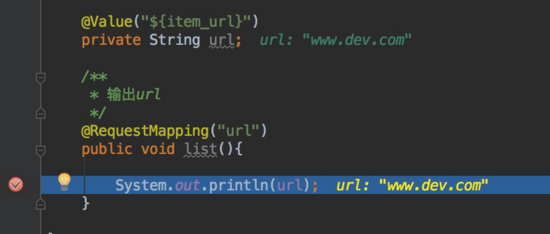
3、ConfigController類(測試用)
@RestController
@RequestMapping("/api/v1/product")
public class ConfigController {

  @Value("${item_url}")
  private String url;

  /**
   * 輸出url
   */
  @RequestMapping("url")
  public void list(){

    System.out.println(url);
  }
4、測試
通過訪問:http://localhost:8001/api/v1/product/url 進入斷點。

看完上述內容是否對您有幫助呢?如果還想對相關知識有進一步的了解或閱讀更多相關文章,請關注億速云行業資訊頻道,感謝您對億速云的支持。
免責聲明:本站發布的內容(圖片、視頻和文字)以原創、轉載和分享為主,文章觀點不代表本網站立場,如果涉及侵權請聯系站長郵箱:is@yisu.com進行舉報,并提供相關證據,一經查實,將立刻刪除涉嫌侵權內容。